We remain fully operational. Our teams are working around the clock to ensure your deliveries continue safely.

Descargar la aplicación


Servicios al cliente
Sobre nosotros
Copyright © 2025 Desertcart Holdings Limited
Descargar la aplicación
Buy anything from 5,000+ international stores. One checkout price. No surprise fees. Join 2M+ shoppers on Desertcart.
Desertcart purchases this item on your behalf and handles shipping, customs, and support to Panama.
🔩 Upgrade your suspension game—because your ride deserves pro-level care!
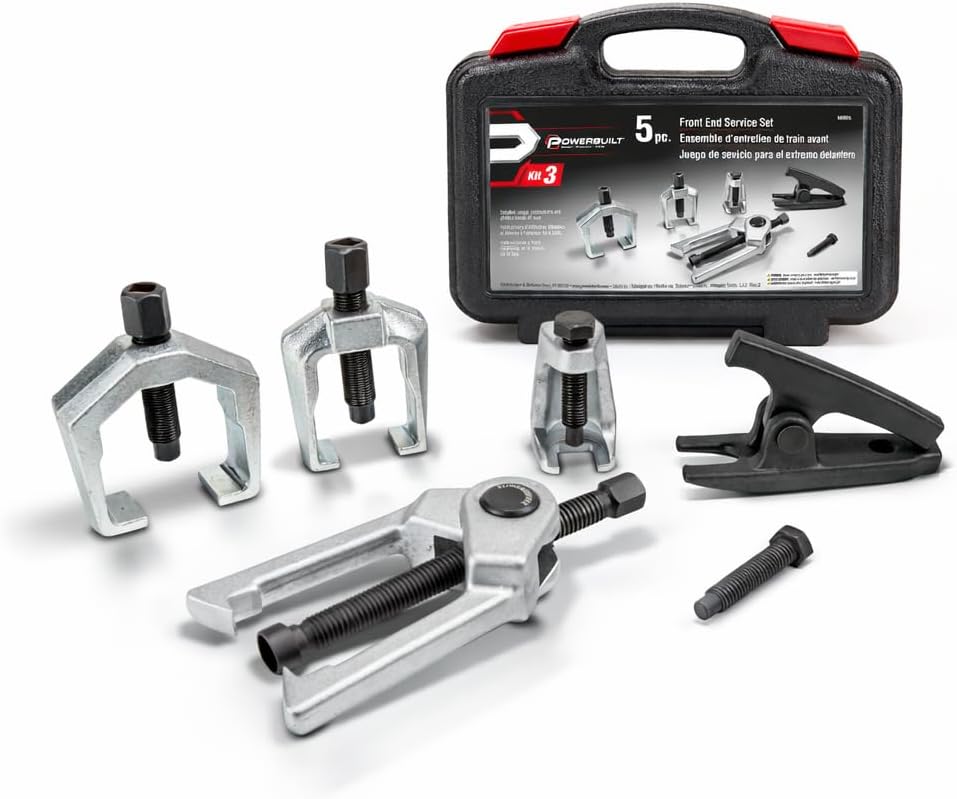
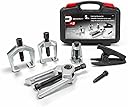
The Powerbuilt Front End Vehicle Service Kit is a 6-piece professional-grade toolset designed for efficient and damage-free removal and installation of tie rod ends, ball joints, and pitman arms. Featuring heavy-duty construction, laminated step-by-step instructions, and a durable carrying case, this kit streamlines front-end vehicle maintenance for cars and trucks, making it an essential upgrade for any serious DIY mechanic or professional.


| ASIN | B000GKIDK8 |
| Best Sellers Rank | #65,312 in Automotive ( See Top 100 in Automotive ) #90 in Ball Joint & Tie Rod Tools |
| Brand Name | Powerbuilt |
| Color | Black |
| Customer Reviews | 4.4 4.4 out of 5 stars (377) |
| Finish Types | Polished |
| Global Trade Identification Number | 00028907103945 |
| Included Components | Front End Service Tool Set |
| Item Type Name | Alltrade 648626 Kit 3 Front End Service Tool Set |
| Manufacturer | Alltrade Tools |
| Model Number | 648626 |
| Package Quantity | 1 |
| UPC | 028907103945 |
| Unit Count | 1.0 Count |
M**S
Suspension tool
Great tool for side jobs
V**R
great value and quality
Amazing value. Costs a fraction of similar sets but is still great quality and works well.
B**C
Works as advertised on a 1979 C20.
I needed the tool set for replacing my power steering gear box. I have a 1979 Chevrolet C20. The large Pittman arm puller worked flawlessly to remove the Pitman arm from the old gearbox and the small Pitman arm puller worked well removing the Pitman arm from the steering linkage. The kit appears to be very sturdy and I would not hesitate to use it replacing any tool in the kit.
D**R
Awesome tool works and looks great!
Awesome tool!!! It was delivered within a few hours from the time I went to Amazon to order it. I went straight to my garage and opened the box, took out a puller and pressed out an Outer Tie Rod on my Toyota Sequoia just like that. I mean, it was so easy, it was almost like cutting through buttermilk cheesecake. I know a thing or two about tools, and these babies are awesome! Very strong and well made, they look and feel durable. These pullers will really make your front end job (s) enjoyable instead of stress and pain. I am actually replacing the upper and lower ball joints on my Sequoia, but I had to pop out my outer tie rod which is in very good shape, so I obviously did not want to damage the rubber or integrity of my tie rod and this kit delivered. It was done effortlessly, fast and smooth. The tie rod was very stuck, but the power of the puller was so overwhelming that the tie rod made a very loud bang (like a heavy caliber gun shot) when it popped out. I mean it was a joy watching this tool perform so incredibly. I STRONGLY recommend this kit. GREAT TOOL!!!
U**I
Excellent for the money, performs fine
Nice sturdy blow molded case. Both the large and small pitman arm pullers can be socket/wrench/ or 3/8" driven. All have a nice finish, and seem to be the same as the higher priced similar tools I own. Made in Taiwan with a 100% lifetime warranty, direction card mounted inside case for those unfamiliar with usage along with address. Website, and toll free 800 number listed on cards. These are VERY similar to a set costing fifty dollars or more that Amazon sells. The set is holding up very well to usage. Based on all this I would recommend this money saving set, along with other Powerbuilt sets. I own several and I am well pleased with them. Warranty, durability, and low price sold me.
W**S
great product
really helped doing my ball joints
Z**W
Good quality. Worth every penny.
Retired mechanic here... rented that same set from parts store to do ball joints on my 2000 Grand Marquis. It was absolutely fine for what I needed. So I bought one, because I have to do my other (2001) Grand Marquis soon, and then my buddy's 2003 Crwn Vic. It already paid for itself waiting for those two jobs. Quality is very good-medium to heavy duty. I don't think I would break it in my lifetime. Very decent product for the money. Highly recommend getting one, even if you only have to do one car; it'll pay for itself!
P**L
Worthless Tools and Not the Best Quality
DO NOT BUY THIS KIT, IT's WORTHLESS IN THE REAL WORLD... I scratch my head. Who designed these tools. Only 1 of them is actually a working tool, the others are versions of the first. The one that works is average for ball joints, but it's too big for many projects and because the parts are not a straight shot, the one working tool often times can't fit into the space. What this Kit should have included was an expanding tool, which is so needed. However all the tools are compression tools.
G**O
Me han servido de mucha ayuda. Use un separador de brazo pitman de otra marca y se abrio la pinsa. Pero la powerbuilt si aguanto. Valio la pena la compra.
D**E
Serves the purpose. Good price for "once in a while job".
P**H
I used the tool for the first time and it done everything it was made for ...brilliant tool. First class
I**C
great set,good quality
D**Z
La caja es un poco más chica de lo que esperaba... El extractor de brazo Pitman venía manchado de grasa, de esa grasa que viene adentro del brazo pitman. La misma condición para el foam que los cubre. El sello que cubre la agarradera ya estaba roto.. En fin, no lo regresaré porque es un dolor de cabeza regresar las cosas en la frontera, pero si me siento un poco decepcionado que te vendan cosas usadas.
Trustpilot
Hace 3 semanas
Hace 1 día