🚣♂️ Elevate your adventure—load smarter, paddle harder!
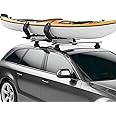
The Thule Hullavator Pro Rooftop Kayak Carrier features gas-assist struts that lift 40 lbs of your kayak’s weight, making solo loading effortless. Its double extending arms allow loading at waist height, reducing strain. With 8 padded support points and corrosion-resistant cradles, it protects kayaks up to 75 lbs. Built from aluminum and double-coated steel, it offers durability and includes bow and stern tie-downs for secure transport.


| Color | Black/Silver |
| Brand | Thule |
| Load Capacity | 75 Pounds |
| Mounting Type | Rack |
| Global Trade Identification Number | 00091021607026 |
| Manufacturer | Thule |
| UPC | 091021607026 |
| Item Package Dimensions L x W x H | 34.1 x 16.75 x 6.5 inches |
| Package Weight | 19.85 Kilograms |
| Brand Name | Thule |
| Warranty Description | Limited Lifetime |
| Model Name | Hullavator Pro Kayak Rack |
| Suggested Users | unisex-adult |
| Number of Items | 1 |
| Part Number | 898 |
| Style | One Size |
| Included Components | 1 |
| Size | Hullavator Pro |
| Sport Type | Sporting Goods |
S**N
Worth the money
Worth the wait. I waited a couple years to be able to buy these so I could safely transport my kayak. I also needed a lift as I have shoulder issues. After having these professionally installed I was finally able to transport my 16ft kayak to the water. Yay!
D**F
Works well with 60" Aeroblades WITHOUT 4" overhang from foot packs on 2016 Ford F150.
The instructions said that my crossbars needed at least 4" overhang from the footpacks, but I was already using the longest Aeroblades available (60") for my vehicle (2016 Ford F150). On my setup, the Aerobar extended maybe 1" from the foot pack, and I was afraid that this would not work for me, but I wanted to give it a shot anyway. Good thing that I took the chance...On my install, I discovered that with the Hullavator mounted at the end of the Aerobar (with endcap removed), I had about 8" clearance between the Hullavator arms and my vehicle. The instructions recommended at least 4". This meant that I could install on my setup with no issues!Because of the extra 4" clearance, I figured I'd try to set the Hullavator 4" further away from the end of the bar. This didn't work because the arms couldn't clear the end of the bar + end caps. The best that I could do is set the Hullavator 1" from the end of the bar. Now when I lower the arms, it clears the end caps, and I still about 7" clearance between the arms and my truck (see photos).A few things that I noticed but aren't deal-breakers are:* When loaded, my Kayak looks like it's too far towards the edge of my truck as opposed to being centered on the rooftop. I know that I can move the J hooks closer to the other end of the bar to remedy this, but this limits how wide of a kayak I can carry. I have 2 kayaks that are thin, buy my girlfriend's kayak is pretty wide.* When unloaded, I can hear the Hulavator jingle around up there while driving.A few recommendations for the install:* Don't cut the rubber strips on your Aeroblade until you've found the best placement your vehicle.* The square nuts are a little bowed on one side. I placed mine in the Aeroblade tracks bow-side up so that there is more surface contact with the inside tracks on the Aeroblade when I tightened the Hullavator down. The instructions didn't mention this, so I don't think it matters, but why not have more surface to hold it down tight.* Use blue locktight on everything screwed down so that bolts don't come loose from all the road vibrations.* Take your time --- it's actually a very simple install
H**T
Work Smarter Not Harder
Not gonna lie…I’m pretty handy but the directions were intimidating as hell. I bought this as a returned item and aside from the directions, nothing was opened (everything comes in a separate sealed packet) so I’m assuming the people before me looked at the directions and noped. Once I started putting it together though it was actually way simpler than it looked. Took about 30 minutes in a downpour to fully install. I dropped it once so there was a small amount of bleeding, but nowhere near the mess it could have been. It takes a little bit of practice to open & close it, especially with the kayak on it, but after 2-3 runs I figured out the trick to it instead of happening on it as a fluke. They don’t come with locks, which at the cost of these things is absurd, so you have to buy them separately (which seems to be Thule’s marketing strategy to sell every single thing separately). They also don’t pop off easily when you’re not using them so it’s essentially a permanent fixture on your roof unless you want to go through the whole uninstall/install process every time. But overall it’s a well made, sturdy, and helpful product. I just upgraded to a larger & heavier kayak and this makes it so I can take it out solo and easily load & unload.
A**R
It could be so much better.. unfortunately they’re the only one that makes sense
Perfect if you want your $50,000 investment to sound like a rattle trap …If you’re seeking a system that’s not easy to remove or might even damage your paint by falling off due to its awkward mechanics of removal, or if you’re simply willing to take a chance of it getting ripped off in a parking garage, this is the system for you. There hasn’t been much improvement over the past decade. I’m in a Kiaya club and we all have the same complaint issue: they’re very difficult to remove. The directions are pathetic better off watching etrailer videos… unfortunately there’s no other competition so I continue to buy
M**S
Carrier
This is a great idea but after using it a while it is less exciting and I have since bought a trailer. I do think its a well built product.
Trustpilot
Hace 1 mes
Hace 2 meses