Desert Online General Trading LLC
Dubai, United Arab Emirates
Desert Online General Trading LLC
Dubai, United Arab Emirates


💡 See and be seen: Restore your headlights, reclaim your night drive!
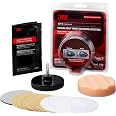
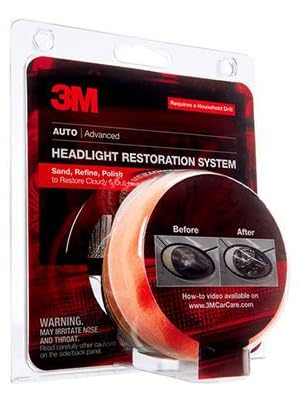
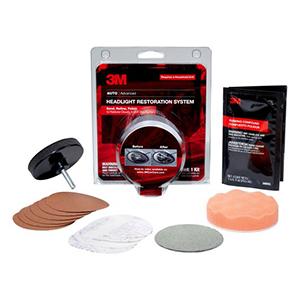
The 3M Headlight Lens Restoration System (model 39008) is a professional-grade kit featuring 6 sanding discs (500 and 800 grit), a drill-activated disc holder, and rubbing compound designed to remove heavy yellowing and restore headlight clarity. Compact and lightweight, it enhances night driving safety by improving visibility and vehicle appearance with a simple DIY process.

| Material | Plastic |
| Grit Material | Aluminum Oxide |
| Item dimensions L x W x H | 6.14 x 4.51 x 0.84 inches |
| Brand | 3M |
| Grit Type | Medium |
| Item Weight | 4.64 ounces |
| Grit Number | 500 |
| UPC | 051131390089 |
| Number of Items | 1 |
| Global Trade Identification Number | 00051131390089 |
| Manufacturer | 3M |
| Item Weight | 4.6 ounces |
| Product Dimensions | 6.14 x 4.51 x 0.84 inches |
| Item model number | 39008 |
| Is Discontinued By Manufacturer | No |
| Exterior | Machined |
| Manufacturer Part Number | 39008 |
| Mirror Lighting Type | automotive-exterior-headlight-bulbs |
M**L
Amazing product and it really works well!!
To my utter astonishment, this product blew me away! After following the step-by-step instructions, my 2007 car lenses look amazing! In polishing out all the scratches, my headlight visibility has substantially increased!! The best part is that I saved hundreds of dollars in replacement headlights which was worth this small investment!
J**S
This works!
If you have ‘foggy’ headlight covers buy this!Follow the multi-stage abrasive discs and final polish instructions and your headlight covers will be crystal clear and look brand new! You just need a drill to use the sanding discs.Well worth your time! See before and after pics below.
P**K
Great results - Still needs a top coat to be completely restored
Before you buy this, don't. Get the 3M 39045, which has the top coat included in the kit!First, the before and after pictures are not an exaggeration. The system will indeed produce a clear lens by following the directions. That part of the process I would give 5 stars to. The directions are very clear, but I would add a few items of my own, having made some mistakes.1) If possible, remove the covers from the vehicle and secure to a stable work surface!! If not, put a triple layer of masking tape around the edges of the lens to protect everything within 1.5 inches of the cover. (Use the green 3M tape or blue if you have to, NOT the tan kind!!) If you are inexperienced with using a pad mounted in a drill, you will have trouble holding the pad on the surface at first and you'll end up with nicks and edge marks around it.2) Use very, very light pressure on the first stage. Let the sandpaper do the work. This will help you keep more of the pad in contact while you control the pad's movement. Plus, it will help you avoid digging in the edges of the pad and causing very difficult-to-remove marks or burns.3) Use a slow speed at first. The instructions give a min/max RPM recommendation, but I found the pad difficult to control when it was spinning that fast, plus it was very easy to cause burn marks. Once I dropped the speed to slow, it became very easy.4) The first pass is what does all the yellow removal, so take your time, use up all the sanding disks (3 per lens), and wipe the lens often to see where you've missed. If you dig into the lens a little, then concentrate on that spot more. The second pass will not correct deep scratches, so work them out on the first round.5) The remaining steps are simply to remove the previous step's sanding marks. Use light to medium pressure. Wipe often.6) With the final tri-zact pad, it takes light pressure. Be careful not to damage this pad, since there's only one in the kit. It had no problem going the distance, but be cautious around the little nibs that stick up from the lens, etc. Keep the pad wet, and also keep the lens wet. The instructions say "damp", but you'll have better results with more moisture (to a point.) Rinse the slurry off and wipe with a terry cloth often. If you have a light handy, shine it at an angle to help see any sanding marks you've missed.7) With the sanding complete, you'll need to polish. The sponge pad is very absorbent, but a little compound goes a long way. The first time you add compound, use the recommended dime size and work it lightly around and into the pad with your finger (drill turned off.) Then put another dime sized drop on and place the drill on the lens lightly before turning it on. Same as sanding, but now you're using medium to firm pressure for the first 4-5 passes. Cover the lens in repeating passes left/right and up/down until you've been over it 4-6 times (per directions.) Use reduced pressure for the last couple passes. You will probably have to add compound a couple of times, but after that there will be plenty in the pad. I only had to add it once on the second lens. If it slings off or builds up, you've got too much on the pad (just squeeze a little out on a rag.)8) Finally, use a microfiber cloth to remove the hazy compound.You are NOT done, however, because this kit only cleans off the lens. It does NOTHING to protect the lens! It's going to yellow again within a year if you don't protect it somehow.3M makes a protectant product, which is included in another kit - 3M 39045, which is an overall better choice than this one (the protectant and green tape are included in that kit.)You can also clear coat it with a clear gloss spray-can finish (as long as it's an exterior grade finish.) You've already got it taped up, so mask off the area and go for it. That will last much longer than the 3M protectant. Don't forget to do an extra prep cleaning before spraying.That's it. My total time was about 1 hour for two lenses on a Toyota Corolla. Overall, I'm satisfied, but I wish I'd known about the more complete kit for just $4 more...
B**.
Exceeded expectations - great product
It took me awhile to get around to using this, but I finally got it done last weekend. This exceeded my expectations. Took me about 40 minutes to do both headlights on my SUV. Final results are excellent. They look brand new, bright and crystal clear. I had my doubts as I was doing it, but sure enough in the final step they buffed out clear. It has been a week since I completed it, so I can't comment on how they hold up over time, but I can't see why they wouldn't.The lenses on my SUV were half fogged up, mainly the upper half that gets exposed to the sun, so they weren't horrible from the start. But the headlight lenses are over 13 years old. The SUV has 220,000 miles on it, so I didn't feel like buying a whole new headlight housing. The housings are actually pretty cheap ($40 each if I recall), but sometimes the installation of the housing is a pain in the butt if you can't easily access every bolt. Thus, I wanted to give this a try.In this kit they give you multiple disks of the 500 and 800 grit. Then one of 3000 and one buffer pad. I only used one of the 500 and 800, which did both headlights. I wiped off the lens and pad every couple minutes to avoid build-up. I also didn't go full speed with the drill to avoid having the plastic head up (maybe half speed). I bet there's enough disks left over to do another 5 sets of headlights. So I wouldn't worry about running out. I used my electric drill at home, which didn't even use up a full charge on the battery. I took my time, mostly to be careful. The instructions say to go over the lens 6-8 times with each grit paper, but I bet I only did 4. Seemed like plenty. Also, it recommends to put masking tape around the molding surrounding the light to protect it. I put two layers and due to being sloppy I went off the lens and hit the tape. It sanded right through it and put a small scratch in the molding. After that I put a layer of duck tape on top of the masking tape. It was much more durable and didn't lead to any more scratches.It was so easy and the results so go, I'll probably go do my mother's car for her. Her car is newer than mine, yet for some reason more fogged up than my own.
G**E
Great product
Have tried other restoration kits in the past. The 3M kit worked better than expected.Easy to use, instructions are clear and worked easilyWould definitely recommend this product for anyone looking to clear their hazy, yellowed headlights
C**Y
Works as advertised
Works as advertised on my 15 year old KIA Forte. While I was able to remove discoloration, some areas had a fog that I just could not remove. The lenses' have micro cracking that will not be affected by the use of this kit.The polish compound will be kind of messy getting slung off of the buffing pad. You may want to cover the area, inside hood and engine bay to keep the white droplets from get all over the place.I think my time and money would have been better spent in buying new clear lenses', and just swapping out the bulbs.
D**I
Amazing and useful
This thing works like magic! I got a 2007 Camry that had legit yellow plague over the headlights! It took most of it out and my lights looks perfect ! Very simple to use and quick fix for old cars
Trustpilot
Hace 5 días
Hace 2 semanas
Hace 2 semanas
Hace 2 meses