❄️ Stay cool, save green—insulate like a pro!
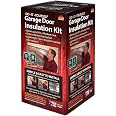
The 3009 Garage Door Insulation Kit features 8 silver reflective bubble panels that block up to 95% of radiant heat, improving energy efficiency and reducing costs. Lightweight and easy to install with included adhesive pads and cleaning sponge, it meets fire safety codes and requires no special tools or maintenance.


| Global Trade Identification Number | 00853455003009 |
| Manufacturer | Reach Barrier |
| UPC | 853455003009 |
| Part Number | 3009 |
| Item Weight | 3.3 pounds |
| Product Dimensions | 25 x 13.4 x 13.2 inches |
| Country of Origin | USA |
| Item model number | 3009 |
| Is Discontinued By Manufacturer | No |
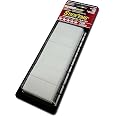
| Size | 8 Bubble Insulation Panels |
| Color | Silver |
| Item Package Quantity | 1 |
| Included Components | 8 panels, 1 pack of Stickems and instruction sheet |
| Batteries Included? | No |
| Batteries Required? | No |
J**N
Noticeable Difference in Garage Temp with Insulation Installed
I looked at the published R-values of this product and NASA Tech. They are both broadly listed as R-21. There are better insulating products available usually of the fiberglass batt type but these can be "dirty" and difficult products to install. The NASA Tech originally looked like the best bet but to install it, I would have had to remove the hurricane straps (5 of them), unroll the NASA Tech, marking the holes where the hurricane straps were bolted and reinstall the hurricane straps and bolts. Not a small job. I elected to purchase Reach Barrier becasue of the pre-cut panels. First, one box covers a single car garage door. For my project I needed two boxes for a 7'h X 16'w door. Second, each panel in the Reach Barrier Kit is 24" X 48". There's enough product to do 16, 24" X 24" panels per box Third, not every panel on my garage door (an Amarr Product) is the same size. The outside panels (closest to the roller tracks) are 25" wide, 21" high. The others are all 23"w X 21"h. Each panel had to be trimmed from the stock panels in the kit. I started the project by myself by marking the dimensions with a marker, labeled the L corner and top of each trimmed panel and would trim the stock panels to size using a long straight edge (a level) and box cutter. The panels trim neatly and easily with a box cutter. I switched to one person cutting (my wife) and the other (me) installing it - that saved a lot of getting up and down from one's knees. The first 4 or so panels cut and installed solo were slow going; it took about 10-15 minutes each panel to trim and install it. Going slow like this with one person doing the cutting and installing would take almost 3h to do one half of this project, 6h total. Too long. Get the wife, save my knees! Once we got a system going we did the other 28 panels in about 90 minutes. They advantage of the Reach Barrier product over the NASA tech is that I was able to install the cut panels without removing the hurricane straps. If you look closely at the photos of the completed garage door, you may note that the hurricane straps will actually hold some of the panels in place (there is enough space between the aluminum panels and the hurricane straps to easily work the cut panels under them). I started out using the stickies per the instructions. The problem with that was installing the stickies on the panel, removing the top covering of each of them then trying to slide a panel under a hurricane strap without the panel sticking to them until in place. After screwing up one panel that way I stopped putting the stickies on all four corners and in the middle. Instead I started cutting the panels 1/4 " longer in each dimension. Voi-la. They fit snuggly in place (mostly). If there was a saggy corner, I'd put a sticky under it by rolling the corner back, placing the sticky then unrolling the corner onto the sticky. That was only required on a couple of panels. The design of the door made it possible to jab that 1/4" extra of material in a grove and it stayed in that grove even with the door operating multiple times to test this technique. I imagine that wouldn't work on some door designs with or without Hurricane straps and you'd have to use the sticky is The important thing for DIY'ers is that you can easily install this product successfully even when leaving horizontal hurricane straps on the door. As for performance, I'm impressed so far. My garage door faces west and in the afternoon the door gets blazing hot - likely over 110 degrees. The garage is uninhabitable in the heat of the day with inside garage temps reaching 102 - 103 and it is presently serving as a storage area for heat sensitive things. I'd estimate that the insulation alone drops the ambient temperature inside the garage 8-10 degrees in the heat of the day with full sun on the door. Low 90s is still uncomfortable. My garage is about 450 SqFt. I just installed a 10000 BTU portable room AC that ducts (intake and exhaust) out the garage window. With it set at 80 degrees, it has no problem getting the ambient temp down to just under 80 degrees - comfortable for us. In the heat of the FL sun, the combo of a portable AC and the garage door insulated with the Reach Barrier product makes the garage a useable space. All I need now is a solar shade for the 48" X 48" window that I noted today leaks a lot of radiant heat now that the garage door isn't doing that!.
A**N
Simple and effective
Why did you pick this product vs others?:Great product. They were easy to install. I bought gorilla tape instead of the supplied sticky squares and used two kits for a 16’ door. The gorilla tape ran out after one kit so I used the supplies tape on the other half. Time will tell if gorrila tape is with it. I had to trim some pieces but it is easy to cut with scissors. I can tell a big difference with the garage temperature.
J**E
Good product
Overall I am satisfied, it did decrease the heat in the garage by 10 to 15 degrees lower. My house has west/ east exposure. The garage is facing west so we get intense afternoon heat. It took me a little more than 2 hours to install because the garage door brackets were different in size and I had to customize them. The stick’em’s were not that good in sticking inspite me cleaning the garage door before sticking them. I had to also use another double sided tape to supplement. Also you need to order 2 insulation kits for a double garage door.
J**R
Keeping it cool
This product was easy to install and has lowered the temperature in my garage and helped lower the temp in the room over the garage. At night the room above the garage was around 90ish degrees; since the installation the temp has peaked at 82 degrees. I am recommending this product to anyone interested in lowering their garage temp.
J**B
Easy to install. Great price.
I purchased 2 boxes to cover 16 garage door panels. Had to do a little cutting for the windows. I purchased UPINS 120 Pack Double Sided Foam Tape Square Self-Adhesive Foam Tape Black Strong Tape Pads for for $6.95I used all materials. Nothing was left over; covering all nooks and crannies Follow the directions on the box.
K**S
Didn’t Work
Idk what to say besides this product made absolutely zero difference in the temp of my garage. Now, my garage faces the west (setting sun) and is white in color. So it has the elements mostly stacked up against it. It gets easily 90 degrees in there by the evening. I installed these panels last night to see if they’d make any difference today. And sadly they didn’t change a thing. It was even cloudy today. Still over 90 degrees in there this evening.I’d also like to point out that these were a pain in the a$$ to install. Each one has to be cut to fit. With two people it might not have been so bad but I had to do this by myself and it was dreadfully tedious. They should make them in standard garage door sizes to save you the back and hand pain. Just saying.I have one experiment to try. And if it proves fruitful, I’ll update my review. I did take one trip to the store this afternoon so maybe the car heated up the garage and turned it into the oven it currently is.
Trustpilot
Hace 2 meses
Hace 4 días