We remain fully operational. Our teams are working around the clock to ensure your deliveries continue safely.

Descargar la aplicación


Servicios al cliente
Sobre nosotros
Copyright © 2025 Desertcart Holdings Limited
Descargar la aplicación


Buy anything from 5,000+ international stores. One checkout price. No surprise fees. Join 2M+ shoppers on Desertcart.
Desertcart purchases this item on your behalf and handles shipping, customs, and support to Panama.
🌿 Never let your plants thirst again — smart watering made simple!
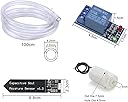
The WayinTop Automatic Irrigation DIY Kit combines a capacitive soil moisture sensor, 1 channel 5V relay module, mini brushless water pump, and 1 meter vinyl tubing into a compact, Arduino-compatible self-watering system. Designed for millennial plant enthusiasts and tech-savvy gardeners, it automates watering by sensing soil dryness and activating the pump only when needed. This kit includes comprehensive support materials, enabling easy integration and customization for indoor gardens, potted plants, herbs, and flowers—perfect for busy professionals who want thriving greenery without the hassle.
| ASIN | B07TLRYGT1 |
| Fit type | Standard Connectors |
| Hose length | 100 Centimeters |
| Item model number | WYTP25-KIT-1C |
| Item weight | 0.09 Kilograms |
| Manufacturer | WayinTop |
| Number of pieces | 4 |
| Package Dimensions | 14.73 x 14.73 x 2.79 cm; 91 g |
| Power source | Battery Powered |
| Special features | Automatic Watering |
| UPC | 713871273489 713871270532 |
A**E
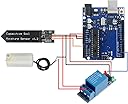
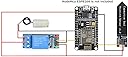
This is the best kit for this on Amazon. Great price all the parts worked. This is great from someone that just got into audrino and got through some of the tutorials for coding. Remeber you need a Uno or equivalent to get this work also you need the wires to hook this all up.(usually provided in other kits, I have a ton) Audrino is very flexable so you can set this up multiple different ways. I used a breadboard but you can set it up without it. 10-15 Lines of code and had this up and running. Great seller, great price, fast shipping. I only have good things to say about this. Update: This is the best parts kit on amazon for working parts to get this work.If you don't know how to code basic code in sketch don't buy this as this isn't for one that has no clue how to code in arduino at all. This is for people that need the parts in a convenient listing i am a novice. There is no tutorial hand holding for the code side. This is for people that can figure out basic code and pins(plenty of videos) You can ignore the reviews by people saying no instructions as they have no idea what they bought. They wanted the seller to provide the code to pull this off which is not what they listed as it depends on the parts they already own. Anyway this kit is prefect because they sent me all working parts, if your complaining about anything else its your fault. Great seller.
A**R
Works great. More durable sensor than most.
A**R
The directions are a bit confusing for someone who is an amateur at Arduino, but they can be figured out with some google searches and common sense. The code provided has a few errors in it, so here is the code that worked for me. One can just copy and paste it into the Arduino IDE. const int relayPin = 2; const int sensorPin = A0; float sensorValue = 0; void setup() { // put your setup code here, to run once: Serial.begin(9600); //begins communication with serial monitor pinMode(relayPin, OUTPUT); //sets pin 2 to output pinMode(sensorPin, INPUT); //sets pin A0 to input digitalWrite(relayPin, HIGH); //turns on relay, in turn turning on pump delay(500); //runs pump for 1/2 second } void loop() { // put your main code here, to run repeatedly: Serial.print("MOISTURE LEVEL: "); //prints "MOISTURE LEVEL: " sensorValue = analogRead(sensorPin); //sets "sensorValue" to input value from A0 Serial.print(sensorValue); //prints moisture level if(sensorValue>750) { digitalWrite(relayPin, HIGH); //if moisture level is above 750, turns off pump } else { digitalWrite(relayPin, LOW); //if moisture level is not above 750, turns on pump } Serial.println(); //prints new line for spacing delay(1000); //waits 1 second before re-checking moisture level } //Remember to select "tools>board" and "tools>port" before uploading code
E**T
In testing the pumps this is what I discovered. At 3.3V the inrush is about .11 ah(111 mah) and at 5.0V the inrush is .27ah(270mah). This is well above what an Arduino can put out through any of its output pins. Inrush for those who don't know is the additional amperage that a DC motor will draw when starting. It takes more amps to get going than to sustain. With that being said these pumps will almost certainly need external power. I am no expert(I'm actually a novice at best), but in my testing, I was not able to get the pumps to come to life from my Arduino, only from my bench power supply. I suggest everyone looks into a motor controller as well. They are not expensive and are really easy to use. I only give it 3 stars since no motor controller was included. If someone shows me how to make these run just from the Arduino power its a 5 star from me. The capacitive soil moisture sensor is simple, easy to use, and worked fine. I'm not sure if they require calibration or anything, but even if it isn't super accurate it works for my purposes.
G**R
Pump died with extremely limited use. 30 seconds a day for like 6 months…
Trustpilot
Hace 2 semanas
Hace 2 semanas