We remain fully operational. Our teams are working around the clock to ensure your deliveries continue safely.

Descargar la aplicación


Servicios al cliente
Sobre nosotros
Copyright © 2025 Desertcart Holdings Limited
Descargar la aplicación


🔥 Shrink your creativity, amplify your style! ✂️
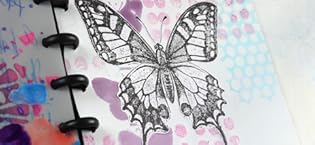
Grafix Ink-Jet Printable White Opaque Shrink Film offers six sheets of 8.5"x11" double-sided printable film designed for inkjet printers. Easily cut and bake your custom designs to shrink them to 20% of their original size, resulting in thick, durable plastic perfect for personalized jewelry, tags, and crafts. Made in the USA, this versatile shrink film empowers creators to produce professional-quality, one-of-a-kind embellishments with ease.


| ASIN | B002B8O0MS |
| Best Sellers Rank | #31,110 in Arts, Crafts & Sewing ( See Top 100 in Arts, Crafts & Sewing ) #2 in Multimedia Surfaces |
| Brand Name | Grafix |
| Color | INK JET WHITE |
| Customer Reviews | 4.4 4.4 out of 5 stars (1,850) |
| Global Trade Identification Number | 00096701137770, 37011482291200 |
| Item Dimensions L x W | 11"L x 8.5"W |
| Item Type Name | GRAFIX PRINTABLE SHRINK FILM 8.5X11 6PC |
| Item Weight | 0.14 Kilograms |
| Manufacturer | Grafix |
| Material Type | Film |
| Paper Finish | Smooth |
| Paper Size | 8.5-x-11-inch |
| Paper Weight | 4 |
| Recommended Uses For Product | Crafts, Drawing |
| Sheet Count | 6 |
| UPC | 370114822912 096701137770 |
| Unit Count | 6.0 Count |
N**G
My Steps and Tips for this product! 💖
*UPDATED: JULY 2020* This product is AMAZING! I have been using this product for a few years now, and I have loved the results I have gotten from this product. Continue reading for my tips and tricks when using this product! First of all, I print out my designs from my computer to my Canon MX922 printer. I use the Photo Paper preset, but the Glossy Photo Paper preset works the same. A VERY IMPORTANT tip is to lighten the colors. The percentage of lightening the colors can vary, but know that the more you bake your designs in the oven, the darker they become. When I used to bake them for 3-4 minutes, I lightened it by 50%, but now when I bake them for 8-10 minutes, I have to lighten them by about 70%. Second, after I print them, I move on to cutting. The cutting process is self explanatory, but it is also important to HOLE-PUNCH before you bake if you are making keychains. Another thing would be that my hands often times get sweaty when cutting, so I HAVE to wear gloves, since it can leave a yellow stain on your designs. Third, its time to bake! (The most enjoyable part, but can also be stressful for your first time) I pre-heat my oven to 300 degrees, put my designs between 2 pieces of parchment paper, and put them into the oven. People say it takes 2-4 minutes, but for me, it actually takes from 8-12 minutes. It really depends on the size of your designs, so you will have to experiment. After doing this many times, I realized that the longer they are in for, the less imperfections that they have. Again, the most important thing is TRIAL AND ERROR, so find that right temperature for you. Another tip would to be to NOT FREAK OUT. The main reason why most of my charms failed in the oven step was because I was so anxious if they were going to over bake. However, this ALWAYS led to me removing them too early and having failed charms. Just remember that over baking is WAY better than under baking, so there is no reason for you to worry. I did read that someone said that they can burn, which I never encountered, but be cautious! Finally, I quickly remove them from the oven, flattening them with a flat pan/plate. BE WARNED that they cool down VERY quickly, so flatten them quickly. Next, I apply DecoArt Americana Triple Thick Gloss Glaze for one main reason. If you use Mod Podge Dimensional Magic, using it by itself without an under coat will probably make your design smear. This product does make the colors more saturated, so be aware of that! It isn’t my favorite glaze because of it saturating the colors, but I don’t know of any other gloss so I just gotta make do with what I have. I leave it to dry for the whole day or night (10-12 hours-ish), and then move on to using Mod Podge Dimensional Magic. I have to say, Mod Podge Dimensional Magic is very stressful to use. Lots of my charms have failed because of it. The air bubbles are very stressful, but I typically use a needle and toothpick to pop the big ones. If there are some small ones you want to take out, you can scoop them out with a sticker note or paper, which works most of the time. I also had times where the liquid overflowed, so make sure to not overdo it. Another tip I have for this product is that whenever the liquid covers small spaces/crevices, I wait about 1-2 hours for it to set, and then go in with a toothpick to cut the liquid that has fallen in these areas. Using this product can be very stressful, but when done correctly, the end result will be very nice and will leave you satisfied. I let it fully rest for 12 hours before I call it finished. Overall, this product is really fun to use, especially for those who want to get into the art of making charms. I am super satisfied with how my charms have all turned out and very excited to continue making more. A final tip to you all would be to not give up if you mess up. The mistakes are what allows you to learn and become better at doing this. I hope this review helps someone, as knowing some of these things from the start would’ve been so helpful to me. I know this has been long, but thank you so much for reading this! 💖
K**B
Nice little kit
Nice way to start with Shrink Plastic.
S**O
Beautiful prints compatible with home printers and cricut machines!
These shrink film sheets are my favorite to use. They print bright and vibrant designs with no ink bleeding. Easily cuts with my cricut maker 4. They shrink to the perfect size. I also appreciate the price point for the amount you get. I️ recommend!
S**U
Ok Shrinky Dink replacement
Like a lot of comments here, I bought these as an alternative to Shrinky Dinks. (Shrinky Dinks changed their inkjet plastic formula and they kind of suck now.) I kept my expectations low and tried my hand with this new plastic. For people too lazy for a thorough review: Overall an ok craft product. Silhouette cutting is doable. Once baked the plastic is slightly thinner than brand plastic and flexible. Fuzzy texture on both sides. 3.5/5 For the OCD crafters who need a thorough review grab a snack and get comfortable, because this will be a long one. lol ----- My experience: **Printing:** - As recommended, I lightened my images by 50% and printed on the standard setting with my Canon inkjet printer. No smearing, no paper jam. Print quality will probably vary depending on your printer, but mine was great. So far so good! **Cutting:** - For those of you that are looking to cut these with a Silhouette machine: it's doable, but you'll need to work to get the results you want. Keep in mind that I do not have a deep cut blade, so for those of you that do check out the recommended settings in the asked questions section. - I tried my first sheet with the basic shrink plastic setting (the one Silhouette expects you to use with their brand sheets) and it took forever. I ran it through my machine with double cuts 8 times and it never cut through. I ended up having to snap the pieces out. This wouldn't be a big deal if the back of the sheet wasn't covered with whatever they use to make the plastic printable. It leaves a thin layer around the edge, like the thin membrane you find around hard boiled eggs, so I trimmed off what I could with scissors and ended up completely pulling this layer off on a couple of my other pieces. -- This will become a problem later, but can be avoided. - My second run went a little more smoothly setting my blade to 10 with the shrink plastic setting. Had to run it about 10 times and it still didn't cut all the way through. Snapped my pieces through, trimmed whatever thin skin again and got ready to bake. **Baking:** - I preheated my oven to 350° and baked my first batch for about 3 minutes. They shrunk slowly and got stuck in the "cup" position at around the 3 minute mark. No worries - I added another minute and they flattened out ok! I moved them to my counter and pressed them down with a cook book. First batch good to go. - Second batch shrunk faster since the pan is already hot from the first run. Remember when I said I peeled off the backings on some of my pieces? Those pieces flipped and curled in on themselves on the blank side. Might have been able to uncurl and flatten them out, but the plastic cools off so quickly outside of the oven that I took the loss. Keep in mind: this plastic CAN NOT be reheated once the plastic cools like the Shrinky Dink brand, so act fast if this happens. - For my third batch I ended up laying a second piece of parchment paper on top of the pieces to keep them from curling, like the instructions recommend. Shrinks perfectly fine without any curling and worked on the pieces without backings! **Results:** Size and consistency: My pieces shrunk about 50%. I made a 5inch (12.7cm) test piece that shrunk down to about 2.5inches (6.35cm). Turns out this isn't really as helpful as I was hoping since the 9 pieces I cut out of a single sheet ended up having different levels of warping. Some of my pieces came out fine, while others were slightly stretched or squished. This might not be a deal breaker if you don't care about consistency, but definitely will be if you're buying this to make matching earrings or pins for Etsy. Another thing to note is that this plastic is slightly thinner than Shrinky Dink plastic. It's thin enough to have a good amount of flex. (See photo) This could be a winning or losing point for crafters. Long, narrow pieces have a lot of flexibility and small round/square shapes will have less flex, but still have a bit of bend. Flexibility might be great for accessories that need to hold up under some pressure, like key fobs, but might not be great if you're looking to have some solid hanging charms. If you want a thicker finished product, buy Grafix' regular non-inkjet plastic. Texture: (See photo) Like other comments have mentioned, the pieces will have a textured front and back from the printable material coating the plastic. If you end up peeling some of it away and bake the pieces, it will be really obvious. The texture will also be present around the edge. You can take an emery board and file off any edge fuzz or uneven plastic, but unless you're aggressive with your sanding you won't be able to have a flat clean edge like you would with Shrinky Dink plastic. Sealant: I think this really depends on your printer ink, but I used a matte fixative and it sealed my prints ok. I'm currently waiting on the layer of mod podge to dry, but it seems to be doing ok without any running. I'll update in the event that the mod podge tears away from the surface, but I doubt that it will with how textured the baked product is. lol ----- Wow you made it! Personally, if you're buying this to use for craftables with your kids, it's great. If you're looking to use this to sell on Etsy, I'd buy it with caution. Hope this review was helpful ^^
F**A
Buen material, yo lo he utilizado pare realizar pins y pendientes y el resultado es muy bueno aunque dependiendo del tamaño del que lo hagas y del resultado que quieras tienes que ir experimentando un poco y calculando tus propios tiempos. Algo que no he leído mucho sobre este producto y que creo que la gente debería saber es que para que tus creaciones se queden totalmente planas, nada más sacarlas del horno, corriendo tienes que aplanarlas con una espátula.
K**E
I decided to scrap one sheet for testing a few things. First of all, I have an HP inkjet printer and I had zero issues printing my designs. The result is a very sharp and smooth print that is also very easy to cut with regular scissors. Second thing, I tried using both a toaster oven and a heat gun to shrink my product (the end goal was a rather detail intense set of pins). I needed the design to shrink as flat as possible with almost no distortion. I knew, from experience with a similar product, that the heat gun could get messy and gosh it did xD I can see it being useful for making petals or other more 'organic' forms but controlling the shrinkage with a heat gun requires control and you often end up with the design folding on itself thus making it impossible to flatten it afterwards. On to the toaster oven! With a parchment sheet folded over the design to keep it down a bit, merely 30 sec in the oven (and not the 2 min mentioned on the package) and once removed, I quickly rolled a water bottle over each shrunk design to flatten them before they got cold. Success rate of nearly 100% The few I missed I could reheat and redo the flattening process. Third point, the shrinkage % The package mentions BOTH 20% and 50% so I went to their website... which mention both % as well in different pdf, which is stupid. Get your facts right people. I can assure you the shrinkage is 50% and NOT 20% And final point, colors. Keep in mind that, as the design shrinks, you get more ink in a smaller surface so everything will get significantly darker. If you use a design drawn from an art program, I suggest making it at least 20% paler than what you want as an end result. (The lazy yet efficient way it just set it to 80% transparency on a white background). It worked like a charm for me. Hope that lengthy review will help some people. Have fun!
A**G
Fa sempre un ottimo lavoro e non tradisce le aspettative. Certo, è un po' caro...
X**D
It works!! Very happy that l can make my very own keyrings and pins!!! L just need to find a way to stop them from curling up other then that. Very nice and and very happy with it :D
C**H
Die Folie läßt sich sehr gut bedrucken und schrumpft dann gut zusammen. Das fertige, geschrumpfte Produkt ist fest, glatt und der Druck ist gut sichtbar. Die Folie ist auf beiden Seiten glatt. Die Anleitung ist auf Englisch, da aber Schrumpffolie einfach zu handhaben ist und eine Anleitung eigentlich nicht wirklich nötig ist gibt es dafür keinen Punktabzug. Beim Kauf sollte man darauf achten, wie stark die Folie schrumpft. Bei diesemProdukt sind es 50%, also sollte das Ausgangsbild entsprechend um 50% größer sein als das gewünschte Endprodukt (andere Folien schrumpfen z.B. um den Faktor 7). Das fertige Produkt fällt etwas dunkler aus als nach dem Drucken. Auf dem bei Amazon gezeigtem Produktbild steht, dass die Folie um 20% schrumpft - ich habe eine andere Folie der gleichen Firma erhalten, die allerdings um 50% schrumpft. Da es ein gutes Produkt ist und micht der etwas andere Schrumpffaktor nicht stört gibt es keinen Punktabzug. Tipp: Man kann sich aus der Folie ein Lineal basteln und dann dieses Lineal schrumpfen. Damit läßt sich dann gut im Vorraus die Endgröße berechnen. Man sollte dann allerdings immer die gleiche Schrumpfdauer im Ofen einhalten. Tipp: Wer Ohrringe herstellen möchte sollte beide Ohrringe zusammen schrumpfen. Läßt man ein Ohrring z.B. eine Minute länger im Ofen kann es sein, dass die Ohrringe in der Endgröße minimal unterschiedlich ausfallen. Nachdem die Folie bedruckt wurde sollte man kurz warten,bis die Tinte getrocknet ist, dann kann man mit einer Schere die einzelnen Figuren ausschneiden - dabei daran denken nach Bedarf mit einem Locher Löcher zum Aufhängen anbringen. Danach den Backofen mit Backpapier auslegen und auf 150 - 170 Grad Celsius erhitzen. Wenn der Backofen heiß geworden ist die Figuren mit dem Druck nach oben auf das Backpapier legen und beim Schrumpfen zusehen.Dieser Teil dauert 2-3 Minuten und macht besonders Kinder viel Spaß. Die Folie beginnt sich zu bewegen und rollte sich von den Seiten her auf. Dann rollt sie sich wieder aus, bis sie fast glatt ist. Wenn man die Schrumpffolie aus dem Ofen holt sollte man sie danach direkt für ein paar Minuten pressen. Ich benutze dafür ein altes Buch. Die Folie ist dach dem Schrumpfen nicht klebrig, das Buch wird also nicht beschädigt. Tipp: Um die Haltbarkeit zu erhöhen kann man die Figuren mit Klarlack einsprühen. Tipp: Man kann Shrinkplastik auch mit Buntstiften oder einem Bleistift bemalen. Da diese Folie auf beiden Seiten glatt ist sollte man sie dazu mit 300er Schleifpapier kurz anschleifen. Ist das Shrink Plastik nicht angeschliffen läßt sie sich nur mit Permanentmarker beschreiben / bemalen. Ich nutze diese Shrink Plastik z.B. um Ohrringe herzustellen. Man kann sich abe auch den Spaß machen, die Kinder zu "schrumpfen". Schnelle Lieferung. Ich werde dieses Schrink Plastik auf jeden Fall nochmals kaufen. CH
Trustpilot
Hace 2 días
Hace 3 semanas