🧵 Stitch Your Way to Perfection!
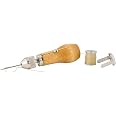
The Speedy Stitcher Sewing Awl is a high-quality, durable sewing tool designed for sporting goods enthusiasts. Made in the USA from synthetic materials, it offers unmatched performance and easy maintenance, ensuring you can tackle any sewing project with confidence.


| Unit Count | 1.0 Count |
| Material Fabric | Synthetic |
R**S
Great tool!
Perfect tool for so many things. My only regret is I didn’t find it 50 years ago.
M**N
Very good awl!
The awl sews very well. The quality is great - the wooden handle sits well in the hand and the needles are sturdy and very sharp. It has two needles and the thread. The step by step instructions are very clear.
R**F
Like a machine!! Fixes all thick fabrics that need stitching!
Fixed all my camping folding chairs with this baby. Works fantastic! I wish I had pictures. This thing sews like a machine! Saved hundreds of dollars on all the folding chairs. Professional look and strength! I have one at home AND one at the RV.
C**R
Awesome tool for heavy fabric repairs; poorly illustrated instructions
I stumbled across this tool--the Speedy Stitcher Sewing Awl--and read so many positive reviews that I decided to try it out. It seems like an ideal tool to keep aboard a sailboat for on-the-water emergency sail repairs. Although I haven't used it to repair any sails yet, I tested it out on other projects. For instance, I used it to sew visible stitching marks in my anchor rope at 20' intervals so I can easily know how much anchor rode I'm feeding out while anchoring. I sewed a few test stitches in a couple of pieces of 1/8" thick leather scrap. And I tried sewing a couple of pieces of very light material (like T-shirt fabric).First, the needles are impressively sharp and the line is very heavy duty. It works great for thick/substantial materials like rope and leather. The standard needle and thread are overkill for light materials, however, such as thin cotton--partly because the needle head is so large (i.e., makes a large hole that stretches/tears light fabric), and partly because the line/thread is so heavy it causes the material to bunch and ruffle. A smaller "fine sewing" needle can be purchased separately, and I would recommend getting it for sewing projects that involve light to normal weight fabrics. For heavier materials like heavy canvas, leather (i.e., repairs to shoes, heavy canvas tents/bags/sails, straps on heavy duty wilderness packs, etc.), this tool comes ready for the job and seems well up to the task.Second, the Speedy Stitcher is relatively simple to use--once you figure it out, which may take awhile. Essentially, a thread leads down from a bobbin in the handle, out through the side of the handle, around a tensioning post, up through the chuck, to the head of the needle. When you begin sewing, you pull out all the thread length you'll need to complete your repair. To sew, you (1) push the needle all the way through your materials, (2) pull the needle back out partway to create a loop in the thread that lays alongside the needle, (3) pass the tail of the thread through that loop and snug it up as you extract the needle to create a lock stitch--just like a sewing machine. When you finish, cut the thread and tie a square knot to finish off and secure the stitch. It helps that the needle is very sharp and the thread is hefty and stiff, making it easier to handle than a much thinner, more supple thread would be, and dispelling any worries about breaking the thread as you tension a stitch or tie a finishing knot. It's plenty strong, though how "speedy" you're able to sew will depend on your manual dexterity and how cavalier you feel about working with such a sharp needle. I sew quite slowly to ensure nice, even stitches and to avoid stabbing myself.The tool itself is great, given an appropriately suited task. The main shortcoming here is the lackluster instructions. While adequate to figure out how the device operates, they are not particularly well illustrated. The illustration for setting up the device to sew is limited to a single picture that looks like a photocopy of a photocopy of a photocopy--with thick, fuzzy lines that make it difficult to see precisely how the thread should be led out of the handle, through the chuck, and up to the needle head. You'll be able to figure it out, but you'll be baffled when the instructions tell you to "Continue thread along handle groove and through ferrule hole as illustrated" (If you know what a ferrule is, you'll be fine, but it's strange not to label it or otherwise mark it in the picture). Then you're told "Place needle in threaded post making sure that grooves in needle and threaded post are in alignment with each other." (If you examine the actual tool carefully, you'll figure it out, but if you think the picture is going to help you... well, I hope you enjoy squinting at fuzzy and indistinct lines and feeling unsure.) To be clear, this isn't a deal breaker and I've seen worse instructions, but it's strange to me that someone can make such a nice tool and apparently realized an illustration might be helpful with its setup, yet DIDN'T think it was necessary to make that illustration sufficiently large (and labeled) to make it truly useful.As it turns out, there is a diagram that defines the parts of the tool for those who wonder what "chuck", "ferrule", or "tension post" means. However, in a cardinal sin of technical writing, they are identified in a separate illustration on a separate page than the written instructions that actually use those terms. Besides the fact that parts diagram is small and lost in the busy look of the title page, there is no standard cross-referencing system (letter annotations) to call your attention to the diagram's existence in any way. Maybe I'm nit-picking because I was a professional technical writer, and perhaps other people won't see it as a major annoyance. But a clearer illustration could've saved me five minutes of confusion and timid assembly. Since this is the kind of tool that people probably use once then put away for a long time, I suspect they'll need the instructions every time they use it--and go through the same, initially baffling process of setting up the tool to prepare to sew. If you're going to illustrate it at all, why not do it right?By contrast, the three other illustrations showing the sewing process are fairly accessible. They suffer from the same fuzziness, but the simpler nature of what they're illustrating (the three stages of making a stitch) makes them easier to comprehend. Even so, you'll still have to try sewing a thing or two before you really "get" how it works. Another quibble: The steps to make a stitch start with the setup as step number one. That's strange, since you don't need to set up the tool after every stitch! I'm sure reasonable people will realize this, but it again illustrates the sense that the instructions aren't really polished. They feel more like an afterthought someone didn't quite have enough time to refine and organize fully.All in all, a great tool that I certainly recommend for people who want an effective, compact sewing tool for in-the-field heavy duty repairs to tents, packs, sails, saddles, shoes, etc. I deducted one star because of the lackluster instructions (which could be much clearer with a few simple tweaks) and because the tool does not include the fine needle or fine thread. I suspect many folks will want to sew materials that need them. Yet, it appears you must purchase the needle separately--for nearly the same price of the entire tool. That will annoy some people greatly if the included standard needle and thread prove too large for their purposes.
G**H
Two Foot Done and 28 To Go
My loving wife who is mostly supportive of my endeavors said I was crazy. The remainder of my family were already booking a padded room for me. The neighbors joined in with a sarcastic good luck and not even my faithful dog Cromwell was ready to support me. He dropped a tennis ball into my lap stood there wagging his tail and looked at me with pleading eyes to please throw the ball and not start stitching the 30' awning on our Airstream trailer. Early one morning, at sunrise I strode out to the trailer and welcomed the sunshine. Pulled down the awning and threaded the Speedy Stitcher. An hour later I had mastered a stich. Now the sun has risen with the temperatures breaking a record for our northern location. Undaunted I began my second stich which was accomplished in only half the time of the first. This really is a Speedy Stitcher I remarked to Cromwell. I began stitch number three, then four, and five. Now it is lunch time and I took a break. You see that on stitch 4 I looped the tucked thread into the hanging thread and ended up with four threads. This was a good time to learn how to cut and knot the thread. With lunch past I began stitch 6 and soon I was on number 15. I looked back at the two inches I had stitched with pride and went to get a beer. The directions do not mention it but beer is much needed to work this Speedy Stitcher. On stitch number 18 I learned just how sharp the needle was as it passed through my finger and securely stitched it to the awning. This indeed was a problem. If left my finger attached I would need to fashion some sort of shelf for me to stand upon when the awning was retracted and we pulled the trailer down the road. I decided it was best not to leave my finger attached to the awning. I opened another beer and sat down to admire my work. I decided if I made my stitches straight the project would take half the time. The directions do not tell you this so you have to learn it by yourself. Darkness came about stitch number 25 or so. I had yet to develop the competency to stich in the dark so I stopped for the night and resumed the next day but first I had to pick up more beer. I look forward to the day when I start stitching again but for now I will sit here, throw tennis balls for Cromwell and drink beer. Please do purchase your own Speedy Stitcher, your life will be much improved.
R**H
The all powerful stitcher.
With a couple hours. It's amazing what this little but powerful tool can accomplish. With your consistency, and determination while learning to do something new. The speedy stitcher can help you create, or finish a product like the one pictured here.
P**N
Works fantastic for making quilted sneakers
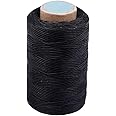
I absolutely love this product for making quilted sneakers versus using the needle, nose, pliers, and needle trick. Easy to use, better than other models with a more exposed thread bobbin. Save your hands! Save your sanity! Thread is super high-quality. Excellent size. You can re-thread it with whatever thread you need to. Absolutely must have so glad I bought it. Highly recommend. The needles are very sharp and they store in the tool itself ! Simple genius design watch a YouTube video about how to use it.
Y**M
Great idea. Needles too big
I used a sewing machine needle for the job I needed, 6 layers of think fabric. It worked great. The needles that came with the kid are way to big and thick for most average jobs I think.
Trustpilot
Hace 5 días
Hace 2 meses