We remain fully operational. Our teams are working around the clock to ensure your deliveries continue safely.

Descargar la aplicación


Servicios al cliente
Sobre nosotros
Copyright © 2025 Desertcart Holdings Limited
Descargar la aplicación
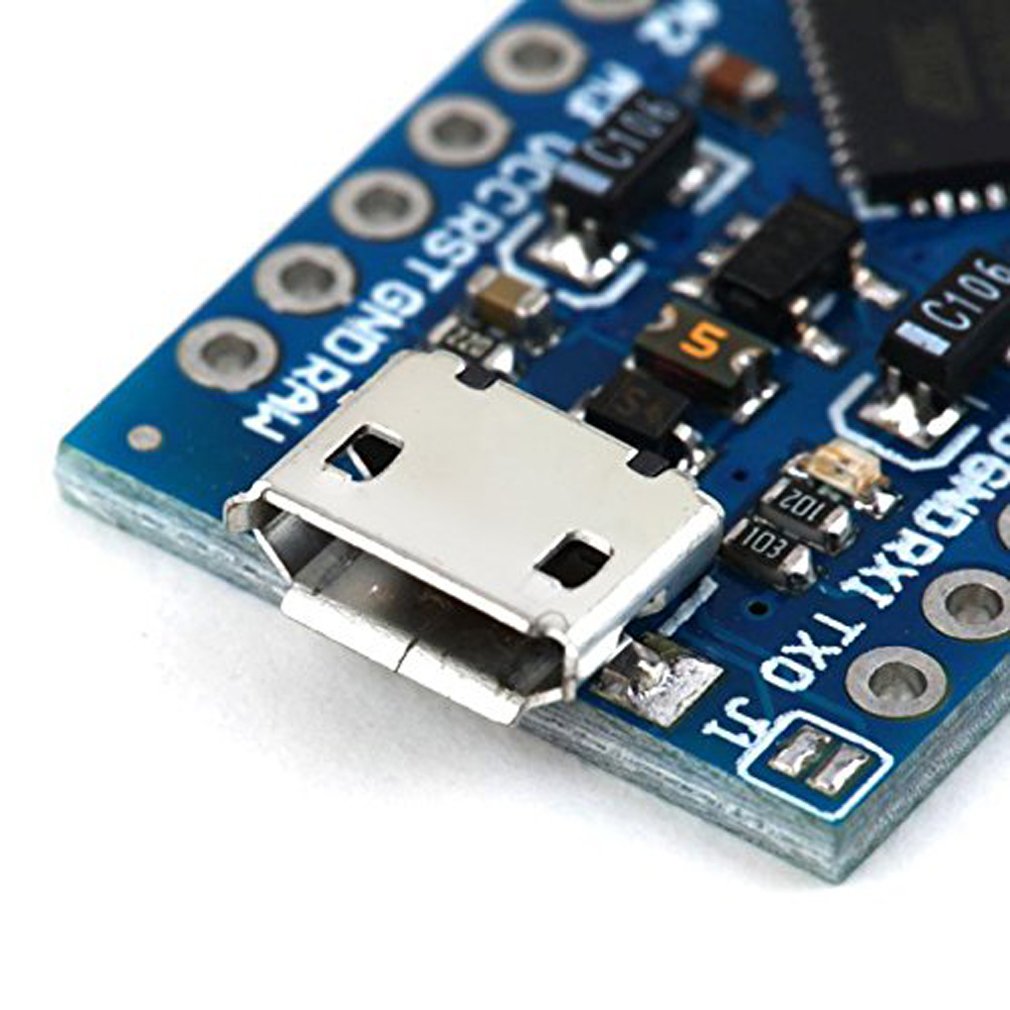


🚀 Tiny Board, Massive Potential: Power Your Next-Level Arduino Creations!
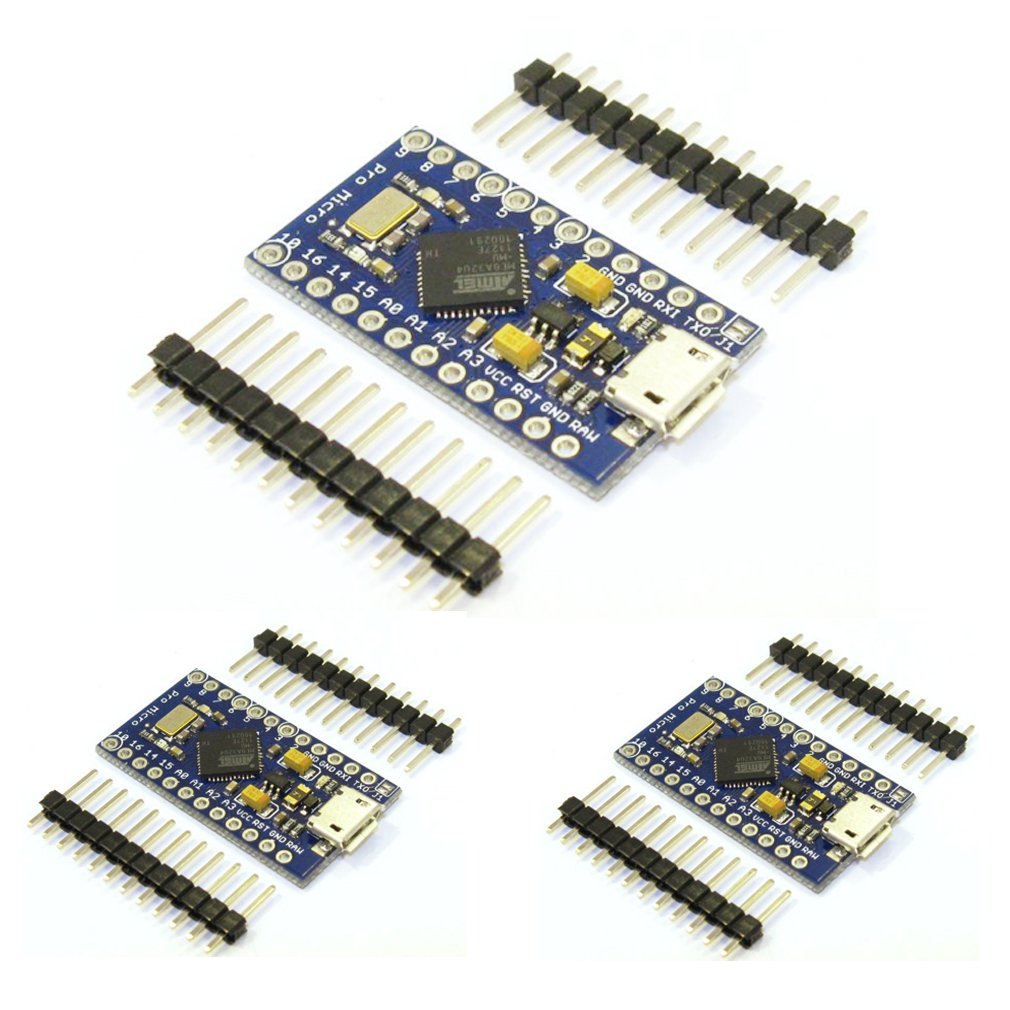
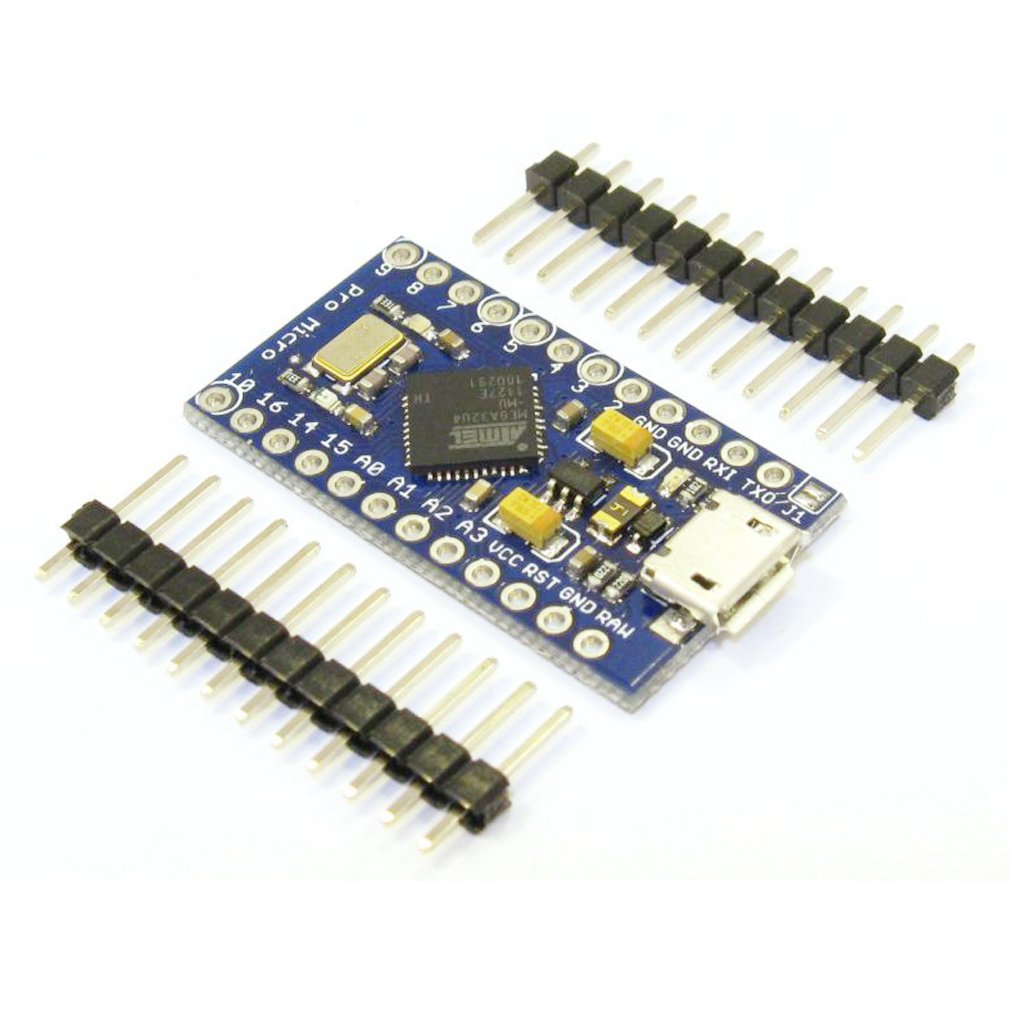
The HiLetgo Pro Micro features an ATmega32U4 microcontroller running at 5V and 16MHz, equipped with an onboard Micro-USB port for easy programming. It offers 4 channels of 10-bit ADC, 12 digital I/O pins, and dedicated hardware serial connections (Rx/Tx), all fully compatible with the Arduino IDE. This triple-pack bundle delivers compact, versatile development boards ideal for professional-grade embedded projects and rapid prototyping.
| ASIN | B01MTU9GOB |
| Best Sellers Rank | #1,616 in Single Board Computers (Computers & Accessories) |
| Brand | HiLetgo |
| Color | Blue |
| Customer Reviews | 4.4 4.4 out of 5 stars (391) |
| Date First Available | November 29, 2016 |
| Is Discontinued By Manufacturer | No |
| Item Dimensions LxWxH | 2.76 x 1.97 x 0.59 inches |
| Item Weight | 0.16 ounces |
| Item model number | 8541586627 |
| Manufacturer | HiLetgo |
| Number of Processors | 1 |
| Operating System | Linux |
| Product Dimensions | 2.76 x 1.97 x 0.59 inches |
| RAM | LPDDR3 |
| Series | Pro Micro |
| Wireless Type | 802.11b |
M**Y
Works well for me.
All three units functioned well. At first, I had a problem with my old Windows 7 computer recognizing the device. I was able to upload a sketch to it, and once I had done that, then the computer located the proper device driver for it. Not sure how that worked, but it did. They all worked fine with a Windows 10 computer. I was able to run a few simple programs, including one emulating a USB keyboard. One thing to note, when writing a sketch to output to the UART, you must use serial1.begin() (and associated serial1.xxx functions) not serial.begin(); The USB port does NOT share the UART pins as is the case on a UNO. If you have code that writes to the USB port, the program will not run until you open the serial monitor. If you write to the UART, it will run regardless of whether you have anything connected to the USB port or UART pins, but the output will only go to the UART pins.
R**.
Great value, but a few things to note about these modules: LEDs and USB troubles
For the value these are great little Arduino compatible Leonardo Atmel32u4 boards. I wish there were a schematic for them. Then I'd know that the LED typically on pin 13 is actually on pin 17, and a bonus LED on pin 30. (Thanks to other commenters for the heads up on that) Another problem I ran into: When programming these modules I got my LED blink test code to work then suddenly, without any warning, ~10 seconds later, I got an error message on my PC telling me that the device's USB had failed. Sure enough I couldn't download code to the module; however, I knew that the module didn't fail, it was still running running my LED blink code. The PC didn't recognize the device no matter what I did like unplug and plug it back in... it would make the USB connect and disconnect sounds, then display the error message again. To solve this problem, at least this worked for me so it's worth trying, connect to a different USB port on your PC, like I said, I have a USB hub; however that's not good enough to switch to a different one on the hub. You need to go to a completely different USB port on the computer... directly to the PC if possible. It should register this time without a problem, then, using the Arduino IDE, change the port number and it connected right up and I was able to program my modules again. I speculate, but there could be an issue with the USB and hubs, other devices plugged into the hub, I don't know. Anyway it's a great board at a great value, I plan to pick some more of these soon.
L**E
Worked as advertised with exception of Input raw voltage rating!
All three were well packaged. I had no problem installing sketches straight out of box with my Mac. I will definitely purchase more of these. I was able to get 20x4 lcd with shift registers with 8 button and 8 LEDs up and functionining for midi controller project. These little boards work as advertised with the exception of the raw voltage input that it can handle. The only problem I had was when using a voltage regulator that was not functioning correctly it put 9+ volts to raw pin on board, “fried it”. These boards will not handle anything over 9 volts.
C**R
It survived me with a soldering gun, so it's got some quality.
Poor eyesight, shaky hands, and not much experience makes me a danger to any circuit or wire I come at with a soldering gun. Well, I decided my Sim Racing rig needed a new button box with digital encoders, so I needed one of these guys to achieve that. The last set I purchased of the Nano style (ATmega328) had the pins already pre-soldered to the boards, so I could just slide female wire ends to them and be on my way. These however, do not have the pins pre-attached. So, grabbing a base with clips and magnifying glass, I set to work. I did my best to flow over the pins properly, without blobbing over to any adjacent ones. Once, I was finished, I connected my wires, plugged in a USB cable, and prayed. Low and behold, everything worked! First try, even! So these automatically get my full seal of approval. If they can survive my electrical engineering skills, they can probably survive World War 3, and be used to re-build society with. So, you should probably stock up on a few.
C**N
Definitely worth it.
Let me just say these are packaged with care, which seems to be getting rare these days. (haven't tested the anti-static bags but they feel high quality, no suspicions here) I just love these little boards! I plan on using these to make custom gaming pads and a macro keyboard, super easy with the Arduino libraries. (Search for Arduino Keyboard / Mouse examples) These devices can be recognized as a keyboard, mouse, midi device, game pad (joystick/controller) and more in a few clicks just by using the Arduino libraries. I personally like these more than the ATMEGA168/328 boards. These are also breadboard/veroboard spacing compatible with the pins soldered on, allowing for super easy prototyping, my go to for simple sketches on a small breadboard. SparkFun made an awesome tutorial using these and some MX Cherry Switches to make a custom macro keypad for Eagle PCB, that's one thing I plan on doing with these. (will update with pictures if I remember :D)
S**A
All three boards were bricked
I got these boards about 2 years ago to put in keyboard projects. All three were DOA. I never totally figured out why but all three boards will not flash and do not respond to reset. I mostly forgot about them until yesterday whey I was getting ready to do another keyboard build and came across them, once again I've determined that they are bricked or otherwise unusable. Pretty disappointed but not surprised.
D**M
Wonderful for split keyboards!
I recently got into making split keyboards as I deal with a lot of wrist pain using my standard keyboard, and I love these pro micros! They're very responsive, no problems when initially flashing them, and they have no issues handling me consistently typing at over 150 words per minute. I can't speak on the longevity of these as I've only had them for a short while, but so far I'm satisfied. Have not noticed any stuttering/disconnects. Make sure you secure the USB port with some hot glue as these do tend to fail over time if you are not careful. This is not a fault of this specific brand, it can happen to any manufacturer.
D**N
Shipping was great on this item - arrived very quickly (UK). The boards are individually sealed in anti-static bags, with the header pins included but not soldered, which leaves your options open. I have now tested all 3 boards and they work fine with the Arduino IDE. It's a versatile little board and good value here - I highly recommend to others. Installing the driver can be a little confusing at first, but is straightforward. I have documented some instructions below to help other users: (1) Download the Arduino IDE (2) Plug the Pro Micro board into your computer. If the COM port does not appear in the COM port list in the Arduino IDE (go to Tools--> Port -->), the chances are you are using a charging USB cable, rather than a data USB cable - so use a cable you know works and communicates with other USB devices. (2) If you are happy with the USB cable, but still don't see the COM port In Windows, open Device Manager and navigate to Ports (COM & LPT). It should read something like 'Arduino Leonardo' (this is how the board is recognised by Windows). If things aren't working, there will be a yellow exclamation mark besides the Arduino Leonardo text. Right click on this and select "Update Driver Software" and "Browse my computer for driver software". Browse to your Arduino installation directory, something like "C:\Program Files (x86)\Arduino", make sure "subfolders" is ticked. Click OK and the driver should install (it can take a while). (3) In the Arduino IDE you should see a new COM port available (under Tools) - if not try restarting the Arduino software and confirming the "Arduino Leonardo" device appears in Device Manger without a warning exclamation mark. (4) You are now ready to upload sketches from the Arduino IDE! Try the "Blink" sketch first (File--> Examples--> 01.Basics--> Blink). Of note, the Pro Micro board (unlike other boards) doesn't have a builtin LED so the sketch will upload okay, but you won't see flashing. It has two LEDs that can be flashed, so try changing instances of LED_BUILTIN in the Blink sketch to 17 (RX LED) or 30 (TX LED). Upload the sketch and you should see some flashing!
R**7
Ils fonctionnent tous avec un firmware QMK (firmware de clavier mécanique) comme tout bon Arduino pro micro, faut juste voir combient de temps les ports USB vont tenir en utilisation quotidienne.
T**S
Der Arduino funktioniert sehr gut. Ich verwende ihn um ihn als USB Tastatur an meinen Rechner anzuschließen. Mit den Beispielen der Arduino Bibliothek funktioniert das wunderbar. In Verbindung mit einem 433 MHz Funkmodul habe ich ihn auch getestet. Das Funktioniert ebenfalls sehr gut (die Funkt verbindung reicht durch das ganze Haus). Er ist zwar etwas teurer als die Arduino Nano nachbauten, die ich sonst meistens verwende, aber diese Funktionieren nicht als Tastatur, daher habe ich für dieses Projekt den Pro-Micro verwendet. Ansonsten sind die Unterschiede zum (etwas billigeren) Arduino Nano glaube ich nicht sehr groß. Fazit: - Funktioniert sehr gut - Lässt sich als Tastatur oder Maus am Computer anschließen - Sehr ähnlich zum Arduino Nano, aber für manche Projekte funktioniert nur dieser hier (oder ein noch größerer und teurerer) - Ich kann den Mikrocontroller wirklich nur empfehlen
L**S
Totalmente compatibles con el original de Arduino Micro, están bien fabricados y bien embalados, cada Arduino en su sobre antiestático. Las filas de pines vienen sin soldar, tal como muestran las fotos en el anuncio, lo que es muy útil si se van a utilizar en un montaje de cableado directo, porque es mucho más fácil soldarlos que des-soldarlos, si fuese necesario.
M**L
This little micros are versatile and reliable. Make sure you choose the right voltage 3.3 or 5V. The built-in ability to emulate a PC mouse and keyboard is very handy for some projects. I’ve purchased many units from this seller with no problems.
Trustpilot
Hace 3 semanas
Hace 2 meses