We remain fully operational. Our teams are working around the clock to ensure your deliveries continue safely.

Descargar la aplicación


Servicios al cliente
Sobre nosotros
Copyright © 2025 Desertcart Holdings Limited
Descargar la aplicación
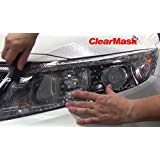
🛡️ Protect your ride’s eyes with aerospace-grade clarity!
The 3M 8 Mil Headlight Protection Film Kit offers 20% greater thickness than industry standards, delivering superior abrasion resistance and long-lasting clarity. Featuring a non-yellowing tri-laminate construction and 550% flexible elongation, this aerospace-manufactured film ensures an easy, bubble-free installation while maintaining crystal-clear headlight visibility. Perfectly sized for popular headlight dimensions, it’s the ultimate upgrade for millennial professionals who value both style and protection.
| ASIN | B07D4QXLNN |
| Batteries required | No |
| Best Sellers Rank | 225,121 in Automotive ( See Top 100 in Automotive ) 600 in Vehicle Paint Protection Films & Vinyl Wraps |
| Customer Reviews | 4.2 4.2 out of 5 stars (172) |
| Date First Available | 17 May 2018 |
| Item model number | 5 |
| Product Dimensions | 38.1 x 76.2 x 0.01 cm; 227 g |
| Ultraviolet light protection | False |
G**E
To start with let’s all agree plastic headlights suck! That said, I just finished wrapping the headlights on my 97 Civic which are curved and have a seam between headlight and turn signal. Took my time and followed directions-in fact I read them start-to-finish three times-and at least so far they look beautiful! I’m impressed with the quality of the wrap, it should last several years. If I were keeping the car I would apply two layers but as it is going to be sold I just used one but I did leave a tab at the top so the owner can just peel it off in the future easily if it gets cloudy. I have a few small spots around the assembly edges that I am sure will lay down and adhere tomorrow-they aren’t on the lens, just on the flat part around the light reflector, out of view once assembled and protected from car washes etc. that might cause edges to lift. Actually I’m so impressed I may just buy new lenses for my Volvo 245SE and another set of these. Mine are cloudy as heck and new plastic costs 1/3 what glass lenses do so even adding this cost makes it more economical. And I don’t drive a 30 year old car because I’m a car nut(although I am) but because I’m a cheapskate! This old Volvo is one of the most dependable, least expensive to maintain and safest cars on the road, It has 400,000+ miles and engine and transmission have never required repair. I drive around 475 miles round trip to the VA hospital and average 85MPH and 28MPG when roads are clear-3 passes twixt here and there. On the other hand I am beginning to like this Honda and I was a Honda factory tech before I retired so I am certain this one has another 200,000 miles in her before major before she dies, at least!
K**I
Very reasonable price for the quality of the film. Crystal clear and does not haze badly after time. Took a while to make a template to cutout the shape for the light. Goes on well with water and adheres very firmly. Looks good once in place
S**U
Film is thick and strong and clear, perhaps a little too thick for easy maneuverability and application, or perhaps just due to my inexperience. I refinished oxidized headlights on a car and applied this film to the end product. These headlights had some curves to them, and despite using a heat gun to help stretch the film over curved surfaces, I had great difficulty. The film has been on the outdoor-parked car for slightly over a year now and seems to be holding up well. There’s a little bit of rainbow stretch distortions if you look at the headlight directly when they are on. This may be due to how much I had to stretch the product or my own heat application.
D**K
The product was exactly as described, a thicker 12mil 3M brand film, LLumar. I used it to protect my glass headlight lenses and it was very easy to install once I got the hang of it. The film is very durable but doesn’t appear to be very stretchy, although if you applied heat I bet it would be better. It comes with instructions and tips and tricks as well which was unexpected. Be sure to read them thoroughly and mix up a good slip solution as directed. I have yet to drive the vehicle but the intent was to prevent rock chips from breaking the glass headlight lenses. Hoping this will do the trick
K**B
Some reviewers have posted detailed experiences which I found helpful. I would like to add some tips for after after you read and reread the directions. There is one more tool I found extremely helpful: a burnisher. Mine is a small chunk of ebony about a quarter inch thick with rounded corners on flat and curved edges. Anything hard with very smooth edges will work. There’s probably something in your kitchen utensils you can use. The instructions say not to install in direct sunlight. That’s probably true, however, I installed the second side in the late afternoon and the headlight was quite warm. It was ten times easier than the one I did earlier under cloud cover. I used a lot soapy water and made sure it wasn’t drying up before I started to peel the backing. The instructions say to keep your hands and the film backing dry. Not true. I sprayed everything. It washes away any dust or particles that were attracted by staric. When you cut your piece, give yourself a good inch. Clean the car well and you can use the car to help hold the piece while you figure out where to stretch and shape the film for a clean fit. When making your template or drawing your lines, do leave extra on the “other side” of the hump. The flattest part is easier to trim close, but as you stretch around the most convex parts, it will change where the line is. I used an xacto blade to trim the film after it was installed. It was a bit squirrely before the film had time to cure in place. Give it a few hours before you try to trim close to the light.
Trustpilot
Hace 2 meses
Hace 2 semanas