
Descargar la aplicación


Servicios al cliente
Sobre nosotros
Copyright © 2025 Desertcart Holdings Limited
Descargar la aplicación

⚡ Turn small spaces into big ideas with power and precision!
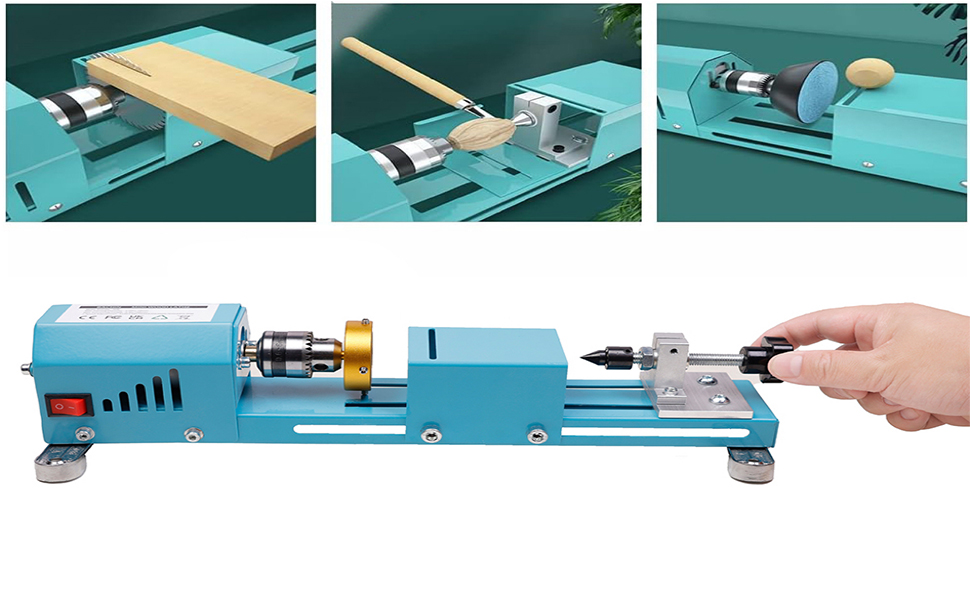
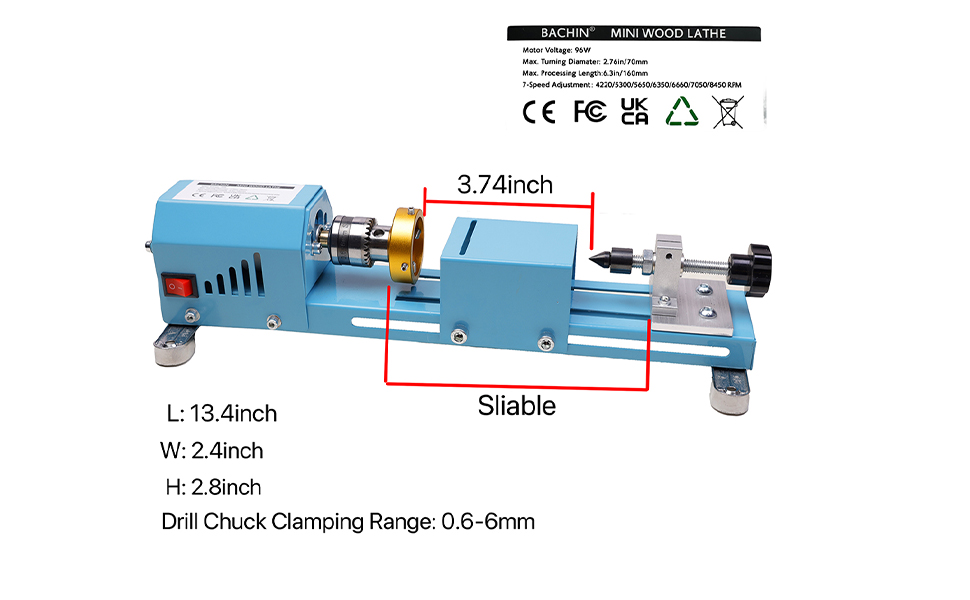
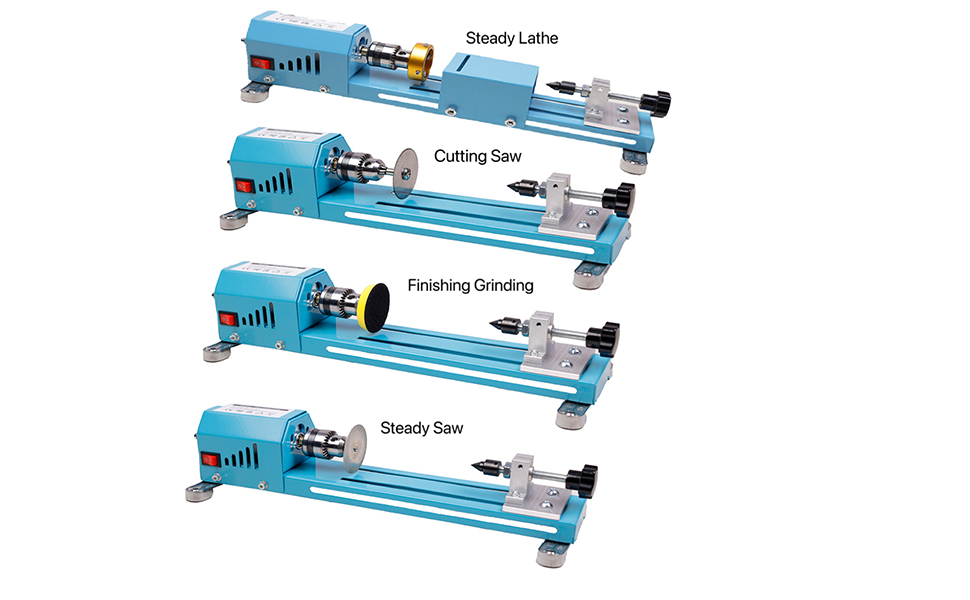
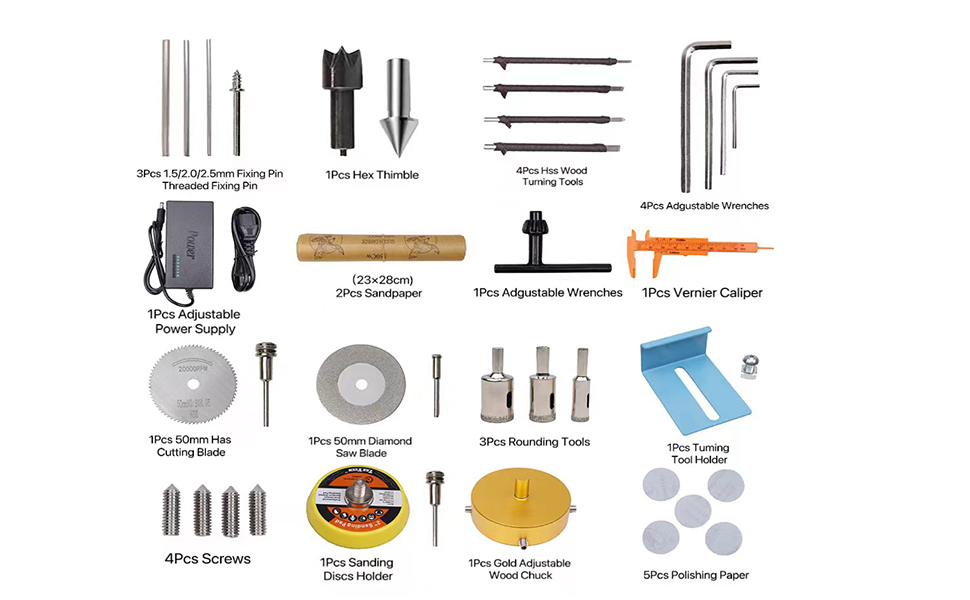
The BACHIN Mini Lathe Wood Lathe Machine is a compact, multi-purpose woodworking tool featuring a robust 96W high-frequency motor with 7 adjustable speeds. Built with a sturdy aluminum alloy base and steel headstock, it ensures minimal vibration and precise operation. Equipped with a gold adjustable chuck and 4 professional HSS tools, this lathe supports cutting, grinding, polishing, and milling on wood and other materials. Ideal for DIY enthusiasts, it offers portability without sacrificing performance, making it a top choice for detailed small-scale woodworking projects.


| ASIN | B0D73P7RHS |
| Batteries Included? | No |
| Batteries Required? | No |
| Best Sellers Rank | #97,676 in Tools & Home Improvement ( See Top 100 in Tools & Home Improvement ) #5 in Power Wood Lathes |
| Color | Blue |
| Customer Reviews | 3.8 3.8 out of 5 stars (807) |
| Date First Available | June 14, 2024 |
| Included Components | Wood Lathe Milling Accessories, for Wood Polishing, Grinding, Cutting and Milling |
| Item Package Quantity | 1 |
| Item Weight | 4.97 pounds |
| Item model number | Mini Wood Lathe Machine |
| Manufacturer | BACHIN |
| Material | Aluminum |
| Part Number | Mini Wood Lathe Machine |
| Power Source | ac_dc |
| Product Dimensions | 13.4 x 2.4 x 2.8 inches |
| Size | Large |
| Voltage | 110 Volts |
| Wattage | 96 watts |
F**H
Better Item Description & Measurements
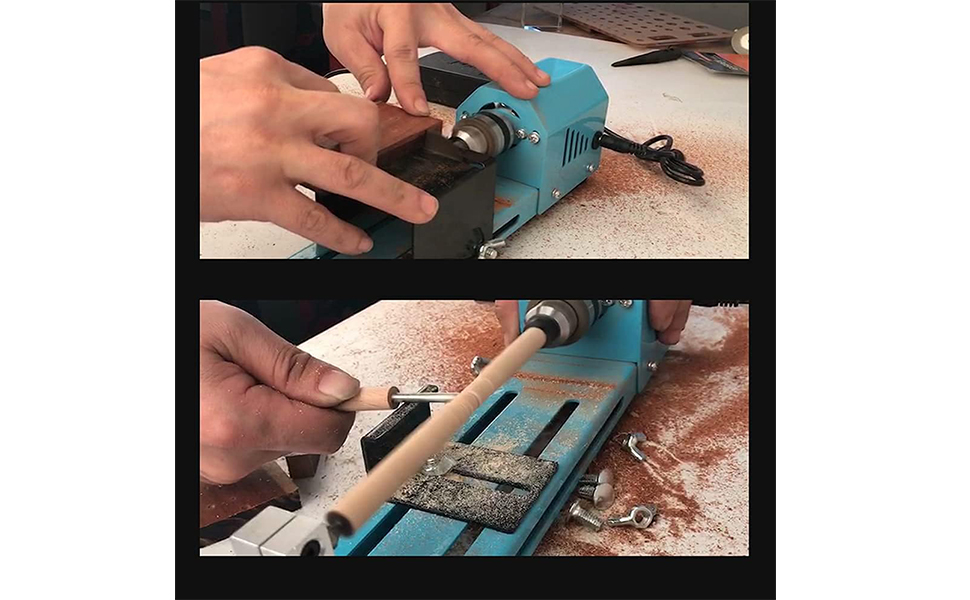
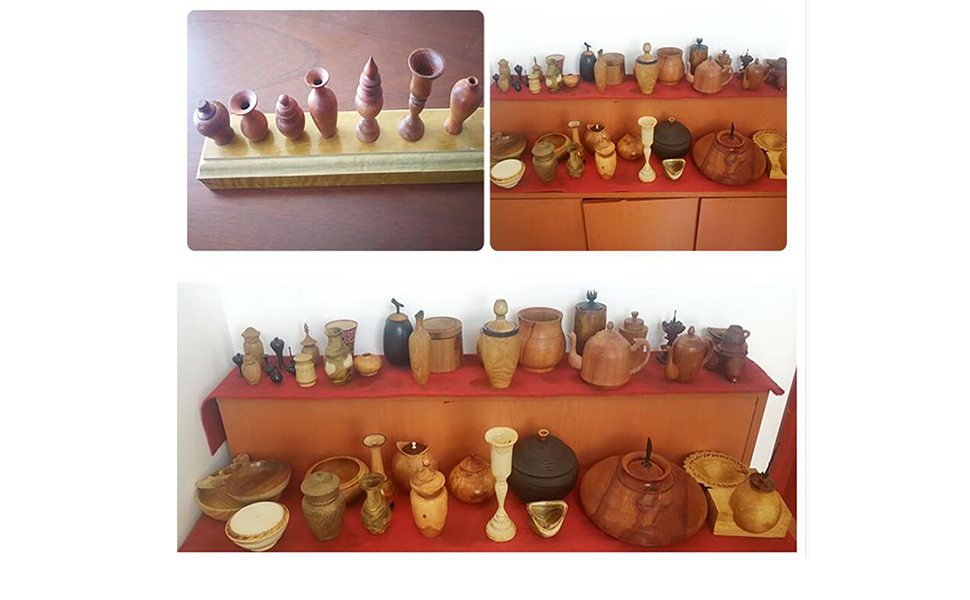
Okay, the product description is terrible, but the pictures are fairly correct. Contrary to the description, there are no acrylic or plexiglass parts. The mini t-track base and seats are aluminum. The covers (beige, no company logo) are painted sheet metal. The only plastic is the switch, plug, and power supply. The overall product length is 12", height just over 2.5" (roughly 2 5/8"), and width just over 2.25" (roughly 2 5/16"). It uses a sub-mini t-slot track/base, so normal t-slot tracks and/or bolts will not fit (size or spacing). The maximum wood/material turning diameter is about 2 1/4" to 2 1/2" (70mm). Smaller diameter pieces are easier to work with. The maximum wood/material clamping length is roughly 5," but the lathe can handle a roughly 7" length of material if you turn the tailstock around and let it hang off the end of the base (note the screws may or may not reduce the maximum turning diameter in this configuration). The only effective way I saw to expand this lathe (optional) was to purchase a second lathe and cut off some of the track from that one. I left about 4.25" of track under the second motor, which is now used as a mini grinder with a sanding disc wheel attached. The lathe, with new track, was bolted to a piece of wood, making sure all was aligned as straight as possible. It can now handle material up to about 12-13" long, which is about the max a mini lathe like this could realistically handle. The three-jaw drill chuck capacity is roughly 1/4" (6mm). The included screw drive (mandrel) for this chuck (spins the wood/material) is similar to the mandrels used with Dremel's polishing wheels. That little screw drive (mandrel) works okay, but I purchased two Plum Blossom thimble drill bit lathe drives (6mm drill shafts with 8mm & 14mm lathe heads) from China (eBay) which work even better. The speed of the motor is controlled by a small switch on the 110/240v power supply. The speed range is 4000-8000 RPM in seven power steps (12/15/16/18/19/20/24v). Since this lathe works similar to a Dremel tool (little nibbles at high speed, not sheer motor horsepower), I don't recommend even slower speeds using a dimmer switch or similar. The wood/material to be turned should be as round as possible before starting. If you're using square material, cutting off the corners (after you've marked the center at each end) will reduce time and lessen the chance of tool kickback. Of course, make sure the wood/material is centered at each end before starting. Position the tool support (angle aluminum) as close to the turning material as possible to reduce tool kickback and increase the smoothness of the cuts. If necessary/possible, turn the tool support around. I cut the screw slot in that tool support a little deeper to allow for slightly greater adjustment. I'm not very impressed with that tool support, so I may eventually fabricate a wider, more adjustable, tool support. When carving, take small slices/nibbles instead of jamming the tool/chisel blade into the wood/material. Again, this lathe works similar to a Dremel tool (little nibbles at high speed, not sheer motor horsepower). Slower speeds will work just fine for most wood or plastic materials, while harder wood or soft metals will usually require faster speeds. The included starter set of chisels isn't very good. The chisels do work, but not great. I recommend the Harbor Freight "Wood Carving Set" (item #98195), but there's many options available in a small size suitable for this lathe. Make sure your blades are sharp and remain sharp as you work. Hold the chisels firmly. Curved shaft chisels will bite into material quicker, so watch out for kickback. And, of course, if you want to work with metals, you'll need chisels for metal. By the way, the second cover, not over the motor, is for small circular saw-style blades, effectively turning the lathe into a mini table saw. The blade with proper mandrel (neither included) fits into the drill chuck and the slot in that cover straddles the blade. The material you're cutting rides on top of the cover, cut by the exposed blade. Be careful. There's absolutely nothing protecting your hands & fingers from that very sharp, very fast spinning, blade. That should be enough to get started. Practice on scrap pieces before trying anything important. This is a fairly versatile little lathe. Watch some YouTube videos for ideas. I use mine primarily to make small wood or plastic fishing lures, plugs, and floats, none easily done on a larger lathe.
D**H
Good little device IF you know what you're doing! Read my Top 10 Tips!
READ THIS BEFORE BUYING OR IF YOU BOUGHT ONE AND QUIT USING IT. Here are the main problems I see with a lot of people who write bad reviews about these types of what I call "micro lathes": #1. Not centering wood between the head and tail stock properly. This will cause the wood to shake and potentially fly out, which brings me to #2 and #3. #2. Not firmly securing the wood to the head and tail stock. I didn't use the little screw bit that came with it and instead took the advice of another reviewer and filed the tip of a #1 Phillips head bit down a little and pounded it into my wood. I also gave the tail stock a couple taps with the hammer to make sure it bit into the other side of my wood. #3. Running the lathe too fast. Cranking up the RPM's isn't necessary for turning wood and won't compensate for dull tools. You're also more likely to stall the motor and risk your wood piece flying out (see #1). I turned some oak dowels at the first and second speed settings with no trouble and minimal vibration, and the higher the RPM's the more it shakes. At the second speed setting I was able to hold the micro lathe still with my left hand and turn the wood with my right hand. #4. Trying to turn soft wood. You'll have more success if you turn harder woods like maple or oak. If you cut down a pine 2x4 for your first couple of tries you're going to be disappointed because it won't cut so much as it will spread/smear for lack of a better word. #5. Not using the right tools in the right manner. I had never turned wood before but watched a lot of lathe videos before deciding to purchase this micro lathe (I do other woodworking though). It doesn't matter if you're using a $5k lathe or this $41 lathe, wood is going to respond the same. You will experience "catches" if you aren't holding your tool in the correct position, poor results if you are turning too fast, poor results if you're using low quality/difficult wood, etc. If you're trying to remove a lot of wood use one of the roughing tools, there's a curved one and one with a 90 degree angle. If you're seeing sawdust and not little slivers of wood you're not doing something right. The other tools are for finishing and finer detail. #6. Being shocked by how small this thing is. Again, I think we should call these "micro lathes" because mini lathes are an actual category and these are not one of those. If you need to turn really small things I think something like this would be preferable because of the level of detail you can get with the appropriate tools. #7. The tools that come with this can be used. The jury is still out but I experimented with heat treating and tempering some of the tools to make them more useful and extend their life. I heated 4 of the included tools until they were glowing orange and quenched them in vegetable oil (not water) and then heated them back up to a glowing orange and let them air cool to room temperature to temper the steel. In theory this might allow the steel to hold an edge longer. Heat treating and quenching should make the steel harder but more brittle and heat treating again and allowing to cool slowly will improve the metal's toughness (tempering). I then honed the edges with a whetstone which I would recommend regardless of whether you choose to try to heat treat and temper. Any tools you buy will need the edges touched up from time to time, they're no different than your kitchen knives. #8. Adjust the guard as close as you can to your wood. The farther your tool is from the wood the harder it will be to control. #9. If you want to make a dowel out of square stock remove as much wood from the edges as you can before putting it on the lathe. If you choose to not do this use one of the roughing tools and go slowly. #10. Invest in some better (but not great) quality tools. The included tools will work but will require frequent resharpening and probably won't last too long for you if you're turning a lot of wood. A $100 set of tools will also work but so will a $25 set from Harbor Freight, it's all in how you take care of your tools. And if you invested in a $41 micro lathe chances are you're probably not really serious about wood turning or just want to turn really small things. I hope this helps you. This is a purely unsolicited review and I did not receive anything from anyone for my opinions and advice. My first attempt with the lathe was to make a Raketti Block, and science trick toy that demonstrates Bernoulli's principle. The only places I could find to buy one of these was Grand Illusions in the UK and a specialty puzzle dealer in Finland. I was pleasantly surprised to find mine worked as well as my Finnish version.
J**R
Works great! (encountered issues but was my fault)
I admit, I was pretty frustrated with this tool until I figured out what i was doing wrong. If you have had issues, please read this first before you trash the seller with a poor review. I promise that I am completely unbiased. I am just a buyer like you. I bought this set because I want to build a chess set (see photo). This was the cheapest lathe I could find so I jumped on it. It wasn't doing the job, at first, either the wood would eventually be stripped or it would split. Either way, it removed any and all chance of being able to accomplish what I was hoping to. Watching the video again, they used some weird needle things to cut a hole in the wood. I've never seen those before but pulled out my power drill and a small drill bit. This is when it started splitting, but there was definitely good progress from when I hand-screwed it directly into the wood (it would start to strip just as a screw might). So looking again, I used a larger drill bit (should've known from the beginning), and it did the trick! No longer did I have to worry about the pieces breaking! I didn't expect that to be enough of a fix but it was! FYI, I've only completed two pieces now but will be making more to come. All that to say, if I run into more problems, it likely won't be mechanical (unless the tools they gave break or dull quickly, which I am a little worried about but it's too early to say). Now it's worth noting that this does not come with reasonable instructions and so you might need to learn by trial and error first. Google might be a help but I was stubborn. A couple tips: - I didn't know how to use the cutting tools they gave. I thought using it higher on the block would work best bc the wood would be turning into it but I actually found it to be more effective when I used the tool lower on the block than higher. It doesn't make logical sense to me but I'm not complaining bc it works. - if you can stabilize it, that would probably be best. Mine is on carpet and kinda moves away a bit and vibrates a decent amount. Does the job though - I've been using it on the second lowest speed and it's been fine. But I'm curious what happens if I speed it up. I'm thinking that might be good to get a cleaner finish once it's mostly done being carved, but what do I know? - it doesn't make much of a difference whether the shiny part of the tool is up or the black side. This is good for me bc I like the triangle piece for cuts in either direction - the triangle piece is going to be your hero. The others haven't worked as well for me and I find the triangle tool can do just about anything I'd want it to do anyways. I hope all of this helps!!! Be safe and make cool stuff! Tldr; If it strips or splits, try using the proper sized drill bit to cut the hole before screwing your piece on. And watch the video a couple times too if you're confused about anything else. (you could probably skip to the second half)
J**.
Useless trash, unless you mod it
This is dumb. Too underpowered to even turn pen blanks without hanging up and catching constantly. POS motor and fitment, just cheap trash. And the chuck sucks. I stripped out their joke of a motor and refitted the frame for an old craftsman motor and chuck. Works great now. I guess $30 is worth it to avoid milling and machining, BUT ONLY IF YOU DON'T MIND DIY!!! I had an old drill and I'm lazy. Otherwise, this garbage would have gone straight back to the junkyard it came from. Trash
R**R
It's good for learning basic cuts
If you have zero experience with a lathe and or are only planning to make little pieces less than 4 inches this is a good tool to learn on but if you enjoy it you will probably find yourself looking into a larger lathe. The tools like every one else says are hot garbage so toss those and get a different set. Also keep your expectation reasonable. This lathe is tiny and not very powerful so it will stop and bind up from time to time. Try to avoid starting with square blanks as that causes the majority of the binding issues. I also suggest you mount it in a vise or fashion a jig for it as it's quite light and will move around on you otherwise. I also suggest fashioning a longer tool rest as the one supplied is entirely too short. With all that said at the price point it's at and what it can do it's not a bad little tool if you don't have high expectations in the first place.
I**G
It DOES work
I know some reviews here have said this lathe doesn't work, but it does. There are a couple important things to remember: you are not King Kong, do not try to gorilla your work - it spins fast, so a light touch with any sandpaper will do; use sharp tools - dull tools will create drag and slow the motor. The device is quiet. I've only used it on its lowest speed setting, and it works well and quietly. You can have a conversation while using it - but don't, concentrate on what you're doing! This is a well-spent $35.
Z**S
Went kapoot after 4-5 runs.
Worked really well for about a week (minimal use. Maybe used it 4 times total, with a total run time of about 2 hours) before it decided it just doesn't want to work any more. I never let it over heat, never put too much pressure on it, and never got the motor wet while sanding. Buuuuuut it just decided it didn't want to work anymore and I don't have a clue how to get ahold of the company. Ended up ordering a Vevor model. Might keep this one for spare parts, I suppose. 2 stars because it worked perfectly up until it didn't.
H**N
Great choice for a first timer turning small projects!
My girlfriend wanted some ear plugs for Christmas, so I decided to take a chance and buy this lathe to make some. So far, results have been pretty good! But there are some things you can do to make this more efficient. 1: Take the tools that this comes with, and throw them directly in the trash. They are brittle, dull, and frankly useless. But don't waste money on top tier tools; do yourself a favor, and grab a $10 set of carving tools from Harbor Freight. They are the perfect size, and the lathe isn't powerful enough to do too much damage to them. They work extremely well for this lathe. 2: MOUNT THE LATHE! Make sure that the lathe is mounted to something heavy and sturdy. I had mine mounted to a workbench, but put it on some blocks that can be clamped to the bench to give me a better height experience. Keeping the lathe stable starts with mounting. 3: Spend a little time with your set up. Mine came pretty straight out of the box, but the trick is in your wood prep. Take your time finding the center of your piece and make sure it's secured correctly. I use a spring loaded punch, then drill a small pilot hole for the screw. Secure the wood to the screw, and then line up the tail stock with your punch on the other side of the piece. Have your tail stock baaaarely tightened, then turn on the lathe WHILE HOLDING THE TAILSTOCK BASE. It can adjust quite a bit, let it wander a bit until you find the correct position. You'll know it's right when it's smooth and quiet. Then you can clamp down the tail, and give the rod a tap to make sure it's secured. You can also grab a 3 jaw lathe chuck for drills, and that works pretty well here too. 4: Don't mess with the speed too much. The lowest setting is 4000 rpm which is the highest speed on most quality lathes. The only time I'd turn the speed up is sanding a piece. 5: The best option for a parting tool for this little lathe I've found is a coping saw (again from HF.) A hacksaw blade will oddly dull too quickly, but a coping saw blade is meant for wood and super thin. Eventually, I'll probably throw in a higher quality motor with a little less speed, and a little more torque. I'm also working on making a new tool rest that mounts on the side of the aluminum that's about twice as long since the included rest is short and can get in the way of the tail stock. Overall, a good little tool for $40 when you use it correctly. A little patience, and some youtube, and you'll have a lot of fun.
Trustpilot
Hace 2 meses
Hace 2 semanas