We remain fully operational. Our teams are working around the clock to ensure your deliveries continue safely.

Descargar la aplicación


Servicios al cliente
Sobre nosotros
Copyright © 2025 Desertcart Holdings Limited
Descargar la aplicación
Buy anything from 5,000+ international stores. One checkout price. No surprise fees. Join 2M+ shoppers on Desertcart.
Desertcart purchases this item on your behalf and handles shipping, customs, and support to Panama.
🚽 Upgrade your flush game with KOHLER’s precision-engineered valve kit!
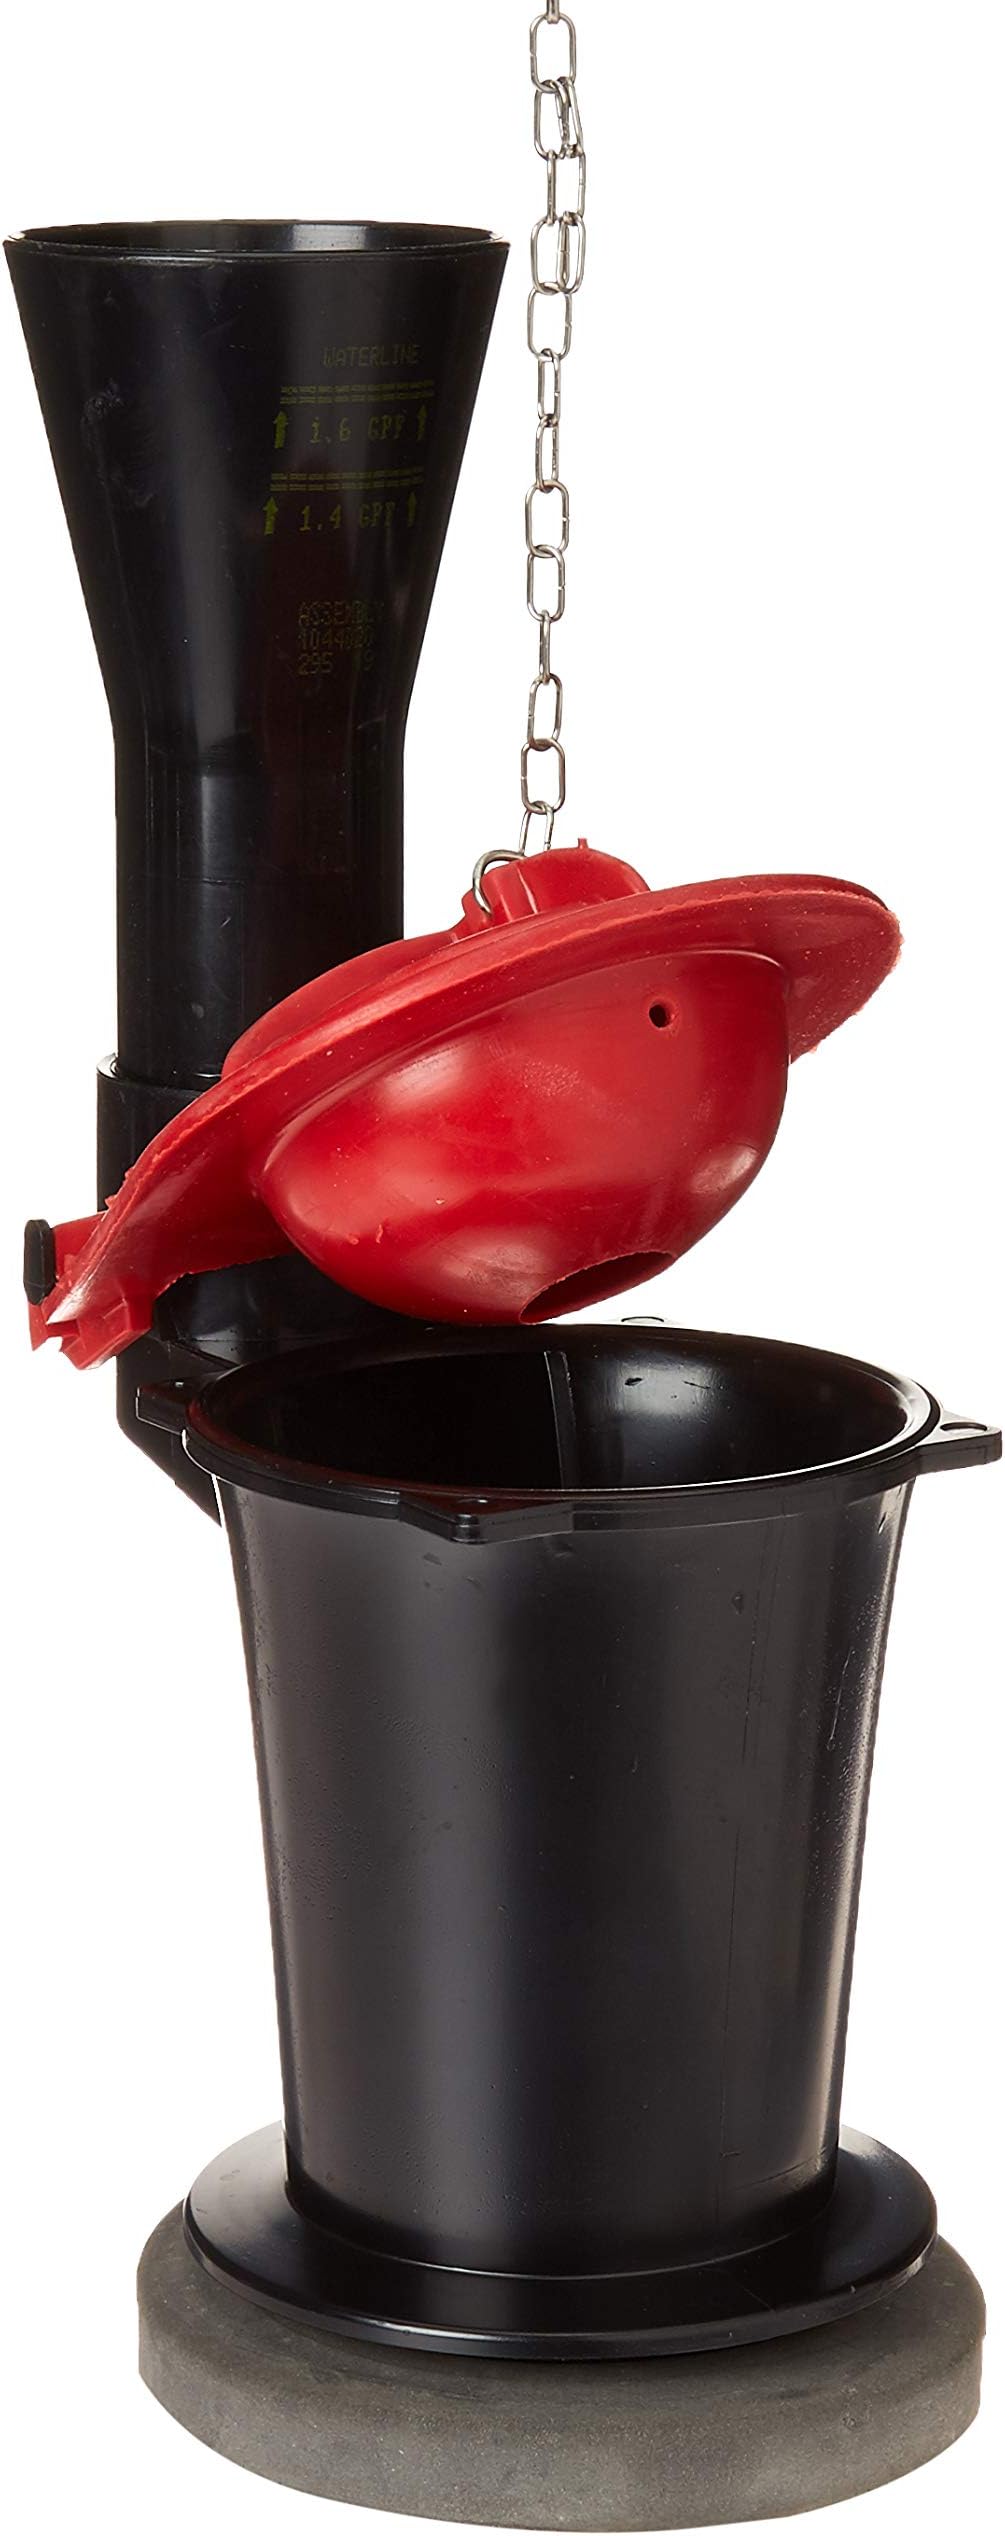
The KOHLER 1044458 Flush Valve Kit is a genuine replacement part designed to maintain original product performance and extend the life of your KOHLER toilet. Featuring durable metal construction and standard 2-inch NPT flare connections, this kit ensures a reliable, warranty-safe upgrade that’s easy to install and built to last.


| ASIN | B005WL28KC |
| Best Sellers Rank | #54,029 in Tools & Home Improvement ( See Top 100 in Tools & Home Improvement ) #62 in Toilet Flush Valves #4,809 in Kitchen & Bath Fixtures |
| Brand | Kohler |
| Brand Name | Kohler |
| Connector Type | Flare |
| Customer Reviews | 4.7 out of 5 stars 572 Reviews |
| Exterior Finish | Unfinished |
| Global Trade Identification Number | 00650531286864 |
| Included Components | Flush Valve Kit |
| Inlet Connection Size | 2 Inches |
| Inlet Connection Type | Flare |
| Item Dimensions | 5.9 x 14.5 x 6.2 inches |
| Item Type Name | Genuine Repair Part |
| Item Weight | 16 ounces |
| Item dimensions L x W x H | 5.9 x 14.5 x 6.2 inches |
| Manufacturer | KOHLER |
| Material | Metal |
| Material Type | Metal |
| Model Number | 1044458 |
| Number of Ports | 2 |
| Outlet Connection Size | 2 Inches |
| Outlet Connection Type | Flare |
| Size | Medium |
| Specification Met | not_applicable |
| Thread Size | 2 inches |
| Thread Type | NPT |
| UPC | 650531286864 |
| Unit Count | 1.0 Count |
| Valve Type | Float Valve |
J**N
Install tip for easy replacement, as good as new!
Installation Tip: Apply mild soap between valve housing and rubber seal to allow rotation to lock into place. Perfect factory replacement flush valve for our one piece Kohler model # K3489 with tall tank. Works like new.
A**R
Another helpful Tip!
This is a genuine KOHLER replacement part that is KOHLER quality, not some after market cheap copy such as a flapper I ordered when I was not paying attention! Thanks to TekLord's helpful instructions (see his comments) the installation went smoothly, but I could not have done it without his help!! My toilet is once again working the way it did when it was new, however I did learn one other tip that I'll pass on to you. I had adjusted the water level previously by turning the adjusting screw Clockwise so that it would allow a higher water level in the tank and consequently more water per flush. As I found out....It was a bad idea, as it caused me some problems. After installing the flush valve I shut the water line off at the wall so that I could tell if there was any leakage at all from the new Flush valve assembly. As I sat there watching it I saw the water level drop slowly to a certain point and then stop. I also noticed a thin stream of water coming from the fill tube running down the inside of the overflow pipe. I thought , "GREAT! Now I have to replace the the fill valve! :^( I went on line to see if I could find some instructions for checking the fill valve. I did, and in them I found that the tip of the water tube that runs from the fill valve has to be above the tank water level otherwise it syphons water back into the overflow. so I looked at the overflow tube again and found the proper water level mark...adjusted the water level screw counterclockwise to drop the water level to that mark and Voilà, the water stopped syphoning! I shut the water supply line off and waited 3 hours to check the tank water level. It stayed right at the level of the mark! YES !!!!!! :^)
R**R
Works perfect
Exact replacement part for a Kohler one piece toilet
T**T
Thanks to the advice of others this was fairly easy
Replacing this part can be a pain. I followed the steps and advice of others and found the installation to be fairly, easy and in my case, it was even trickier because the toilet access is under the counter top with only ten inches of access. But based on wonderful advice and plagiarized instructions of WJ and R. Savage and others I’ve come up with an anal version of steps for installation. YOU HEAR YOUR TOILET RUNNING -FINDING WHAT IS LEAKING 1. Turn off the water supply to the toilet. 2. Observe where the water level stops. If it stops at the flapper then the surface needs to be cleaned on the flapper as well as the rim of the flush valve. Any signs of wear replace the flapper. Be careful when removing or replacing the flapper as it can cause the seal to leak at the bottom of the flush valve. Turn the water supply back on and fill the tank. Flush the toilet a few times and verify the leak has been fixed. 3. If the observed leak with the water supply shut off continues to drain the tank to the bottom, then your problem is a bad seal or the plastic locking tabs on the flush valve have broken off and no longer supply the desired tension for the flush valve’s seal to the opening in the bottom of the tank. REMOVE THE FLUSH VALVE TO REPLACE THE SEAL OR TO REPLACE THE FLUSH VALVE AND SEAL ASSEMBLY IF THE TABS ARE BROKEN 1. Remove flapper on existing flush valve. 2. Remove existing flush valve by pushing down on the valve and twisting to unlock it for removal. This will remove or drain most of the water from the tank. Remove the seal off the bottom of the flush valve. Inspect the locking tabs on the flush valve and replace the assembly if any of them are broken. 3. With the rubber seal removed from the existing flush valve (if it is okay) or with the rubber seal and red flapper removed from the new assembly trial fit the flush valve in the opening on the bottom of the tank. Do not rotate it. You want the valve in the position where you can pull it straight up to remove and drop it straight down into the opening to install. The goal is to mark the exact position so you know where to initially place the valve for installation. In my case, the top of the plastic valve was touching the back of the tank. At the point where the valve touches the back of the tank, using a silver sharpie draw a vertical line in the black plastic on the valve and a black sharpie to continue the vertical line on the inside of the tank. At this point, with the flush valve in its initial insertion position, with no seal attached you should be able to rotate it to a locked position (all three tabs will be rotated approximately 20 degrees or so) and the valve will be loose but unable to be removed. Rotate the flush valve back to your starting position marks and remove it. INSTALLATION STEPS 1. Dry the locking surfaces of the porcelain hole Inside the tank thoroughly. 2. Lubricate the new rubber Seal by generously apply olive oil to the top, bottom, inside, and outside surfaces. Also lubricate the area of the flush valve where the flush valve gasket is placed on the bottom of the flush valve. in addition, lubricate the porcelain surfaces upper and lower where the valve seal and plastic tabs rotate. 3. Reinsert the lubricated rubber seal back onto the bottom of the flush valve. The tapered edge of the seal should be on the up side. 4. Clean your hands washing them thoroughly. You will need a firm grip to twist the part into place, and any oil or residue could make it difficult to handle securely. 5. With the seal pushed up Insert the flush valve in the hole in the bottom of the tank aligning it with the marks on the tank and upper flush valve black surface marked earlier. In this position one should be able to fill the valve is in the correct position for rotation by slightly moving it left and right. 6. Secure the flush valve to the tank opening with the aide of a softball in the mouth of the flush valve press down firmly and twist the flush valve into place locking it in the opening. Apply force carefully to avoid cracking the part as the flush valve only needs to rotate about 20 degrees or so. In my installation (and starting point) the flush valve assembly ends up parallel to the back of the tank with the drain hole facing the fill valve. 7. Install red flapper while supporting the flush valve to minimize any force. Turn on the water supply to the tank and verify proper operation by flushing the tank several times and then monitoring for no leaks (water level stays constant). Note1: As stated by others if you are having to apply a lot of downward force you are most likely not lined up correctly with the opening. Good Luck! Take your time and be patient, the fit is tight by design. Note2: The idea of using a softball was brilliant. One can use a small towel to ease the force of the flush valve rim on your hand but with my cramped area it (the softball) made all the difference.
I**E
INSTALLED NEW FLUSH VALVE ASSY TONIGHT
Installed one of these tonight. Have to agree with the Olive Oil part in the other reviewers comments. First I tried to install without it and could not get it to turn. Then used a couple of squirts of PAM Olive Oil on the bottom of the tank and on the top of the gasket --- much easier and got it locked into place. I have to also comment that you really need to push down hard to get the tabs under the lip to rotate it -- harder than you might think (I'm repeating this even though it have already been commented on -- you need to PUSH DOWN HARD). I also found the same issue reported by another reviewer. Toilet was installed new in about 2007 -- recently I started having the toilet run to fill for about 10 seconds every 15 or 20 minutes minutes or so... 1st I just ordered a new gasket thinking it needed to be replaced-- but, when I removed the old Flush Valve to inspect and replace the gasket I found 2 of the 3 locking tabs were cracked and bent back (no way it could be locked into place with a new gasket). New Flash Valve assembly is installed solid -- no leaks as of about an hour ago so I think all is good. For info -- you don't really need to get it to rotate very far at all -- maybe 15 or 20 degrees -- that's plenty to get the tabs locked under the lip of the bottom of the tank. For the value rating -- much cheaper than calling a plumber.
C**5
Perfect fit!
Perfect OEM fit. Easy installation! Could not be happier. Only issue is wrong item number sent 1st. Gave them a chance to make it right and they didn't disappoint.
S**E
The first one lasted 4 years. Buy it it's your only option.
These were hard to find at the Lowe's in the Home Depot and know you're getting the right part so I just went ahead went through the dimensions on the ad and this is it it works great.
M**K
Kohler 1044458 Flush Valve Kit
It's expensive but probably the most reasonable priced of all I found. When I received it the gasket was very warm and soft and Squishy so it was very easy to install this thing. Online you may see that people complain that it was very difficult to install.
Trustpilot
Hace 1 mes
Hace 3 semanas