


Buy anything from 5,000+ international stores. One checkout price. No surprise fees. Join 2M+ shoppers on Desertcart.
Desertcart purchases this item on your behalf and handles shipping, customs, and support to Panama.
๐ Light up your nights effortlesslyโbecause your pathway deserves the spotlight!
The Moonrays 95534 Tier Light Kit is a 10-pack low-voltage incandescent landscape lighting solution featuring 4W bulbs, a dusk-to-dawn photocell sensor for automated operation, and 50 feet of durable 18-gauge cable. Designed with black plastic fixtures and frosted lenses standing 9 inches tall, this cUL-listed kit ensures safe, stylish, and energy-efficient illumination for patios, pathways, and outdoor steps.

| ASIN | B000Y4BTW0 |
| Best Sellers Rank | #531,475 in Industrial & Scientific ( See Top 100 in Industrial & Scientific ) #4,605 in Incandescent Bulbs |
| Brand Name | Moonrays |
| Brightness | [APPROX] 160-400 lumens |
| Bulb Base | Wedge |
| Color | PlasticFrosted Lenses |
| Control Method | Touch |
| Controller Type | Remote Control |
| Customer Reviews | 4.3 4.3 out of 5 stars (1,351) |
| Efficiency | 2.027 lumens/watt |
| Embellishment Feature | Moonray Design |
| Finish Types | White |
| Fixture Type | Non Removable |
| Global Trade Identification Number | 00062964955345 |
| Included Components | 10 path lights, power pack and low voltage cable |
| Indoor Outdoor Usage | Outdoor |
| Installation Type | Freestanding |
| Item Dimensions L x W x H | 11.75"L x 9.75"W x 11.75"H |
| Item Type Name | 4W Wedge BaseBulb (#95503), Photocell Controlled - Dusk To Dawn Operation, 50 Ft 18G Low Voltage Cable, 10connectors, 10 4 Watt Bulbs, |
| Light Color | White |
| Light Fixture Form | Path |
| Lighting Method | Incandescent |
| Manufacturer | Moonrays |
| Manufacturer Warranty Description | 1 year limited warranty. |
| Material Type | Plastic |
| Model Name | LowVoltage Landscape Lights, 10Pack Kit, uses |
| Model Number | 95534 |
| Mounting Type | Floor Mount |
| Number of Items | 1 |
| Number of Light Sources | 10 |
| Other Special Features of the Product | Photocell Operated |
| Power Source | Corded Electric |
| Required Assembly | Yes |
| Room Type | Patio |
| Shade Color | White |
| Shade Material | Plastic |
| Specific Uses For Product | Lamp,Pathway |
| Style Name | 10 Pack Kit |
| Switch Type | Touch |
| UPC | 803982755162 062964955345 620870682436 |
| Unit Count | 10 Count |
| Voltage | 120 Volts |
| Water Resistance Level | Waterproof |
M**R
Work great
Great product for a great price. Lights look great at night. Nice and bright. Fraction of the cost compared to HD. Plug it in to try each light after connecting. Sometime the connector might miss the wire so a simple readjustment of the wire might be necessary. This is more difficult to do once all the lights have been connected but checking them one at a time is easy. I used the 18 AWG wire that came in the box and it worked fine for me. You can add an additional 2 lights (sold separately on amazon) for a total of 12. I have 12 connected and no problems the last two months. Update - I've had these about 4+ years now. Still working great. I do take then inside during the winter and put back out in the spring. The only thing I've had to do is replace a few bulbs. Would recommend.
S**S
Don't be scared off by some of the negative reviews!
OK... Best BANG for the buck. 10 lights for $40. Can't go wrong. Plastic? Sure! What isn't? Unless you want the $30 -$70 per lamp aluminum ones. If you do, you're not shopping here. My advice follows: 1. Never give an engineer a screw driver!!! An old ET saying :-) . Do not over complicate the process. Take your time and READ the instructions. But, ignore the "Don't connect the light sockets with the power on". Plan your install. Measure how far apart you want your lights. Do the wiring and socket connection where you are comfortable, with the power on. Power the cable, insert a bulb in your socket, bend your wire, insert it through the standoff and push it into the contact pins in the socket. If the bulb does not light, pull it out and retry. Once the bulb comes on, even momentarily, put the cam lock in and seat it. Done. Go on to the next light. Once all are done and lit, assemble the lens assembly and install. Go plant them. As for the comments about the caps fly off. It clearly states in the instructions to "Snap" the caps on. Feels pretty secure on mine. As for the short cord comments: I spaced my 10 lights 48 inches apart, with slack and ended up with 4 foot of cord to go to the power supply. So plan accordingly. In my case, the 4' got me to a wall and a 110vac extension cord got me to my outlet. I am a BIG fan of LEDs. So, I ordered 20 T10 warm white LED bulbs for $15. If the power supply is weak, as some have said, the extra couple bucks for the bulbs will certainly lighten the load. So, $55 total for 10 lamps. Less than half the cost of comparative sets, And, they look good. I may order another set or two. My 2 cents.
T**E
Works fine if you are handy
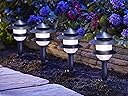
Thankfully I read a LOT of reviews on this product. Also glad that I'm rather handy with tools and a volt-meter. Before you buy this product, ask yourself this: Do I have a volt-meter and can I use it to check every connector in this 24VAC lighting network? Do I have 2 to 3 hours to do the work? I had recently put some solar lights on my front walk, and I really liked the way the looked (they threw a pattern of light on the walk that was really appealing), but that area doesn't get enough bright light during the day to charge well, and the front door light is too bright (at only 60w ???) and it kept the solar lights from turning on. Knowing now that I like the look of sidewalk marker lights, I looked for a wired solution. Being my first attempt at low-voltage decorative lighting, I didn't want to buy something that had a big price tag, so I chose this Moonrays kit (after reading the good and the bad reviews). There were some comments about this product being discontinued, but the build date on my transformer is from June of this year. I believe that many of the bad (and really bad) reviews are due to the connector base. It was designed to pierce the power cable, but I don't think it was designed all that well, and then some tolerance loss during manufacturing makes the connector base be the weak-link in the entire kit. See below for how I dealt with the connector base eventually. It took me about 2.5 hours, at a comfortable pace, to get this set of 10 lights installed and working. About a half hour of that was trying to figure out what I had to do to get the failed connections to work - but more on that later. For best results, locate the 2 extreme end lamps, and lay out the 50 foot of power cable to make sure that it will reach with plenty to spare (you need to account for about 8 to 10 inches of the wire going up and down the stand-off tubes, and from the first one to where you will mount the transformer). Next, use a long tape measure to get the total inches of the run you want to light and divide by 9 (there are nine lengths of cable between the first and last lamp). This number should be the spacing, in inches, of the other 8 lamps. Locate each of the lenses at these spacings and then step back to make sure it has a consistent look. I had 2 immovable stubs of concrete along my path that I had to make adjustments for so I had to make 3 sections look uniform. Next, using a rubber mallet (oh, the heal of an old boot), pound the 10 stakes in at the marked locations, making sure that the stake goes in as straight vertical as possible. If you test fit the stake and stand-off tube first, you'll get an idea of how far down the stake should go into the ground.. There is a rounded top flange on the top of these stakes, with a small hole in it, and I don't know what the purpose of it is but almost all of them broke off when I was gently pounding the stakes into the relatively soft ground. This didn't cause me any problems though. Now the easy work is done. The rest of the work is making the electrical connection for each lamp on the power cable - and since everything is at ground level, you'll be doing most of your work laying down or sitting/kneeling on the ground (with many trips up and down). First, make sure the transformer is mounted where the photocell can react properly to the natural light - be aware of other lighting you might have so that it doesn't trick the photocell into staying off too long - and that the spade connector ends reach it easily. It is recommended to make sure the transformer is unplugged before making any of the lamp connections - I have a different thought about this at the bottom of this review. Now, get comfortable next to the first lamp in the run and have the following items with you: Lamp tube, bulb base (connector), a cam pin, a large blade screw driver, and a bulb. Make a loop of wire go up the tube (from the bottom up) and extend a few inches higher so that you have room to work. Also, before you pierce it with the connector, check to be sure that the post will fit onto the stake with the amount of wire you have going to the transformer. Pinch the cable tight and then guide the cable up into the piercing part of the connector. Now, hold the cable very securely in one hand and the connector very securely in the other. Pressing them hard onto each other, twist and rock them back and forth a bunch of times to help make sure that the piercing points have gone into the conductor inside the cable. THIS is the number one problem that has caused so many bad reviews. The piercing parts are not long enough, or they are pointing away at an angle, and they do not get into the conductor itself. Once you think you have made the connection, slide the connector and cable down into the socket base, install the cam (big end pointing away from the connector) and make sure it goes through to the hinge-hole on the other side, then turn 180ยฐ with the screwdriver. I noticed that if made my connection properly that the cam would feel sloppy at 180ยฐ (the cam device was meant to actually do the piercing for you), so I have most of mine at about 90ยฐ now to help secure the cable to the connector. Before you insert the bulb, look at the connectors in the base where the bulb goes and make sure they aren't touching each other. I noticed that don't have a decent separator to keep them apart and they can touch, shorting out the cable. Now, insert the bulb and power up the transformer. I was NOT able to make the transformer click (if you listen carefully you can here the relay inside change) by just covering the photo sensor with my hand, or even my thumb. Somehow it was still too bright, so I put a strip of electrical tape on it for the remainder of my tests. Try this a couple of times so that you get use to hearing the click of the relay. Did your bulb light up? If so, good! Move on to the second lamp (don't put the lens assembly on the first one yet. Bulb did not light? I got lucky with my first lamp, especially since I only let the cam do all of the work instead of all the extra twisting and pressing that I mentioned above. At first it didn't light but I noticed that the bulb fits quite sloppily in the base, and a couple of nudges got it to light up. But the 2nd lamp did not respond with that. After messing with it for about 10 minutes, taking it apart a bunch of times, I moved on to the 3rd lamp. The 3rd lamp worked after some extra fiddling so I decided that I would just do all 10 before I got all bothered about one or two not working. Well, 6 out of the 10 did NOT light at all. All 6 needed a lot of messing with and I finally came up with the best method. For these steps, I kept the transformer ON. First, have a volt-meter with you. Then, look inside the piercing end of the connector base to see if the piercing points are pointed straight. I found a couple were not seated properly and they pointed away at an angle so it had no chance of touching the conductor. Then, use a lot of force to push and rock the parts back and forth. Then, set your volt-meter to 20vAC range (or whatever scale will read about 13vAC). Put your leads where the bulb contacts are and see if you get 12 to 13 vAC. If not, it will probably read 0 or 1. Keep rocking and forcing the cable/connector until you finally get the voltage to come up. Put the connector into the base and put the bulb in. Repeat until all 10 lamps are lit. After all 10 bulbs are working, assemble the lens assembly (making sure that the top piece is forced on hard so that it clicks into place) and carefully lock them onto the bulb base. Remove the electric tape from the transformer and then go out later in the evening to admire your work. Now, if I was going to do this again, I would throw caution to the wind and do all of the work with the transformer ON and a bulb in the connector while making each connection. This would probably save another 1/2 hour or so, and save a lot of trips up and down and back and forth. My knees really hated me for all the up and down I had to do. But, all 10 lamps work and they look nice. But, I wish they had the same visual effect that the other ones did. Those made a nice pattern of light on the ground while these are just a spread of light.
E**N
Nice landscape lights,
Very nice landscape lights. Good looking. Good amount of light. Easy to install. You can replace the lift bulbs unlike the led landscape lights that you have to replace the entire light. You can buy led replaceable bulbs for these. Much better than solar lights that don't last very long and don't work half the time.
R**Y
Moonrays are my address! The huge fir tree cuts off the front of my house and people cannot find my address. I put these wonderful Moonrays under that big fir tree and tell those who wish to visit me, ""I am the house with the big fir and Moodrays shining from under it' I am always found now. I have had these lights under my tree for over 25 years...this new set is going in today...the old one, to the backyard where it may live out it's life in peace as is slowly goes to pieces! Please keep on making the plug-in type Moonrays, Solar does not work in winter...or under the dark tree. I love Moonrays!
T**J
These low voltage moonray pathway lights look nice at night. They don't actually take that long to assemble and test. You need to spend the time to determine where you want your lights to be which can take more time than you initially planned especially if you make adjustments as you go. Most of my time was spent digging to move plants and to allow for a trench to hide the wiring and repositioning the lights. If you need to make a straight line with the lights, you may want to use a string tied to two or more posts to line up the lights in between. The length of wiring was not long enough for me so I had to buy extra at HD. I would recommend getting a thicker gauge (14 to 16) than the 18 gauge wiring that the kit comes with to allow for longer runs. I also bought some tubing and clamps to protect the wiring going into the power pack. I also bought silicon filled caps to cap off the connection to extend the wiring and at the end of the extra length of wiring. I'm hoping these will be good enough to hide underneath the soil/dirt without any problems. I placed an order for three more kits so I can add more lighting to my garden in my front yard and along a walkway on the side of the house. Update: 06-08-2015 I installed three additional kits that I bought and they all work. The one negative that I got was one of the kits was missing 4 light bulbs. The bulbs come in one 6 pack box and one 4 pack box. I was disappointed when the final 4 pack box I opened was empty. Fortunately for me, I had ordered additional bulbs as the future replacement bulbs so I wasn't stuck with non-functional light fixtures. Not sure if they can send me 4 bulbs to compensate me but I'll keep this review updated when I find out more info. Update: 06-28-2015 The lights are still working although we haven't gone through heavy rain, snow, or freezing temperatures so I'll try to update this in a year's time. I wanted to follow up on my 06-08-2015 update to say that Amazon was able to offer me a variety of options for the 4 missing bulbs and I am happy with their quick response and handling of my situation.
S**Y
Unfortunately I bought this as a gift, and the person receiving these lights did not have an electrical outlet in the back yard, so they could not use them! Very sad, but these thing happen! But anyone who has electrical outlets they are wonderful to have in your yard! Much better than solar lights!
C**N
Bought these to replace broken lights on a 20 year old strand. Work great.
L**S
I have some moonrays installed 25 years ago that still work due to their superior system of connection inside the light tube up of the wet ground, the competion's system of clamping each light to the main power line and then burying that connection underground may work well in a dry desert climate but quickly fail in the wet west coast climate. When moonrays became available again I ordered 3 sets and proceeded to install the first string, after seting up the first light I turned on the control box/power pac to discover it DID NOT WORK! The other 2 power pacs also DID NOT WORK! The instruction sheet that came with the power pac has a hilarious translation from (presumably) Chinese to English and was no help. The moonray instal sheet has a website address that directs you to their 800 phone number, calling that number goes to an answering machine that directs you to leave a message and they will get back to you but they do not call back. Now calls to moonrays find the answer machine full. Just tried the number again and got a recorded message wanting $3.89 to get the new 800 number from directory assistance which produced no answer.Amazon wants nothing to do with this and says go to moonrays for help. Obviously since moonrays ship power pacs that DO NOT WORK and will not stand behind their product every one should NOT BUY MOONRAYS!
Trustpilot
2 weeks ago
1 week ago