

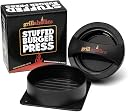



Grillaholics Stuffed Burger Press & Hamburger Patty Maker
Product ID: 20291883
🍔Perfectly uniform patties every press
🧀Stuff with gooey cheese & more
🧼Dishwasher safe BPA-free plastic
Desertcart purchases this item on your behalf and handles shipping, customs, and support to Panama.
🍔 Elevate your burger game—because ordinary patties are so last season!
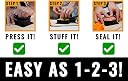
The Grillaholics Stuffed Burger Press & Hamburger Patty Maker is a compact, BPA-free plastic tool designed to create perfectly uniform, juicy stuffed burgers with ease. It simplifies the process of making gourmet Juicy Lucy-style patties by allowing you to press, stuff, and seal burgers quickly, while its dishwasher-safe design ensures hassle-free cleanup. Highly rated and ideal as a gift, it transforms backyard grilling into a creative, family-friendly experience.



| ASIN | B0140PKJUQ |
| Best Sellers Rank | #87,768 in Patio, Lawn & Garden ( See Top 100 in Patio, Lawn & Garden ) #188 in Barbecue Presses & Irons |
| Brand | Grillaholics |
| Brand Name | Grillaholics |
| Color | Black |
| Customer Reviews | 4.5 out of 5 stars 3,353 Reviews |
| Item Dimensions | 4.5 x 4.5 x 2.25 inches |
| Item Highlight | Juicy Lucy Hamburger Stuffer | Dad Grilling Gift | Free Recipe eBook |
| Item Weight | 6.72 ounces |
| Item dimensions L x W x H | 4.5 x 4.5 x 2.25 inches |
| Manufacturer | DSquared International LLC |
| Manufacturer Part Number | 4322437468 |
| Material | Plastic |
| Material Type | Plastic |
| Material Type Free | Bisphenol-A (BPA) Free |
| Number of Pieces | 1 |
| UPC | 646437168106 |
| Unit Count | 1 Count |
T**G
Perfect, yes, PERFECT Juicy Lucy stuffed burgers
I have had my press for about a month, and have made a couple of batches of stuffed burgers (Juicy Lucy) with it. The press works well to form both the cupped bottom and flat top portions of ground beef, and then join the two parts to assemble the stuffed burgers. The burgers from this press are exactly the right size to fit on a bun, too. It is far easier to use my Stuffed Burger Press than to form them by hand, especially when using a soft, creamy cheesy filling (any filling with cream cheese; for example, creamy blue cheese or jalapeño popper filling). My method is to mix the filling at room temp - cream and cheddar cheeses, chopped scallions and minced pickled jalapeños, and garlic and onion powders, maybe some blue cheese and/or cayenne depending on your bravery reading on your dip-stick - put that in a plunge measure (like the Norpro Wonder Cup Adjustable Measuring Cup (Two Cup Size) - it's the same size and shape as the hole in the cupped ground beef), and set it in the fridge to stiffen up. Meanwhile, form the ground beef (using cling wrap so it won't stick to the press), into flat burger tops and cupped burger bottoms. I install the insert, and sandwich 3 ounces of ground beef in cling wrap to press out the flat top (set that aside). I then remove the insert, and sandwich 4 ounces of ground beef in cling wrap to press out the bottom cup (leave in the press). Using the measuring plunger (remember that? It's in the fridge), press out the chilled filling until there is 1.5 ounces of filling above the top and whack that off level with the top using a butter knife. Lift the cling wrap and schmear the filling into the beef cup that's in the press, spread out the filling if you need to, take the cling wrap off the bottom of the top patty, place the flat patty of beef on top of the filling and smoosh in the burger press. Pop the formed stuffed burger out of the press (it's easy since the bottom lifts out) and use your thumbs to ensure a good seal between the top and bottom - cheesy leaks are not good. Take a swig of beer, it will taste like victory! Repeat. I meant the whole burger process, not just the beer. I often freeze them, carefully (again, leaking cheese is bad). Each one goes into a zipper top or vacuum bag, each one lying on a flat shelf (don't stack them until they're frozen) once Lucy is fully formed. To cook, I leave my thawed Juicy Lucy in its sealed bag and cook it sous vide (140F degrees for 90 minutes). I know, the USDA would arrest me, but what can I say, I'm a rebel. ;^) I am sure that you will want to fully cook them to USDA-approved 160F, even though the meat will be dry and tough, but you may like leather. At 140F, the filling is luscious and melty, without the painful, lava-like scalding and mouth blisters. I then extract from the bag, dry both the top and bottom surfaces with a paper towel, sprinkle on salt and pepper, maybe some BBQ or steak rub, and sear these monsters on an EXTREMELY hot charcoal grill for all of 60 to 90 seconds per side to get a nice crust. I never said it was easy, it does take some time and effort, and it does make a mess of your kitchen, but the end result is 110% worth it. The Grillaholics Stuffed Burger Press really simplifies the Juicy Lucy process, makes identical Paleo-friendly, gluten-free burgers, and as a bonus, it cleans up in the dishwasher. I am really happy with mine.
D**S
Great for Low Carb burgers because no exposed toppings to flop out of the lettuce wrap!
I'm not sure if it's the fact that I use 80/20% beef or what, but so far I've used this 3 times and the beef has never stuck one bit. (The ground chicken did stick a little bit but it wasn't a big deal) I don't spray the parts or use parchment paper or anything. At first I was a little clunky with it but then I watched the quick video the seller has showing how to use the press and had a lightbulb moment. It's VERY easy to use. The only thing I didn't do the first time was really seam up the sides of the meat, so my first experiment was almost like a Keto quesadilla - two meat "tortillas" with fillings in the middle. But amazingly it stayed together anyway when my family put theirs on the burger buns (I ate mine on a lettuce wrap and it was AWESOME because there wasn't anything flopping out from on top of the burger patty - it was all inside the meat!). I did sauteed red bell pepper strips& mozzarella cheese on 2, and avocado slices with bacon and havarti in the other 2). Delicious for everybody!! In fact they were so good that I did it again the second time (and this time I put a little meat up on the sides of the press before ... well... pressing, and that created a beautifully sealed burger.) I just fry them in a stainless steel pan piping hot to sear them and then turn the heat down and flip occasionally until done. The third time I used ground chicken and filled them with bacon, avocado and swiss (mushrooms, avo and swiss in 1 of them) and I have to say this one had some sticking issues. I was planning on either spraying it with cooking spray or trying parchment next time, but the chicken meat is dry and sad. I'd never made a chicken burger before, I just thought it would be fun to stuff with things like ham or avo/bacon etc, but chicken meat just kind of absorbs all the saliva out of your mouth and poofs it out of existence. It was a bummer! In fact if I hadn't filled them with fatty deliciousness of avocado I think we would have dehydrated like prunes trying to eat these. :D The beef is rad though and we've become like mad scientists dreaming up future creations with this press. Next time, for my carb loving family members, I'm going to turn the ground beef into a meatball batch (an egg, breadcrumbs, basil and a little grated parm/romano) and fill them with mozzarella and maybe a touch of marinara - throw in a couple roasted red peppers. Toast the buns like garlic bread and perhaps a touch of sauce on the bun as the condiment. This press made burgers fun again.
B**G
Works pretty well
I watched a lot of reviews on that popular video channel and decided to purchase the Grillaholics Stuffed Burger Press. It works fine and I like it (grilling my 5th stuffed burger using it as I write this review). I would have given it 5 stars except for 2 things: 1. There is a bit of a learning curve as to how much meat to use, AND you must ensure that you are pressing evenly (level) which I found to be a bit tricky at first. I have the hang of it now. 2. I couldn't find a link to any eBook anywhere on their web site and no link was included with my purchase. Pretty disappointed with that as I was hoping for some recipe ideas that I might otherwise not thing of. Overall though this is a good press, easy to clean and seems durable. Oh, I do find that wrapping the bottom plate with plastic wrap helps a great deal in removing the patty from the press.
D**L
Excellent press! Here's some simple tips on how to use ;-)
This is really very, very cool! My wife got me a different burger press for Valentine's Day, and it had many issues: 1) to small overall (would make only tiny burgers), 2) the well for the stuffing was way to small (not much room for stuffing), but 3) most importantly, the burger got destroyed trying to get it out of the press (what’s the point then!). I was thinking, this is crazy! Why not have a push up plate under the burger so that you don’t ruin what you’ve just made! Well, that's what this burger press has, and it solves the other 2 issues as well :-) I read a ton of reviews, and ordered this on Prime and got it on a Sunday, and that night we made *great* burgers! I thought it was a total breeze to use, compared to the other press. In part maybe because as I was waiting for it to arrive, I searched around other videos and saw how to use it and got ideas on what to do. I combined about 5 different ideas in to our first attempt. I used 2 pounds of grass fed beef, and then in a large bowl, I mixed in some Worcestershire and soy sauce, along with fresh cut cilantro and some basil, sea salt and ground pepper (no real measuring here, just whatever you like). After needing that to get a good mix, I arranged the meat on a serving plate in a meatloaf configuration and then used a dough scraper to divide in to 4 even amounts (the dough scraper was a great tip that I saw on a video on stuffed burgers, and I ordered that at the same time as the press and it worked great). Then I got a small bowl for the stuffing out and added in some minced garlic, sliced jalapeno, pepper rings and mushroom, and shredded American cheese, and stirred together. Just divide each portion of the meat in to 2/3rds (for the base that you make a deep well impression in to), and 1/3rd for the top. The base just requires a little bit of pressure and a slight bit of turning to get an even patty. Taking the cover off for the well press is a little tricky, but I used a paper towel to get more grip. Then repeat that even pressure and sight turning motion to make the deep and consistent well, removing any excess meat that comes out (just add that to the 1/3rd portion for the top patty for now). Then put the cover for the well back on, make a bit of a patty with the remaining 1/3rd (doesn't have to be perfect, just close enough of a patty to put on top of the base), then press and turn slightly again, trimming any excess off for the next burger. Once you’re done, just press up in the center of the base (make sure it’s in the center, that’ll make it come out easier, and without any damage) to get the patty out, and then plop the patty down on a plate face first, with the base being on top (gravity will unstick the base from the patty). The patties came out looking perfect! Now to address some minor issues: 1) I did notice some slight sticking that one reviewer mentioned, but it wasn’t *nothing* compared to the disaster of the other press. I’m really not worried about this as I made 4x ½ pound burgers without any real issue at all. 2) I'll keep experimenting with getting the cover to the well press on and off, but a paper towel seemed to help. 3) I couldn't find any information about the ebook on the packaging or on the Grillaholics web site, so I may have to call about that (sadly, no customer service e-mail). But these are all *VERY* minor things IMHO. After suffering through a very poor product (which is now sitting in the recycle bin), I'm very happy with this! We’ll be eating the other two burgers for lunch today, and I can see years of use ahead of us with this press :-)
E**T
Expectations met
This did about everything I expected it to. My first experiment was with a basic bacon and mushroom stuffed burger. Since it was the first time I had used it I managed to overfill the bottom portion of the patty a little so for those who take the time I would recommend not using more than about 3 ounces for the first patty before using the tool to hollow it out. It held together okay but as I was cooking I noticed how thin the top portion was so had to cook / flip carefully. It never would have survived the grill so fortunately mine was on the stove top. Additional burgers have came out perfect and held together without issue. I didn't have any issues with sticking but I did cheat and use a cooking spray on the bottom part because I know how difficult a patty can be. I don't see a need for wax paper but others may if they were to use 73/27 or perhaps 80/20. The leaner burger (85/15) was no issue. It is easy to make a half pound burger if ya just fill the thing and pack it so be leery because 1/2 lb is HUGE lol and not the easiest to consume when ya put it on a bun (can't get your mouth around it!) When making a stuffed burger be sure to ease it along when putting the top on. A twist or two or back and forth twisting action will help seal it and keep it together. There are You Tube videos out there that take but a minute to watch, well worth it when attempting to stuff one
J**E
Has problems
The handle that presses meat with a depression for stuffing the burger is very difficult to remove from the attachment that finishes the press. With greasy burger hands it is nearly impossible. It also takes specific effort to line the press up to put the divot into the middle of the patty. That said, I quit stuffing burgers because the payoff is a gimmick with little reward for the effort. Just put your bacon pepper jam on the burger when it's done. Pressing the patty can result in uneven thickness if you aren't careful. It is easy to remove the meat from the ring after pressing, no was paper required. I found that pre-weighing the meat gave me the best results. It can barely fit 8 oz of meat, but it will make mondo burgers like that if you want them. I'd like a mechanical press that delivers pattys at this diameter. But, I do not regret the purchase and I use it often.
J**S
Wonderful Hamburger Press That Lives Up To Its Advertising!
This is a wonderful product. It is very well made, looks like it will last a long time, and does everything the advertising says. My wife and I used ours for the first time tonight, and were quite pleased with it. We made a batch of patties stuffed with cheese and diced onions, and are looking forward to grilling them this weekend. The patties were a breeze to make. They all turned out firm and perfectly shaped, and did not show the slightest sign of coming apart as we put them between individual sheets of waxed paper. (My wife is 75 years young, and said this is the nicest hamburger press she has ever seen.) One thing that may not come out all that clearly in the listing photos though, is that the top part with the handle is actually comprised of two pieces: a smaller press that allows you to mold the bottom part of the patty with an indentation in it to hold the filling, and then a larger part that fits over the indent press, and allows you to squish down the top part of the patty, sealing the hamburger together with the fillings inside. There are several short YouTube clips that demonstrate this a lot better than I can explain it in words, it would probably be worth your while to view one or two of them before doing it yourself.
J**Y
Easy to use and easy to clean
Pros: Easy to use and easy to clean. You can put anything and everything inside your burgers! Cons: None. TLDR: The Grillaholics stuffed burger press is awesome. After a quick web search the most popular recipe for a stuffed burger was made with diced onions, jalapenos, and pepper jack cheese. I prepped all the ingredients and then made my first patty with the burger press. 1. Throw in ground meat for bottom part of patty (after a couple tries I figured out the perfect amount) 2. Press down then remove the inner mold to create a normal sized patty with an indent in it 3. Place a good amount of heaven (onions, jalapenos, and pepper jack) into the crater 4. Starting from the outside, fill in the rest of the top with more ground meat 5. Using the flat mold press down on patty to seal heaven in the patty I now had a stuffed patty but there is more to do 7. Coat patty in worcestershire then season with salt/pepper 8. I smoked the patties at 240 degrees for an hour and a half with pecan, flipping once halfway. BEST BURGER OF MY LIFE My family wants me to cook burgers every weekend now and I don't mind. There are so many combinations I am thinking of trying. My wife wants hers next one stuffed with red wine and garlic mushrooms then melt swiss cheese on top. I am looking into getting a fried egg inside of the burger, they say to freeze the cooked egg so when you put it in the patty it wont squish everywhere, then it thaws out while the meat cooks. With this secret weapon I will become a Burger GOD among my friends and family!!!
H**A
Nasty Burgers
Funciona muy bien, en verdad puedes crear unas hamburguesas rellenas de lo que imagines. Muy satisfecho. Me hubiera gustado que fuera de metal, pero hasta ahorita, después de unas 25 hamburguesas hechas no ha tenido ningún problema que sea de plástico.
W**N
Compact Press
The press has no handle sticking up so easy to store. After shaping the patty’s the bottom of the press moves to push the patty onto the dividing paper or plate. Carefully designed. Warren
J**K
Awesome gadget
I only used this press twice but I'm already in love. The burger patties are all equal size and flat! I could never accomplish that before. I use 125g of beef mince per patty and they fry really well in my cast iron skillet. And it's so easy to get them out onto the plate - nothing sticks. I use my mince chilled a bit and then let it rest for some time before cooking. Lovely product! Great job Grillaholics!
A**R
Awesome
Easy to clean, easy to use
S**E
Excelente regalos para los niños
Muy fácil de usar les encanto a mis nietas y el material es resistente
Trustpilot
4 days ago
1 month ago