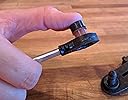


🔩 Shift Smoothly, Save Smartly — Don’t Get Stuck Behind the Wheel!
The BushingFix BP1Kit is a patented, high-quality automatic transmission shift cable bushing repair kit compatible with over a dozen major vehicle brands. Designed for quick, DIY installation, it includes all necessary components and detailed instructions to restore smooth shifting without costly cable replacements or labor fees. Trusted by professionals and backed by rigorous quality standards, this kit is the savvy millennial manager’s go-to for maintaining peak vehicle performance and avoiding downtime.


| ASIN | B06XWDQCR4 |
| Best Sellers Rank | #40,804 in Automotive ( See Top 100 in Automotive ) #11 in Automotive Replacement Shifter Bushings & Components |
| Brand | BushingFix.com |
| Customer Reviews | 4.4 4.4 out of 5 stars (2,050) |
| Date First Available | February 13, 2017 |
| Is Discontinued By Manufacturer | No |
| Item Weight | 0.12 ounces |
| Item model number | BP1Kit |
| Manufacturer | Ascension Engineering |
| Manufacturer Part Number | BP1Kit1 |
| Model | BP1Kit shift cable replacement bushing |
| OEM Part Number | 19316524, 52109781AF, 46790-1R200, 52060164AD, EG2146500D,, TD1146500D, 3382002131, 3382002370, 3382242030, 3382008020 |
| Product Dimensions | 3 x 2 x 1 inches |
D**E
Excellent choice
These bushing are far much better than the original purchases which was just too hard to work with; so I purchased these, Easy to install and have work flawlessly since purchase. If you drive a Toyota model automatic on console shift might as well get a set of these to place in your glove box because when the shift bushing wears out, and it will eventually around 140,000 miles you will go to move, and the shift will just drop all the way down, and you are not going anywhere until replace these bushings. Far cheaper than replacing at a repair shop. I would buy again.
M**A
Affordable and fits
Saved us several times from high costs of repairs. Did it ourselves and it worked like a charm. Fits well durable and affordable. Highly recommend.
R**Y
So far, so good.
Installed about 2.5 years ago, working good so far (2007 Sienna), about 15,000 miles. I also put a couple of 1.25 inch holes in the kick panel to allow me to both inspect the replacement and even temporarily get the vehicle into gear, if needed (using needle nosed pliers). One hole is for the inspecting/pliers, the other hole is to point a flashlight into the area. I'll still have to eventually remove a lot of the dash if the new bushing fails, but at least I'll make it home first.
A**.
BP1KIT
Expensive Nessesary Little Bugger Piece Of Plastic Tiny Little Kit. Be very careful not to drop it or else your doomed. That was my fear if I did.
A**R
Universal fit doesn’t mean it fits great for a specific model
The one I received was black (not purple) and a harder plastic than what some of the pictures show. I have a 2007 Toyota Tacoma and had to use pliers to press the bushing in and again to get the arm on. It was a very tight fit. So far it’s holding well just took longer to install as I was trying to be careful to not break anything else.
T**T
Nice alternative to having to replace the entire Gear Shift Cable on 2007 Toyota Corolla
(See update below for when I installed this bushing) I used a C-washer/clamp to temporarily fix this issue after watching a good YouTube video so I haven't actually fixed it with this bushing yet. However, my lack of initiative shouldn't detract from the value of this relatively inexpensive fix compared to the alternative of the labor & cost involved in replacing the whole cable. Hopefully, as it cools off in Florida (it was a brutal summer), I'll finally get around to doing this permanent fix as I know sooner or later that C-washer/clip will fail at the worst time. My recommendation is to watch the YouTube video on this repair, even the one using the C-washer clamp, as it will make it an easy repair. I just wanted to finally a review in since I've put it off for too long and will update when I install this bushing. 8-20-21 Update-I finally got around to installing this bushing as the shifter seemed to have some play in it lately according to the driver of this Corolla. The instructions left me wondering which side of the bushing (one side is a little segmented along its rim as compared to the other side which is solid all around its rim) faces the driver's side & which faces the passenger side. I finally concluded that the segmented rim faces the driver's side while the solid rim faces the passenger side which makes sense as the segmented side is not going anywhere as the gear shift column is attached to that end of the pin and the segmented side is easier to slide onto the pin. The solid rim side is the side that is open with nothing preventing it from sliding off (aside from a snug fit) which is what happened in the first place requiring this repair. It fits snugly now with no play so I'm happy with this repair. I didn't have an extra C-Washer Clip hanging around after I deformed the one I had on there as a temporary fix, but if this repair is necessary again, I would put another C-Washer Clip on the end facing the passenger side as an added precaution to keep the bushing from coming off again. For what it's worth, it takes 5 minutes to remove the center console around the Gear Shifter (See YouTube video) so take the time & remove it instead of doing what I did the first time when I squeezed my hands in a cramped space scraping them up. It only requires removing about 6 screws & snapping off/removing a few coverings that are made to easily snap on & off or to be easily removed.
J**K
Would not buy again...
Purchased March 2024 because the original broke in my 2010 Forte, fortunately I was in town at the time and could get it towed home because I didn't know what was wrong then. Installed this bushing and have been driving the car since. Today (June 25, 2025) I was 2.5 hours from home, returning from visiting my dad in the NICU, and this replacement broke. Also a good hour from them, but fortunately I recognized the issue immediately and had tools. Removed the center concole and moving the cable directly to get home. Writing this from the gas station parking lot where it happened. I would not buy this product again. If you choose to, I'd recommend buying a spare and keeping it in the glove box with tools. You'll need a Phillips screwdriver, a 10mm socket, and a ratchet with at least a 6" extension (or very short handle). Hopefully you'll have better luck, but I will not be getting this product again. I'm going to order a different brand and hoping it will arrive before I head back to visit Friday night or Saturday. In the meantime, I'm investigating a different fix tomorrow in case it does not get here in time. Hopefully something more permanent.
T**L
2003 Highlander
This worked great for my 2003 Highlander. I didn't pull the whole panel off to reveal the side. I just popped up the top piece that has the cigarette lighter attached. I was then able to reach in and feel the cable link, which is how I'd been putting it back in place when it popped off. I pressed the purple plastic piece into the link, careful not to drop it because I was too lazy to remove the whole side panel and then put the link back in place. This literally took me 3 mins to fix from the moment I opened my door to install to the moment I shut it. I don't know why I waited so long. It was super easy. If you have larger hands then maybe you may have to pull the whole panel off.
A**Y
رغم أنها مجرد قطعة بلاستيكية صغيرة بحجم الخاتم إلا أن أي سيارة لا يمكن لها السير بدونها حيث أنها حلقة الوصل بين عصاء ناقل الحركة (القير) والكيبل الذي يرتبط بتروس الناقل. هذة القطعة تكون عادة ملصقة بالكيبل ولا تباع منفردة وسعر الكيبل عند تويوتا 1,700 ريال غير شغل اليد ولا تتوفر القطعة بالسوق إلا أن بعض ورش السيارات تؤلفها من قطع بلاستيكية أو أغطية قوارير المياة ولكنها لا تضمن ادائها 100%. ركبت هذة القطعة على سيارة لكسوس es300 بشكل مثالي ويمكن تركيبها بسهولة شرط أن تعرف كيف تفتح ديكور عصاء ناقل الحركة فإن لم تضمن فتحه بنفسك فيفضل الاستعانة بفني متخصص حتى لا تكسر الديكور أو تخربه وتركيب القطعة من السهولة و لا يأخذ حتى 10 دقائق فقط اتبع التعليمات التي تأتي معها واستعن بالفيديو المرفق بها وأمورك طيبة إن شاء الله.
S**C
Worked great had my mechanic install it and it shifted perfectly fine after
C**R
Fits perfectly to my santa fe 2013 shifter!
C**S
Took a whole 5 minutes to replace. Seemed a little on the loose side after installation but works fine now.
S**N
The repair kit appears to solve the problem but to pay so much for one little piece of plastic is absurd.
Trustpilot
1 month ago
3 weeks ago