Deliver to Panama
IFor best experience Get the App
💡 Bring your headlights back to life — see and be seen in style!
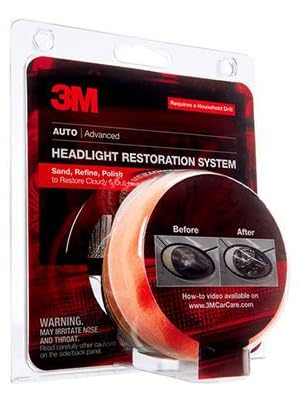
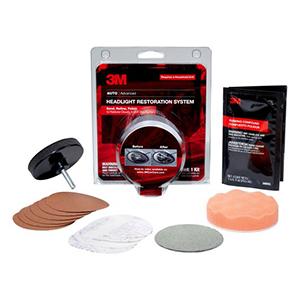
The 3M Headlight Lens Restoration System (model 39008) is a professional-grade, drill-powered kit featuring 6 sanding discs (500 & 800 grit), a Trizact refining disc, and rubbing compound. Designed to remove heavy yellowing and restore headlight clarity, it enhances vehicle appearance and night driving safety with a compact, easy-to-use solution.
Material | Plastic |
Grit Material | Aluminum Oxide |
Item dimensions L x W x H | 6.14 x 4.51 x 0.84 inches |
Brand | 3M |
Grit Type | Medium |
Compatible Material | Plastic |
Item Weight | 4 Ounces |
Grit Number | 500 |
UPC | 051131390089 |
Number of Items | 1 |
Global Trade Identification Number | 00051131390089 |
Manufacturer | 3M |
Model | 3M Headlight Lens Restoration System, Easy Heavy Duty Kit Solution to Restore Car Headlights |
Item Weight | 4 ounces |
Product Dimensions | 6.14 x 4.51 x 0.84 inches |
Item model number | 39008 |
Is Discontinued By Manufacturer | No |
Exterior | Machined |
Manufacturer Part Number | 39008 |
Mirror Lighting Type | automotive-exterior-headlight-bulbs |
A**R
Night and Day difference!!
This was a newer truck for me. This was the first time driving any distance with the truck and a night. It was raining and I could NOT see the lines. No, not blind or hard of seeing! Once I got out of the storm I could see the road a little better. I looked at my headlights when I got home.. I knew they were colored, but not the extent of not seeing the road.I was telling a friend about my adventure. They recommended this product plus add LED lights. I wished I had the pictures to show you how much better the headlights look now from then. When you hear the phrase, different as night and day... pfft... it's beyond that. After I did one headlight, I took it out at night.. It's crazy the difference it made (this is before I replace my lights with LED). With both cleaned and new LED light.. Well, I am one happy induvial. The truck is an '03 Ford F150. It's like I'm driving a new truck. After I did the headlights I did the fog lights.
J**W
There's a lot of sanding, and you have to trust the process, but it works!
It's an interesting process because you must make it worse before you can make it better. There was a lot of "trust the process" involved in using this product. Ultimately, though, it came out as advertised, and my headlight covers look brand new.In addition to the kit, you'll need:- Painter's tape. I used painters' tape for the first layer and then regular masking tape over it to reinforce protecting the paint and chrome around the lights.- An electric drill. Cordless is fine, but there's a good chance the battery will run out. And when mine did, and I switched to the electric drill, it was smoother and easier to use when sanding and buffing.- Spray bottle. The next-to-last step requires spraying the sanding pad and the light cover with water. Make sure you have a water sprayer handy.
T**!
It works, but make sure you get a coating product to apply after you do it.
tl;dr version:Get a hex to smooth chuck bit adapter, if your drill has a quick release hex chuck. The 3M product works (takes about an hour, or so, per headlight), but you will DEFINITELY want to get some sort of clear coat finishing product, to use after you use the 3M product. Otherwise, your headlight will still look kind of awful.Now, the full version:I have previously tried another headlight restoration product, on a different car, and it worked amazingly well. So, when I got this 14 year old car, with horribly oxidized headlight lenses, I was confident I could fix those right up. I don't remember what brand the product I had previously used was, but you had to do all the sanding/scrubbing by hand, and I knew I didn't want to do that, again. So, I found this product, which lets your drill do all the work. Now, there are a few important things to know.1) You will need a smooth-bore chuck on your drill, to use this. If, like me, you have one with a quick release hex chuck, you will need to buy an adapter. Not a big deal. You can get them for $10-15 (maybe even less). But, I didn't realize that, until I was ready to start the project. I had to make a quick run to Ace Hardware, to get the adapter.2) Even though your drill is doing most of the work, it is still a fair amount of work to get this done. You have 3 of the first coarseness of sandpaper disks for each headlight, and you do need to use them all. I think I even went over the headlight (I have only done the passenger headlight, so far) multiple times per disk. You have 2 of the next coarseness disks for each headlight. Again, you need to use both of them, and I went over the headlight multiple times with each disk. You have 1 of the next coarseness disk for each headlight, with which I again went over the headlight multiple times. Last, you have a buffing sponge and compound, with which you will probably need to go over your headlight multiple times (I did).3) Now this one is really important. When I finished using the other product I had used on my previous car, it was like when the storm passes, the sun comes out, and all the birds are singing. The transformation from my old, oxidized lenses, to what looked like brand new headlights, was nothing short of amazing. You might even say miraculous. With this (the 3M) product, after I had spent a good hour sanding and polishing the headlight lens, I was really unhappy with the result. Then, I remembered that the really amazing transformation, with the other product, happened when I applied the final step, which was this clearcoat soaked wipe. Now, the 3M product doesn't come with anything like that. You just sand and polish, and that's it. Luckily, after reading some reviews, I decided to purchase Meguiar's Keep Clear Headlight Coating. After finishing with this product, and trying to decide whether maybe I had just failed with it, or whether I should try to go ahead and seal it, with the Meguiar's coating, I decided to go ahead and seal it. I sprayed it once, waited 5 minutes (at which point, it already looked 100 times better), and then sprayed another coat on. Wow! What a difference!I wish I had taken pictures from before starting the project, an after the 3M product, and an after the Meguiar's coating picture. But, since I have only done the one headlight, so far, you can at least see the difference, between the driver's side headlight (nothing done to it) and the passenger side headlight (used the 3M product, and then sprayed the Meguiar's coating). Maybe when I do the other headlight, I will take pictures at each stage.I should note that there is another 3M headlight restoration kit, which comes with some sort of wax you would apply, after the sanding and buffing steps. I am willing to bet the end result would be much more comparable to what I got, after applying clear coat. However, I am not sure the wax would last as long as I believe the clear coat will.
A**B
The best headlight kit available
This is a great kit and the best value gong for headlight restoration. If you take your time and follow the instructions your headlights will look nearly brand new when you are done. I recently used this kit to polish an extremely yellowed and corroded set of headlights on a 2006 Volvo S60. As you can see from the pictures, the results speak for themselves. The instructions that come with the kit are quite good, but I will try to share my experience and tips for professional results. I recommend you also have painters tape, a spray bottle of water, and 2 microfiber towels for this procedure.The kit comes with a hook and loop backing plate that attaches to your drill, 6 pieces of 500 grit sandpaper, 4 pieces of 800 grit sandpaper, 1 3000 grit sanding disk, a polishing pad, and 3m rubbing compound. The first thing to do is tape off everything that is next to or in contact with your headlight lens. Next you should put your backing plate in your drill and stick the 500 grit sandpaper to the backing plate. I put my 18 volt Dewalt cordless drill on low speed for this step. You should sand your headlight with slight pressure going across the headlight lens in overlapping passes.Do not keep the drill in one place or you will sand an indention into your lens. When the sanding disk starts becoming ineffective you should swap it out with another 500 grit disk or blow the disc out with compressed air. You should sand until the lens is evenly sanded and there are no "shiny" or yellow spots showing (wipe your lens with a damp cloth frequently to check how you are doing). It is hard to explain, but when the lens is properly sanded at this stage, the whole lens should uniformly look frosted.Once you have the proper uniform frost on your lens (I used 2 discs per lens on this stage) wipe it down with your damp cloth and affix the 800 grit sandpaper disc to your backing plate. This step is where I have the slightest complaint with the kit. I really wish the kit included 6 800 grit discs instead of only four. It is really important that you take your time on this step to remove the scratches from the 500 grit sandpaper you just used. I started this step with my drill again on low, and just as you did with the first step, slowly and with light pressure sand across your lens in overlapping passes. When your disc starts becoming noneffective use compressed air to blow the build-up off of the disc. This is where an additional 2 discs of 800 grit would be nice. Continue sanding on low until this disc is no longer usable and then replace it with your second 800 grit disc. At this point I moved my drill to high to continue sanding with light, overlapping passes. Be careful when you have your drill on high. If your disc slips and hits the tape/paint it could burn a spot through the clear coat or even the base. Nothing to be scared of, but just be careful as it is harder to control on high. Really take your time on this step and sand until the 800 grit disc is unusable. You really want to make sure you get all of the deep sanding mark from the 500 grit disc out of the lens. Once you have sanded until all deep scratches are gone or your 800 grit disc is completely unusable, it is time for the 3000 grit wet sand.For this stage you should affix the 3000 grit disc (there is only one in the kit) to your backing plate and and grab your spray bottle of water. Lightly mist the 3000 grit disk with one spray of water and lightly mist the lens with 3-4 sprays. I used the high setting on my drill for this step. As you did with the previous steps, lightly sand across the headlight lens in overlapping patterns. Within about 30 seconds to a minute you should begin to see a white slur form on the lens. I recommend you sand the lens completely 2 times and then stop to wipe it off. After you wipe off the lens, mist the lens with 2-3 squirts of water and complete 2 more complete sands on the lens. Depending on your lens, it will probably take 6-10 full sands of the lens. When you think you are close, mist the lens with 2-3 coats of water, wipe it off, and make sure there are not really any scratches in the lens. The lens should be almost 100% smooth at this point. If your are happy with the lens it is time for the final step.Remove the 3000 grit disc and set it aside (do not discard as you will need this for the other lens). Attach the orange polishing pad to your backing plate and squeeze 3-4 small (smaller than a pee) dabs of the rubbing compound on various points of the pad. I then recommend you touch the pad/compound against your lens in 2-3 locations on your lens (this helps it apply evenly). You should then put your drill on low, and with light pressure. quickly but carefully spread the compound over the whole lens. Once the compound is spread across the lens somewhat evenly, turn your drill on high and with light to medium pressure (a little more than when you were using the sanding discs) make slow overlapping passes across the lens until compound goes almost clear. Add more compund and repeat until headlights are crystal clear or you run out of compound. I recommend you seal your headlights or they will begin to yellow again in a few months. I highly recommend Optimum Opti-Lens as your coating Opti-Lens Permanent Headlight Coating. This kit is expensive (approximately $50), but if you do not seal your headlights you will be doing this all over again in a matter of months to a year. The kit will also easily seal 6-8 sets of headlights.
Trustpilot
Hace 2 semanas
Hace 4 días