We remain fully operational. Our teams are working around the clock to ensure your deliveries continue safely.

Descargar la aplicación


Servicios al cliente
Sobre nosotros
Copyright © 2025 Desertcart Holdings Limited
Descargar la aplicación


🔧 Upgrade your Ender 3 to silent, smart, and stable printing perfection!
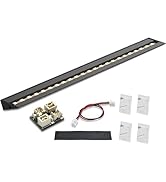
The BIGTREETECH SKR Mini E3 V2.0 is a 32-bit silent control board designed as a direct plug-and-play replacement for Ender 3/V2/3 Pro and Ender 5 3D printers. Featuring an ARM Cortex-M3 72MHz CPU and integrated TMC2209 stepper drivers, it delivers quieter operation and enhanced stability. Its advanced thermal design with a low-resistance MOSFET and 4-layer PCB ensures reliable heat dissipation. The board supports multiple smart functions like BLTouch auto bed leveling, filament detection, and power resume, making it a versatile upgrade for professional and enthusiast users seeking quieter, smarter 3D printing.


| Best Sellers Rank | #55,050 in Industrial & Scientific ( See Top 100 in Industrial & Scientific ) #9 in 3D Printer Controllers |
| Brand | BIGTREETECH Direct |
| Color | Black |
| Customer Reviews | 4.2 out of 5 stars 589 Reviews |
| Display Type | LCD |
| Item Weight | 0.12 Kilograms |
| Material | PCB |
| Voltage | 24 Volts |
J**N
Great board and features for the price.
Bought this for my 2020 ender 3 pro, along with their tft35 e3 v3 touchscreen and a genuine bltouch. My printer is so much quieter now. I'd consider this a must-have upgrade for an ender 3 pro. Install wasn't extremely difficult, but there are some things to note. 1. Unplugging cables from your stock ender motherboard is a pain because they put hot glue all over the plugs at the factory. You will spend a significant amount of time removing those hot glue blobs before you can unplug all your e-motors and end stop switches. This was probably the most time consuming part of the install for me. 2. Swapping the wires from the old motherboard to the new motherboard can be tricky. The main power wires aren't very long so I had to move wires over from the old board to the new board one at a time, with the new board hanging right in front of the old board. 3. For firmware you have two options. Either run the latest pre-compiled firmware for your printer from the BTT github(with options for ABL or no ABL) which is as easy as putting the file on an SD card and turning on the printer which auto-installs the firmware from the sd card, or download the latest marlin release source files and edit/compile your own firmware. I won't get in to the details here but editing/compiling your own firmware is much better and you'll end up with firmware that is better tailored to your printer, and you'll have a better baseline to tweak in order to dial in those prints and ABL performance. Plenty of guides and videos out there for editing/compiling marlin firmware, and marlin has a discord with plenty of really helpful folks to give you advice or instructions if you need it.
A**R
Brings New Life to Noisy Old Ender 3
Purchased a used Ender 3 to repair, had an older Creality 4.2.2 mainboard with the noisy stepper drivers and a failed SD card port. Have run machines with the BTT SKR boards before, but the E3V2 was a direct fit and easy to install. Took ~30 minutes to tip machine over, remove cover and motherboard mounting bolts, swap wires over one by one, and power back up. Please be aware, that the cooling fan on the Ender 3 case plugs into the FAN1 plug, and only spins when the stepper motors are enabled. I was worried I got a dud at first, but make sure to hold off on returning until you home the machine and see the FAN1 turn on. Completely eliminates noise from the machine operation, makign the fans the loudest part of operation. I was able to do a test print immediately after installation without any firmware updates or changes. Would recommend highly, cheaper and just as good if not better than the stock Creality boards.
M**E
Great upgrade from my stock Ender 5 board
Way quieter than the stock (non-silent) Creality board. Makes my prints look slightly better as well. Definitely worth upgrading to just for the better firmware customization alone. I used TH3D's Unified 2 software, was planning on using Marlin, ran into some problems as the branch for the Ender 5's config files in the BTT GitHub was apparently not for the same version as the bugfix version of Marlin. Apparently this has been fixed but I've never needed to go back and customize my fw any further. I will probably switch to Marlin sooner or later. If you need help setting this board up, Teaching Tech has great videos on this. Followed his Ender 3 video and it went well, even though Marlin didn't work for me, it was still useful to know where and how to do things like flash the firmware and where the cables go. He provides the needed diagrams. If you buy this board and plan to switch out a stock creality board, you will quickly find out that hot glue is possibly the worst thing in the world.
C**S
X-Axis driver failed after only one print...
This board worked well for the one print it survived LOL... I wired everything up in my Ender 3 and it worked perfectly for a singular print. I bought two Bambu Lab printers and shelved it for a few months until I had time to tinker with the Ender 3 once more. I found that the X-Axis stepper driver had died when testing movement w/ Klipper. I confirmed this by plugging the X motor into the Y-driver and it worked. I also tested it with a TMC_dump and confirmed that the problem was with the driver. The board itself was fantastic while it worked (silent compared to the stock Creality board) and very easy to plug everything back into (easy to read pinouts and direct plug/play with the Ender 3 stock components), but for it to fail after only one print is a little ridiculous for the cost. I read that the V3 updated some things and that it's common for the V1 and V2 X-Axis to die, but if that's the case they shouldn't even be selling these anymore. Maybe I just got a bad board, but I feel like I wasted money on what otherwise would have been a very nice upgrade. There were no overheating issues to my knowledge, the sd card was easy to use and flash just like a creality board, and I would have liked the extra features (if I was able to use them). I'd suggest getting the V3 as there is quite honestly no point in buying the V2 at this point...
N**K
Best upgrade for a loud printer and if your looking to do additional upgrades
This is pretty easy to install. It’s durable makes the printer quite I actually forget how load the ender 3 is sometimes. Programming is a bit hard and takes some time if you’re tech savvy you won’t have much of a problem. There is a ton of tutorials and videos out there. If you’re upgrading an Anet A8 you will need the screen to go with this.
R**T
Very reliable, well supported in Klipper
Extremely reliable. More reliable than the board that came with my Voron V0 kit, albeit a bit larger. Drivers are absolutely silent and don't seem to heat much and thus don't require active cooling unless you enclose it.
M**.
Wish i had the card
First off I'm giving them 3 stars instead of 1 only because I didn't open the package and install it right away, due to some personal reasons. I haven't been been able to use the printer since I installed it, because it didn't come with the SD card, that has the firmware on it. I don't know alot about firmware. One thing I do know, and thats what it is for. Basically without it, it doesn't do anything. So just recently seen a few things online about compiling my own and flashing it. But then I would have to get another sd card, and I would have to know how to mess with coding. So long story short, make sure u check your contents. Other then that, or was a pretty easy install, but the fact that it doesn't work right now. I have no clue if it even works at all
S**R
Worked with CR10-S, but very little information
Finally got it to replace my damaged CR10-S board. You WILL need an adapter cable or jumper pins to convert EXT1 and EXT2 to the EXT on the SKR board. Do NOT listen to various people who say you only need EXT1, that is not true. If you try to only use a cable with EXT to EXT1 the display will not power or function. Very little (or badly translated) instructions and you'll have to use their Github pages to get most of your information. Luckily their facebook group and reddit page are active and people were able to give help. Wiring CR10-S stock board is a bit different. I don't think it made a difference, but put the DCIN power cables into the connectors on the side of the board (they're the two green screw mounts that are by themselves). You'll have to follow the board specifications from their Github pages and it's pretty straight forward. After all was said and done it was significantly quieter and worked great. It seems to be moving slower, but the quieter performance and better quality prints seem to be worth it. I don't have much experience and I was able to figure it out without damaging or bricking the board.
Trustpilot
Hace 1 mes
Hace 2 semanas