🔥 Stay Warm, Stay Adventurous! 🌍
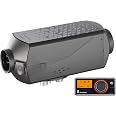
The Eberspacher Espar Airtronic Heater Kit AS3 D2L is a cutting-edge diesel heater designed for extreme conditions, offering a powerful 2kW heat output, whisper-quiet operation, and versatile installation options. With a robust build that withstands temperatures as low as -46°C and altitudes up to 18,000 feet, this heater is perfect for adventurers and professionals alike. Its plug-and-play installation simplifies setup, while the advanced diagnostics ensure reliability and longevity.
| Manufacturer | Eberspacher |
| Brand | Eberspächer |
| Model | Eberspacher Heater |
| Item Weight | 17.41 pounds |
| Package Dimensions | 22.5 x 14.88 x 8.25 inches |
| Item model number | 2773SW |
| Manufacturer Part Number | 25.2953.05.0000.0B |
T**4
Excellent diesel heater
I installed this heater in our sprinter van this fall. Very straightforward install. The video instructions are much easier to follow initially. We just completed our third winter trip and it worked perfectly. On nights with the temperatures well below freezing this heater kept the van at a comfortable 65F. It is more expensive than the Chinese versions, but it is MUCH quieter and more fuel efficient. If you are serious about living in your van or RV in the winter, this is a must have.
E**N
Super!
After watching YouTube videos I was a bit concerned about it being a tough DIY addition to our Sprinter, but it was all reasonable. The key is to understand that you need to treat the installation as 3 separate install sub- systems: The physical install of the furnace, the install of the electrical system, and plumbing the fuel line.Yes, it takes a few days if your van is all built out like ours was. The vendor was very responsive to my questions and provided YT links, that I ended up not needing after. The kit was complete, I didn’t need any other parts of any kind. The link to the Espar manual provided sufficiently clear instructions that were further clarified by the vendor’s info. There were some minor leftover parts, mostly related to the unused fuel siphon tube, that were unneeded because MB provides a ready to go T-connect for this very purpose.While the YT installers were all concerned about the exhaust placement due to potential fumes coming in the sliding door, I find the furnace is using so little fuel that the fumes are barely noticeable, and I am quite sensitive to the smell of diesel exhaust. That said, we used it in mild temps only down to about 41°, so in colder temps where the furnace would need to run more and harder, the fumes might be more noticeable. So, if you decide to run the outlet over to the driver’s side, then you will need to procure more exhaust pipe, either the expensive stainless or cheaper galvanized version because the supplied pipe is about 12” too short to go far enough to exit the fumes out from underneath the van. That said, if enough fumes were being discharged to be a problem by the sliding door, my guess is that they would be nearly as unpleasant on the driver’s side as they would drift back to our rear open window. At least the slider gets closed and sealed shut once we retire for the night, so fumes are only possible when the slider is opened and closed for some brief outside need.Sprinters: There is a diagonally oriented flat depression formed in the floor pan specifically for these heaters, which simplifies the installation of the Espar, if the stock MB additional “house” battery is removed. We replaced our MB auxiliary battery with a 100AH slimline LiFePO battery, so there was plenty of room for the battery, furnace, and a MPPT charge controller for the new battery. Without a doubt the most difficult and stressful part of the installation was cutting the hole in the floor. I wisely opted to use a drill-powered sheet metal nibbler I ordered from Amazon. With the nibbler I was able to cut a close-tolerance oval hole that matched the rubber foot of the furnace. Using the diagonal placement allows the use of the included square floor plate and gasket. The plate allows a sloppily cut floor hole to adequately covered and sealed, which means a mostly square cut can be made easily with a Sawzall type tool. Using the plate also aids the connection of the tubes and pipes from inside the van, rather than from underneath, so I recommend using the plate. That said, using the plate and having a big hole can create a significant water trap that will need well executed sealing from under the van.
B**N
Instructions need improvement
I replaced a cheaper heating unit with this one and could be happier. Fits right in place of the old one with no new drilling. Unit works great, heating is perfect, well worth the money. I would have given it this 5 stars if they would made the wiring instructions more clear. Not to hard to figure out but can be annoying, take your time because you don’t need all the wires they send.
M**T
Solid upgrade
Easy install. I used an aftermarket plate with 4” hole. It is nice to have a unit with an internal high elevation kit. It’s easy to use and works great.
B**R
DIY friendly and great performance
I replaced the stock cheap heater my van came with, with this. The stock one would not operate at altitude, over 8k feet in my case. This one does and will be fine to any altitude we encounter. Worked the first time, couldn’t be happier.
T**.
Terrible Instructions
The Espar works well. I have a S3 D2, there were no useful U-Tube videos for the S3 (the new model). They've improved many of their features, but don't let you know what the changes are (particularly the wiring harness). If you follow a S2 D2 U-Tube it lead you astray. Their directions that came with the S3 D2 are not up to date and contradict themselves. They show a 2 piece exhaust pipe, but supply a single longer piece. In-line fuses are not shown on the wiring diagrams. I could go on endlessly.It's a good working heater with terrible information available.
D**H
I should have just bought this one first!
after trying the chicom heater and having it go out pretty quickly, I spent the money on this one...which I just should have done in the first place.wiring is a little involved, but makes sense once you noodle it through it...lay it out first, you may not need all the wiring as it is a stock wiring harness.the thermostat is simple and great!it's been running like a champ since I installed it!
C**R
Price? Don't think so
I think the price is wrong, has anyone spent this much.... gawd i hope not
Trustpilot
Hace 3 semanas
Hace 2 semanas