🔧 Sharpen Your Skills, Elevate Your Edge!
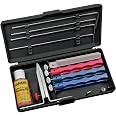
The Lansky Universal Sharpening System LKUNV is a comprehensive knife sharpening kit designed for both amateur and professional users. It features a secure multi-angle clamp, four specialized sharpening stones, and a user-friendly operation that ensures consistent results. This versatile system is compatible with a wide range of knives, making it an essential tool for anyone looking to maintain their blades in peak condition.


| Material | Synthetic |
| Brand | Lansky |
| Color | Red |
| Product Dimensions | 10.25"L x 9.75"W x 1.5"H |
| Item Weight | 0.3 Kilograms |
| Grit Type | Medium,Coarse,Fine |
| Number of Items | 1 |
| Manufacturer | Lansky Sharpeners |
| Global Trade Identification Number | 00080999058008 |
| UPC | 097914389123 080999050088 977175689135 080999058008 |
| Item Package Dimensions L x W x H | 9.84 x 9.25 x 1.61 inches |
| Package Weight | 0.55 Kilograms |
| Item Dimensions LxWxH | 10.25 x 9.75 x 1.5 inches |
| Brand Name | Lansky |
| Warranty Description | 1 year manufacturer |
| Model Name | LKUNV |
| Suggested Users | unisex-adult |
| Part Number | LKUNV |
| Model Year | 2013 |
| Style | Universal 4 Stone System |
| Included Components | Universal System |
| Size | One Size |
| Sport Type | Hunting |
R**M
Better than new
In my opinion - there's a certain art to sharpening with a stone, and it normally takes a lot of time, FOCUS and patience to do it. While that used to be true - some clever folks, including Lansky, are re-inventing the process. I won't completely give up on my older stones, for some knives I feel they deserve the 'old ways'. For the stainless steel kitchen and general purpose knives I own this set seems just right. Plus - I can be interrupted by my kids, set this down on the workbench to help them, pick it up later and know exactly where I am in the process.Most 'knife sharpening systems' are designed to hone the blade (ceramic rods), or grind way too much off (electric sharpeners). You either don't do enough or you eat away too much steel with the cousin of an electric can opener. This system helped me sharpen my knives quickly, efficiently and still have time to make dinner in the same night.Don't jump the gun, read the instructions first. Really. It's a pretty simple process, but an important one to understand for a consistent edge. Sharpening my first two knives took nearly an hour each as they each had some flat spots on the blade edge that required a lot of work. Since then, I've become more efficient, though some knives require more work to get a consistent angle on the edge. For most knives it's been about 20 minutes each - even if they were relatively sharp when I started. Why? When using this system on a knife for the first time - use *all* the stones *especially* the coarse stone. *Tip #1* mark the cutting edge of a knife with a permanent marker to be sure you are using the system properly and the edge is consistently at the proper angle. Several of mine, with a factory edge, were off in two or three spots. *Tip #2* - use the oil! I heard some reviews complaining about the stones clogging up. This happens more on some knives than others - even with the same steel & brand of knives. The oil 'floats' the steel shavings off the stone so the excess can be wiped off. If your stone is discolored by steel shavings use the oil, rub it a bit with your fingertip, then wipe the excess oil and steel shavings away. If you use a white paper towel you can see just how much steel was on the stone.If you are a hobbyist, want to have very sharp knives and have some blades that need to be re-edged due to regular use or even slight damage or mistreatment - this is enough to do that. You may need additional stones (which are available) or a strop if you want a mirror finish or want to shave with a blade. If you're a professional - I'll let you decide if this is fast enough and accurate enough for you as I am not.What I do know is that I, shamefully, had a few knives that would crush a full sized tomato before 'slicing' it. After a proper sharpening with this kit I could not only slice a sheet of paper into fine ribbons, I could cut about 10-15 perfect tiny slices from a single cherry tomato. My 4 year old now wants tiny tomato sandwiches. In hindsight - I learned you shouldn't do this test with your children watching.
C**N
less expensive than a new set of knives
I thought I was all cool sharpening my kitchen knives with a plain old stone. The first couple goes yielded good results, but eventually I came to understand that I had completely destroyed the bevel on my knives. I did not grow up on a farm (like everyone else here, apparently) and so I seem to have no ability to hold a consistent angle while using a stone. As a result I ended up rounding off the bevel on the knives over time.I bought this kit as a last-ditch attempt to save the knives. As such, I wasn't worried about ruining them and was free to following the instructions on the video and experiment as I attempted to cut a new bevel on the knives. I am happy to report that I was successful at creating very nice edges on the blades. Even on the 8" chef I simply mounted the clamp in the middle of the blade. I would guess that the angle of the bevel is "wrong" at the tip and near the handle as a result, but it's still 1000x better than what I was doing, and as long as I'm consistent with clamp placement I should be able to maintain that edge.I added a ceramic ultra fine hone to the kit. In the short term I probably would have been better off with the extra coarse to help me cut the new bevels faster, but in the long run I hope I'll get more use out of the ultra fine hone. Finishing with the ceramic is very satisfying and gives the edge a nicely polished shine.The bit about using oil to clean the hones by "floating" the metal out of the pores was a revelation for me, and certainly seems to work. Clean regularly if you're cutting a new bevel, it'll save you a lot of wasted effort.Probably a well known trick, but while experimenting I found that using an overhead light was the best way to know if I was making progress on the coarse cut. After a few passes you get a new glint for the beginning of the repaired bezel. If you tip the knife farther away from the light you'll pick up other glints for previous bezels, or even a sustained glint for a rounded bezel. Keep going until that's gone. At the very end you'll have a tiny glint that seems to float off the edge of the blade: almost there! Keep going until even that is gone. I suspect this is similar to the advice I've seen to grind until you raise a burr on the other side, but I found it easier to look for the glint than to feel for the burr. Make sure there's only one light above you, or you'll get multiple glints even with a good bevel, one from each light.
J**D
Watch your fingers because your knives will be really sharp again
If you want an insanely sharp knife and have the time to invest in learning to use this system fully then Lansky sharpeners cannot be beat. It takes a few swipes of the stones to figure out exactly the kind of pressure needed to get results, and perhaps most importantly you'll need to get a feel for what kind of grit you'll need to do the job. A few minutes of trial and error was all it took to start getting a solid edge.Pros: Works really well. I took and old dull multipurpose knife and took it from butter knife to razor sharp in a matter of 15-20 minutes. Stones are actually really decent for a universal packCons: The rods that come with the stones are flimsy and don't look like they'll last. I read some reviews indicating that the rods bend easily and I have absolutely no doubt that this is an issue. The upside is that you can buy new rods super cheap. The other issue I have is that the stone used for serrated edges is less than accommodating. It took me a long time to even remotely sharpen the serrated part of my knife. My guess is that I forego that stone in favor of semi-dull serrated edges or have them professionally sharpened. Skip this and buy the 4-5 stone pack.
Trustpilot
4 days ago
1 month ago