Description
🚀 Elevate your maker game with precision and power — print like a pro, no interruptions!
- FAST HEATING BED - Get started quicker with a heated bed that reaches 110°C in just 5 minutes, minimizing warping.
- POWER OUTAGE PROOF - Never lose progress thanks to the smart resume printing function that picks up right where you left off.
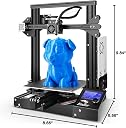
- GENEROUS BUILD SPACE - Print large-scale projects or multiple parts simultaneously with a spacious 220x220x250mm platform.
- PINPOINT PRECISION PRINTING - Achieve ultra-detailed models with ±0.1mm accuracy for professional-grade results.
- VERSATILE MATERIAL COMPATIBILITY - Experiment freely with PLA, ABS, PETG, TPU and more to bring your creative visions to life.
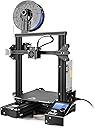
The Official Creality Ender 3 is a high-precision DIY 3D printer featuring a ±0.1mm accuracy nozzle, a large 220x220x250mm build volume, and a rapid-heating bed that reaches 110°C in 5 minutes. Its resume printing function safeguards your projects against power outages, while compatibility with multiple filament types and user-friendly assembly make it ideal for both beginners and pros aiming to create detailed, reliable prints.