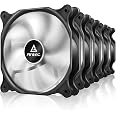
🌬️ Cool Your PC, Quietly!
The AntecPC Fans are a set of five 120mm case fans designed for optimal airflow and minimal noise. With a 3-pin connector, these fans operate at a whisper-quiet 20.2 dBA while delivering a powerful airflow of 30.28 CFM and efficient ventilation at 1000 RPM. Each package includes essential installation accessories, making it a perfect choice for gamers and professionals seeking reliable cooling solutions.


J**J
Great fans! (under certain circumstances)
I installed nine of these in a gaming system which includes four on a 240 AIO in push-pull configuration. All nine fans running quietly at full power. The reason I like using these fans is because they are cheap, quiet, effective, and have no ridiculous RGB. I also like the look of the white blades. The biggest benefit for me is no ramping. I absolutely hate the sound of fans ramping up and down ...drives me crazy! Using a lot of these at 100% power all the time allows for good airflow with little noise. For example, when running Cinebench in a multicore test you wouldn't know it by the sound of the PC fans ramping up which is so nice! But as always there are downsides. The reason they are quiet is low speed and low static pressure. They are not so great at moving air through dust filters or fine mesh. I have removed all my dust filters and just make a point to clean the PC about every other month or so. I wouldn't suggest using them on an AIO radiator unless you use push-pull configuration. These fans just aren't powerful enough to move air though a radiator effectively in a standard push only or pull only configuration. Also, I would absolutely not recommend these fans if you have less then 6 in a mid-tower case, have a small ITX case, or have your PC in a space with an overly warm room temperature. In these circumstances, you're definitely going to want higher speed fans. I would suggest something like the Noctua NF-F12 which is expensive but a nice balance between noise and airflow. Unlike these fans, you'll definitely hear them ramping up and down, but they are still pretty quiet compared to other premium fans. Hope this helps!
J**S
Easy to install (even for computer illiterates like me)
I don't understand anything about the inner-workings of a pc. I probably shouldn't even *own* a pc if truth be told. But my fans went out and it was overheating, so I ordered these. I assumed it would be set up exactly like the stock ones. I spent a lot of time carefully tracing cords and cables and labeling them all as I removed the old fans, only to find out that these new ones did not connect *at all* like the old ones. Panic set in. With some deep breaths and careful examination I realized these fans were actually much simpler than the old ones and once I pulled out the rest of my meticulously-labelled cords, I got them hooked up just fine. All by myself. I didn't even have to use YouTube.And these work great, by the way. The rgb is gorgeous and they spin really well and keep the pc nice and cool. They're quiet too!So basically: just believe in yourself. You can do it! Even if you're dumb, like me <3
R**C
Quiet and dependable
I have built a number of rigs using this brand and so far they have come through every build. I like the balance of price to features and of course how much air they move without a lot of noise. Still the quietest fans I have used in this price range.
L**A
Power & Beauty: A Review of My High-End PC for Gamers, Content Creators, and Creative Professionals
The media could not be loaded. Holy smokes, this PC is a MONSTER!I work in architecture, content creation, and special effects. I need a computer that can handle cumbersome tasks like video editing, and processing huge files in Revit, Premiere, and Aftereffects... And that can also render special effects and design projects. I spent a ton of time researching to find the best components that are durable, upgradeable and will remain high-end for the next several years.This thing is a beastly machine, meticulously crafted with top-of-the-line components that scream quality from the moment you unbox it. The sleek Antec DF700 case ($90), with its killer airflow lets you peek into the heart of the beast, showcasing an Asus ROG Maximus Hero Z790 motherboard built for pure power (I paid $387 for a returned MB in great condition). This bad boy is the foundation for the 24-core, 32-thread Intel Core i9-13900KF processor ($549), a monster that devours demanding tasks like breakfast tacos.I opted for the Nvidia RTX 4070 12G Wind Force graphics card (paid $549) with its triple-fan setup that cranks out stunning visuals and lets you experience the magic of ray tracing. Games? They run smoother than butter on high settings. Editing? Videos render in a flash. This thing is a creative powerhouse, really geared towards those who work in tech or love to game.Speaking of speed, the 4TB Acer Predator GM7000 NVMe Gen 4 SSD ($200) makes loading screens a distant memory. Files, games, applications - everything opens instantly, giving you more time to actually do stuff. Plus, the 64GB Corsair Vengeance RGB DDR5 memory (clocked at a crazy 6000MHz) keeps things smooth as silk, even when juggling a million things simultaneously (I paid $193 for a return in great condition). And if I ever need more juice, the RAM is upgradeable to 128GB - future-proofing FTW!But raw power needs taming, and the Corsair iCUE H150i Elite Capplix XT liquid CPU cooler does it in style (I bought a return item for $108 that was in terrific condition). This premium all-in-one cooler with its RGB fans keeps the beastly i9-13900KF nice and cool, even when pushing it to the limits. Plus, the RGB lighting lets you add a personal touch to your setup. I traded out the two non-RGB lights that came with the Antec case and opted for three RGB fans by Antec (120mm Case Fan, RGB Case Fans, 5 Packs RGB Fans, PC Fan, 4-PIN RGB, F12 Series, $32.61). You can download either Corsair or Antec apps to sync all the lights in multiple displays.When it came to power, I opted for the Aresgame AGT Series 1300W 80+ Gold Certified supply for $179. Although the machine technically only needed 850W, I opted for 1300W for headroom in upgrades, overclocking, efficiency, and reduced fan noise. This. Thing. Is. Quiet!This isn't just a PC, it's a statement piece. It's absolutely meant for gamers who want to max out everything, creators who need blazing-fast performance, and professionals who demand the absolute best. If you're serious about what you do, and you want a machine that reflects that, I recommend putting together something like this one. Trust me, this thing is a game-changer that will change with evolving technology for the next several years.This is my first build... and it took me three days of scouring different YouTube videos and asking Bard to help troubleshoot my issues. Here's my top tips, FYIs, and instructions if you want to build THIS computer:1. Total Cost = $2,450.88 (some parts were returns; thus, my build was cheaper than someone who gets everything new). I have been searching for pre-built computers with these specs and found them all in the range of $4500 to $6,000... so it really is a good deal, even though it's still pricey.2. Extra items to get (included in the $2,450.88):Anti-static wrist strap - $6.99Black zip ties - $5.69Braided ATX-sleeved cable extensions (highly recommend!) - $20.65Rechargeable headlamp for seeing into the case while trying to plug stuff in - $12.17.3. You do NOT need to buy thermal paste. The Corsair iCUE liquid cooler comes pre-pasted and says not to add extra.4. The case has an extra 2-hole RGB cable that did not do anything when it was connected. I disconnected it and did not see any difference.5. Install the Corsair Cooler BEFORE the Motherboard (MB).6. Remove the fans at the bottom and back of the case, and do not install the two RGB fans until you have connected everything to the MB! I had to take those things off like 50 times, so do those last.7. This graphics card does NOT come with its cable. You need an 8-pin (or 6+2 PCI-E) for it (the right cables come with the power supply and the braided ATX sleeves).6. The motherboard has four places for power cables: two 8-pins at the top left of MB, one 24-pin, and one 6-pin on the right side of the MB (they are listed as #6 on the ROG MB layout, pg 1.2)... They ALL need to be connected to the power supply.7. The Corsair iCUE H150i will have a short, braided cable that will connect to the "cpu-fan" 4-pin port at the top right of the motherboard (listed as #4 on the layout). It's the first fan port out of the four. And the 9-hole USB plug will go into #11 at the bottom right of the MB, #11.8. If you use the two sticks of RAM, they will go into slots A2 and B2 on the MB.9. The audio case cable will go in #17, "AAFP," on the MB.10. The case cable for the fans will go into #4 on the bottom of the MB. There are three ports, it will go in the last one labeled "CHA_FAN4."11. The USB case plug will go into #10 on the bottom right of the MB, "USB 3.2 Gen 1 header" slot.12. See the diagram I posted in the pics for how to install the case cables for the Power LED, Power Switch, HDD LED, and Reset Switch. They all go in #20 on the bottom left of the MB, but the case will NOT work if you do not plug them in correctly. FYI, it's best to install them with the cable's text facing down so the positive is in the correct position. You'll see an arrow indented on the ends of the cables. The arrow needs to be facing up. Here’s a good video if you need help with the case cables: https://www.youtube.com/watch?v=7gdjbqOvUdA&t=1271s13. If you opt for the extra RGB fans, like I did (continuation of tip #6), to replace the non-RGB Antec case fans on the back and bottom of the case, the new RGB fans will tether together, and only one will be plugged into iCUE Commander Core for the power, and the 4-pin RGB plug will go into the MB at spot #14, "RGB_Header."14. When you start the computer for the first time, you should see the motherboard begin to throw different codes at the top left… It will be numbers or a combination of letters and numbers, like "34" or "7B." You can look in your Rog Maximus z790 user guide and look at the Q-Code appendix starting on A1 (the back of the manual) to see what the codes mean.15. My case has a flashing red light at the top with a cylinder image... I can't detect any problems, but read that it could mean it's just processing data... The same thing with a yellow/orange flashing light at the far right bottom of the MB... They're flashing, but I'm not receiving any error codes on the MB Q-Code... But I'm not 100% sure about that.16. When you connect the monitor, the motherboard wants you to use the HDMI port on the graphics card and will not register any signal if you plug the cable into the MB HDMI port... You need to plug the monitor into RTX 4070. You can probably change some settings around to allow you to use the MB port.That’s it! Hopefully, it will only take you an hour, as opposed to my three days of trying to figure all this stuff out and redoing it over and over! Good luck!
P**L
Impressing silent simple FAN
First of all, I was impressed by the high quality of this fan. The build is sturdy and it feels like it will last a long time. The fan is also very quiet, which is a huge plus for me as I don't like a lot of noise coming from my PC. There are more silent Fans out in the market but they are also very pricey! For this price it is very much on top what you can get.In terms of performance, this fan definitely delivers. It moves a lot of air and keeps my PC running cool, even when I'm running demanding applications. I've noticed a significant improvement in my PC's overall temperature since I installed this fan.I also appreciated the 3-pin connector, which made it very easy to install this fan in my PC. It's always nice when things are plug-and-play and don't require a lot of technical know-how.Overall, I'm very happy with my purchase of the Antec 120mm Case Fan, PC Case Fan High Performance, 3-pin Connector, F12 Series from Amazon. It's a high-quality, high-performing fan that is also very easy to install. If you're in the market for a new PC case fan, I highly recommend giving this one a try!
Trustpilot
1 week ago
1 month ago