Desert Online General Trading LLC
Dubai, United Arab Emirates
Desert Online General Trading LLC
Dubai, United Arab Emirates

🔥 Ignite reliability, shut off doubt! ⏱️
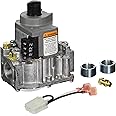
The Honeywell S8610U3009 Furnace Intermittent Pilot Control is a precision-engineered ignition system that guarantees 100% pilot gas shutoff if ignition fails. Compatible with single or dual rod applications and both Natural and LP gas, it offers configurable ignition retry times (15 or 90 seconds) and built-in flame monitoring for enhanced safety and efficiency. Compact and durable, this control unit is a must-have upgrade for any modern furnace system.
| Manufacturer | Honeywell |
| Part Number | S8610U3009 |
| Item Weight | 10.4 ounces |
| Product Dimensions | 6.4 x 4.4 x 3.1 inches |
| Item model number | S8610U3009 |
| Is Discontinued By Manufacturer | No |
| Size | 6.4 x 4.4 x 3.1 inches |
| Color | Multicolored |
| Finish | Black |
| Material | Plastic and Metal |
| Shape | Rectangle |
| Installation Method | Built-In |
| Item Package Quantity | 1 |
| Special Features | Flame Monitoring, Pilot Gas Shutoff |
| Included Components | Honeywell S8610U3009 Furnace Intermittent Pilot Control |
| Batteries Included? | No |
| Batteries Required? | No |
D**R
Really Works Great -- see my installation notes
Works Really Great -- Very Happy.I doubt I will ever need another one but if I did, I would re-purchase this one in a heartbeat.The Honeywell S8610U3009 Furnace Intermittent Pilot Control lights almost instantly on my system. Some heating systems have programed delays and it can do that too. Reasonably priced, looks like it might work on just about any furnace, check first before ordering, they sure have a long list of compatible Pilot Controls it can replace. I am just a home owner, no business affiliation with this product in anyway.Here is how I came to purchase itMy 37 year old combination Carrier Air-conditioner/Heater's original Intermittent Pilot Control had failed, no spark. Our furnace is not used as much as some people would and I am relatively sure new units of today will not last that long, at least my neighbors did not. That exact Pilot Control part, is now manufacture discontinued. Carrier did have a catch your breath $400 new replacement part Carrier LH33CM600 that was on back order at the time. A bit desperate and not knowing about the Honeywell Control as I do now, I found a new Carrier LH33CM600 on e-bay for around $165, from memory. It was old stock but you could see it had never been installed. The Carrier unit made by UT Electronic Controls never worked very well and I never found a way to contact the UT manufacturer. Good news is, it lit the furnace but struggled a bit. I was able to reach Carrier’s technical support, they spoke with me but did not have answers to my technical questions, not how to install questions, nor did they have any suggestions. The new Carrier control worked through the coldest part of this winter and then failed.My Installation NotesI am not an expert, your situation certainly will be different, check with an expert first. Installation is a bit technical, more so for me on the Carrier part I first installed. Read all of the Honeywell instruction first. I might suggest taking a good clear color digital photo of your old units wiring before you start. Look inside your furnace or online first for a wiring diagram that might be helpful for identifying the wiring functions too. The high tension spark lead on my particular furnace was border line short on both of my replacement units but it worked with a bit of fiddling. In my case I also added a ground wire from the Pilot's assembly frame to the “GND” terminal for a good ground return path for flame rectification – Yours may already have one or certainly be different. In my system that’s how "SENCE" terminal detects flame rectification across the pilot flame when the flame is present. Again these are things I did on my system, not suggestions on how you should do your system. By all means don’t forget to turn off/disconnect all the power before working on your system.
U**Y
Glorious Heat!
For the wiring,For the gas valve: MV, MV/PV, PV, and GND (Burner) on my old unitAre the same on the new unit, MV, MV/PV, PV, and GND.Then there is, 24V (1) and 24V (2) on my old unitThe 24 V (1) and 24V (2) lines go to 24V (GND) and to TH-W on the new unit. (The 24V connector is not used.) Since 24V (1) and 24V (2) on the old unit are isolated and AC, I don't think it matters which to which, as long as one goes to 24V (GND), and one to TH-W, on the new unit.The new unit is more functional, in that it has a DIP selector switch (that I left alone) and an LED that blinks once the thermostat is calling for heat (which is when this new controller unit becomes powered.)Also, on my old unit, the spark connector was a spark plug type connector, and on this new unit it is a spade connector. No worries, they include a handy adapter with this control unit. After you hook it the up, make sure to slide the old orange spark plug insulator all the way down over the adapter and spade connector. This control unit also comes with an expansive manual (somewhat arcane though) and some handy information stickers to put on your furnace.Knowing these things, it's easy to hook up, and it works!Some other things - the overall flame system consists of,The pilot assemblyThe controller (this unit)The gas valve.I replaced the pilot assembly first ($70) - didn't fix it. Then this controller ($100) - fixed it. Next, I would have replaced the gas valve ($150).This is a Residio unit, not Honeywell though.
R**S
Works perfectly for a replacement for Honeywell S86F Model
Works as a replacement for the S86F as well as many other Honeywell models and other brands. Fired up immediately after installation, does not have to continuously retry ignition like previous models, gets it first time, every time so far. Has done better than a previous ICM290 Model I got for a similar price. I got mine for under $90, this is a great buy! Can't beat the price!It was a fairly easy installation. **IMPORTANT!!! UNPLUG HVAC UNIT FROM ALL POWER**One thing to pay attention to when installing are the 24V or 25V wires. The volt doesn't matter, those are interchangeable. The key is if you have a damper connected to your old model or not. If your previous model does not have a damper connector, or a damper cable was not plugged in, then place the 2nd 25V wire (not marked GND or COM) to the TH-W terminal instead of the 2nd 25V terminal. Be sure to double check the handy charts in the install manual for specific instructions for your model. They are available on manufacturer's web site.Another thing I would caution, is to be careful with the main Spark connection. This is THE WEAK POINT on all of these units. Do not twist any wires once it is plugged in and try to press straight down when plugging in cable. Make sure everything is adjusted correctly and fits nicely prior to plugging in. If you are using the provided adapter to connect the Spark terminal, plug it into the wire before plugging it into this unit's terminal. Less you manipulate the Spark connection, the better.
C**E
If you don't have a damper, plug the 24V into the TW-
Boosting another helpful review that somebody else left that saved me:———Great. If you don't have a damper on your unit you'll have to plug the 24V into the TW- otherwise it will not work. Less than a 5 minutes replacement and worked flawlessly with the fix described above.———Bought this to replace my original Honeywell controller on my Pentair MiniMax pool heater. Works like a charm with the wiring change above.
Trustpilot
3 weeks ago
1 month ago