


🔧 Join the 3D printing revolution with ease!
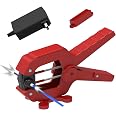
The VIT SPORT 1.75mm Filament Connector is a professional-grade filament welder designed to effortlessly join various filament types, including PLA, ABS, PC, PETG, and TPU. Weighing just 5.3 ounces and compactly sized, this tool ensures reliable and durable filament fusion, making it an essential addition to any 3D printing setup. With a complete kit and a year of dedicated customer support, elevate your 3D printing experience today!


| Manufacturer | VIT SPORT |
| Brand | VIT SPORT |
| Item Weight | 5.3 ounces |
| Package Dimensions | 6.14 x 4.13 x 3.5 inches |
| Item model number | 5267 |
| Color | Red |
| Material Type | Polyethylene Terephthalate Glycol, Polylactic Acid, Thermoplastic Polyurethane |
| Number of Items | 50 |
| Manufacturer Part Number | 5267 |
T**Y
I'm glad I got this - it's not that hard to use and works really well if you do it right.
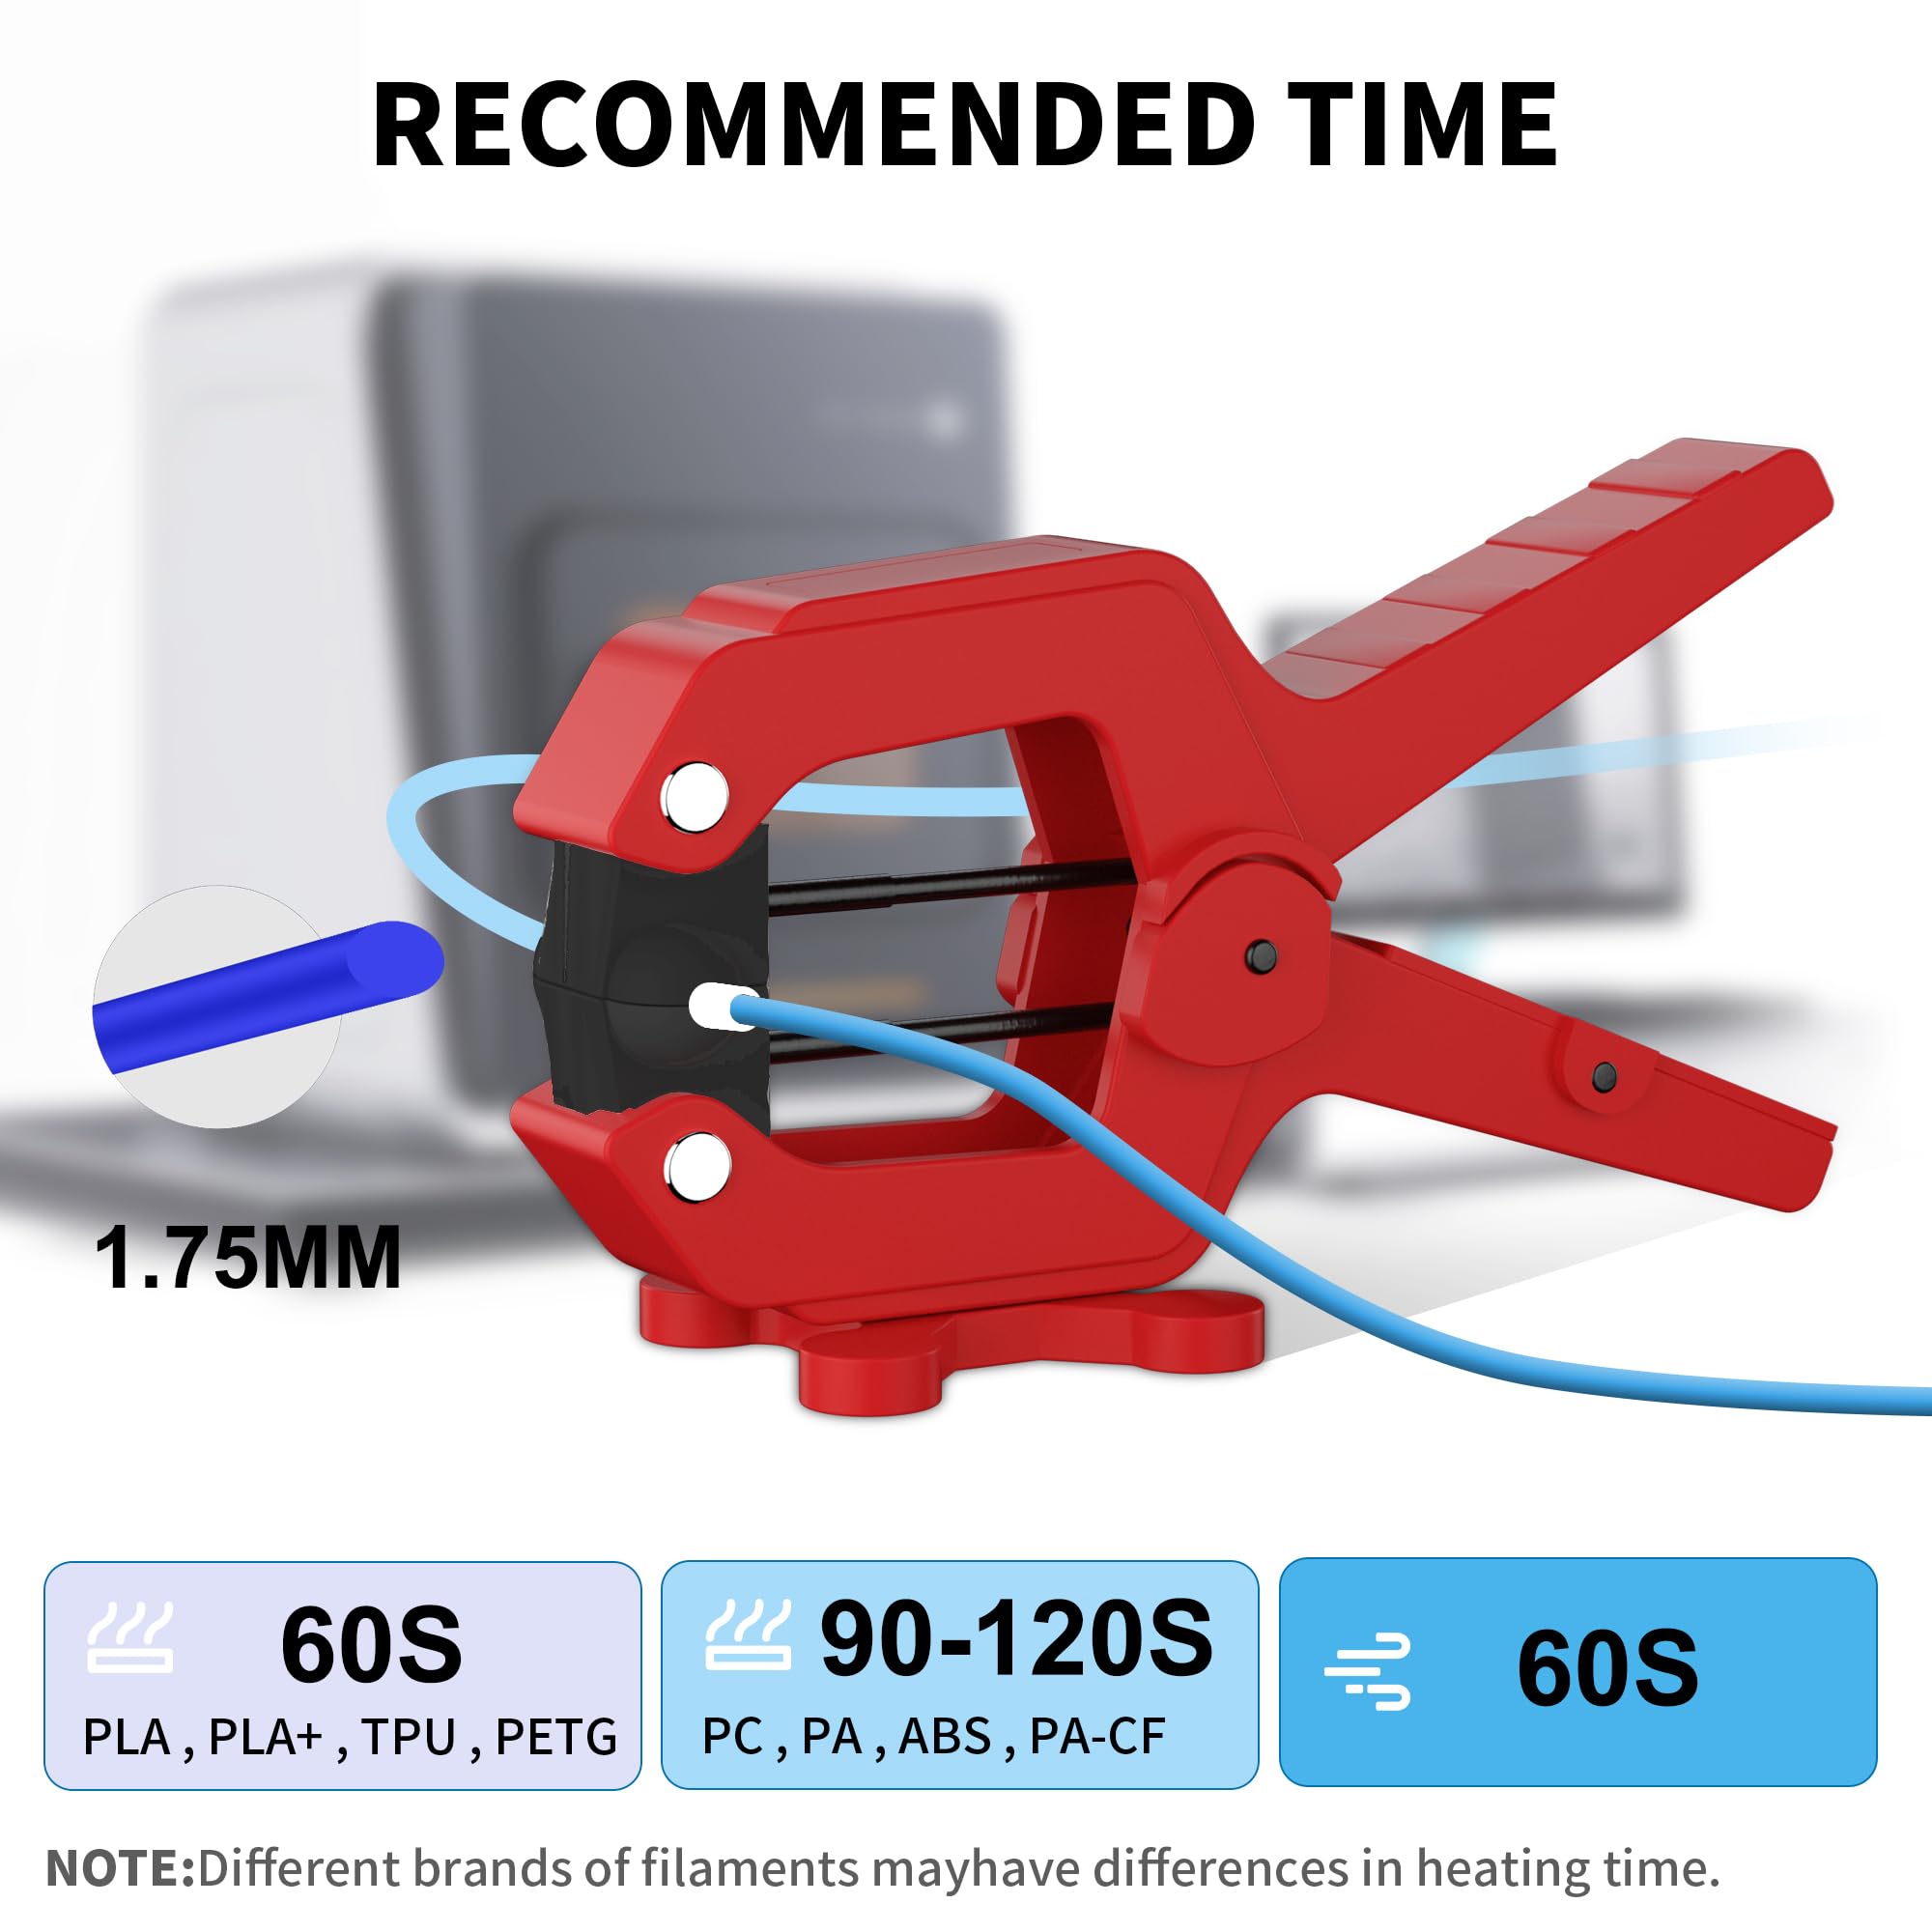
I own a 3D Printing business running 30 printers pretty much non stop 24/7. I've been wasting a TON of filament as most of the products I sell use more than 50g of filament. So when a roll get's low I just chuck it. while I do have a lot of prints that use less, it's just too big a hassle to swap out a running roll for a roll that is low for a short and quick print. Over the last month I've been setting aside the low rolls with the intention of figuring out a way to reuse them. In the last day I was able to take the scraps and turn them into 2 full rolls ready to go. This was the solution. Not only does this save some money, but it's sooo much better for the environment.I've tried other DYI methods of splicing filament and am a bit familiar with how it works so I knew what I was getting into with this. I was pleasantly surprised with how well and easy this worked.I'm using mostly Duramic PLA Pro that prints well at 215-220C, and that's what my experience is based on so far, but I suspect my method will work for any filament that prints between 200-220. Here's how I do it:Turn on the splicer and let it warm up for 3 minutes. while it's warming up, cut both ends of the filament to be spliced nice and square and straighten out the ends of the filament with about 1" straight on both. Once 3 minutes is up, turn off the splicer and immediately open the clamp and put one end of the filament in the middle of the clamp (in the center of the metal heating part). Close the clamp and then push the other filament end into the other end of the clamp till you feel it touch the clamped filament. With both hands push both ends of the filament together about 1mm, you'll feel them mushing together, you don't need to push mush, just making sure they're well contacted. Now let everything rest and cool. Be sure the clamp doesn't move around (I just use a vicegrips on the base to weight it down and position the rolls so they're not pulling on it, this takes a little fiddling but isn't hard). Cooling is the key, let it cool for like 8-10 minutes. Then just open the clamp, pop out the line and you can tear off the little wings that might be there with your fingernails. Then a little sanding (I use 220 grit) and you're good to go.So far this has worked great for me. I'm hoping the splicer holds up, and will update the review if it doesn't.
J**R
Works Exactly As Described!! PETG Confirmed
I'm not quite sure why people are saying that it doesn't work well or doesn't work at all with PETG filament. I followed the incredibly easy 5-step instructions and I was able to splice a piece of PETG with zero effort. I powered it on, set the timer for 3 minutes, once the timer went off I removed power and opened and inserted one end in the middle of the clamp and closed, then I inserted the other end to be spliced through the opening and pushed together with very little force. After about 4 minutes I opened the clamp and BOOM, perfectly spliced PETG rolls.My recommendation for getting a perfect splice with little touchups needed is to use very little force when pushing the to ends together. On my first attempt, I pushed both ends in with a fair amount of force because I was worried that the reviews were correct about PETG so I wanted to give it the best possible chance. Well, it turns out that I used too much force. When I removed the splice I had a beautifully splice, but there was a thin pancake of filament around the splice from where it began to push out of the clamp. Nothing ever leaked and the pancake portion was incredibly thin so it was easily removed with a craft knife and 5 seconds of sanding. On my second attempt, I pushed with far less force and this time it came out perfect. Pulled on both ends with a LOT of force and they stayed together with ease.Very easy, very efficient, and HIGHLY recommend.Thank you!
L**D
Works good, but takes a little skill and patience
It reminds me of the old days splicing audio tapes, except you're using a hot glue gun.The pros? You can use all your old fiber end rolls.The cons? As mentioned in the subject line, it takes several attempts to get it right.The directions only give you the basics.Having the correct heat before starting is critical. Another critical thing is timing. Don't think you can take your time with this. Once you put in the filament, the process needs to happen fairly quickly. Remember, filament will loose its shape quickly. In addition, once you push the two filament ends together, kill the heat! The tricky part is placing each filament in the center of the heater before closing. Something else to remember, don't take it out too soon or you'll have a wisker mess all over. Last thing, the plastic test pipe is kinda useless for a production splice. You can only use it for a test splice. Last but by far not lease is the final sanding of the splice. The splice needs to be thin enough to go through the feeder tube but strong enough to go through the feed gear.Bottom line, if you're an experimenter you should be able to handle it, but if your a novice you could get frustrated.
C**R
Works okay in a pinch, but other options are easier
I've successfully fused filament with this device about 50% of the time. Unfortunately, if you don't get a really clean joint, it will jam somewhere in the filament path. The trick to getting it to come out clean is to make sure you give it at least 5 minutes after you turn the clamp off before you remove the filament from it, and then use a blade to shave off the flash on the sides followed by some light sanding to get a really smooth joint.I've personally found it easier to switch filament "on the run" by feeding in the new filament while the printer is running. It's probably not the BEST way to handle the need to change filaments, but with an open frame printer it's fairly easy to do as long as your print speed isn't crazy high.
K**R
Doesn't work well, don't buy
Bought to use with ABS, it fuses in a way that pulls in one direction Allright, but breaks as soon as the fillament bends at all. And broke as soon as it hit the extruder, and made he have to un assemble and reassemble the extruder mid paused print to get it it feed fillament again. A large waste of money that almost ruined a multi-day print. I don't generally leave negative reviews, but this was such a disappointment, you are better off just doing manual fillament changes early and wasting a few dollars worth of fillament than buying this.
Trustpilot
5 days ago
2 weeks ago