We remain fully operational. Our teams are working around the clock to ensure your deliveries continue safely.

DOWNLOAD THE APP


Customer Services
Copyright © 2025 Desertcart Holdings Limited
DOWNLOAD THE APP

🚗 Transform your garage into a showroom-worthy space—fast, flawless, and built to last!
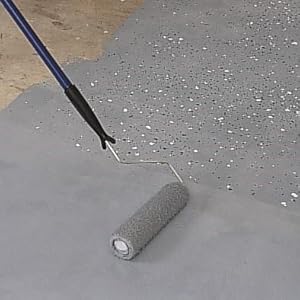
Rust-Oleum RockSolid Polycuramine Garage Floor Coating is a premium, ultra-durable concrete coating designed for interior floors. Its patented two-part burst pouch system offers a self-leveling, buildable formula that is 20 times stronger than epoxy, with a high-gloss finish resistant to chemicals, cracking, and hot tire pickup. The low odor and VOC formula allows quick return to use—walk on in 8-10 hours and drive on in 24 hours—covering up to 500 sq. ft. per kit. Ideal for garages, basements, and workshops, it delivers a professional, showroom-quality floor that lasts.


| Brand | Rust-Oleum |
| Color | Gray |
| Finish Type | High-Gloss |
| Item Volume | 180 Fluid Ounces |
| Size | 1 Count (Pack of 1) |
| Special Feature | Washable |
M**I
Use Double the amount of Product to get a beautiful result. Divide space by the number of pouches
I, like everyone else, researched this process for weeks before deciding on the Rest-Oleum Rock Solid Garage Kit (the 20X version) in light gray. After reading many many reviews about the problems where people ran out of product or the coat was too thin or they could see color of the concrete below due to being too thin of a coat, rollers falling apart etc., I decided I did not want those issues so I started doing some math. My 2 car garage is exactly 410 Sq feet. There are a couple of nooks so it is not exactly square but I meticulously measured everything to make sure I had exact sq. ft. numbers I was trying to cover. From the comments of others, I deduced I would need two full 2.5 garage kits (4 burst pouches) to get the coverage I wanted. Preparation was a bear for me. The concrete is almost 60 years old and there were plenty of cracks and a lot of the rocks in the old cement that were just under the surface popped so I had significant pitting. They must have used a percentage of an inferior type of stone that was black and very soft. When I was doing my prep, the pitting was all because of these softer stones that seemed to have just turned to a black dust when I scraped during my process of fixing and leveling. To make matters worse, 20 years ago, I used an epoxy paint so I had that to deal with. I did not want to go thru the process of grinding the entire floor so I used my portable hand grinder with a grinding wheel and then really tuff sanding disks (about 40 grit I would say) to grind out the cracks and pits as best I could. I used self-leveling cement primed with the Self leveling solution that is supposed to help the cement adhere to existing cement in the cracks and pits then sanded that cement work when it dried using the grinder to get everything level. Perfect is the enemy of good so I decided I would use the Rust-Oleum Re-Coat Primer, to save time. I degreased the rest of the floor with Simple Green and got on my hands and knees and scrubbed the heck out of it hard with brushes and sponges to get every trace of dirt, spider poops, any oil etc. off. When I was satisfied with the cleaning and restoration, I used about 1.75 gallons of the Re-Coat primer and followed the instructions and let that dry overnight. In my mind I wanted to use 100% of the 2 Epoxy Kits that I bought the next day. I wanted a surefire method to evenly coat the floor with my 2 kits so I used a pencil to split and clearly mark my 410 Sq ft int 4 exact 103 Square foot sections. My thinking was I would use 100% of a burst bag in each quadrant area. This worked great for me so you might want to consider doing something similar. I used the foam rollers that came with the kit and had no trouble with them. In fact, I used the same roller for all 4 burst bags with no issues until literally the last 3 square feet where it started to come apart but it finished like a champ. That roller gave its all for me. I had gone out and purchased a 3 pack of top quality purdy 3/8 inch nap rollers just in case the foam rollers were really the disaster everyone claimed but I never used the nap rollers but I will for future painting projects. In my case the temperature was about 55 degrees so that may be why the epoxy never even came close to getting tacky. I used a 2 ½ inch brush to cut in the edges. I basically followed the Video instructions, kneaded the burst bags for a good 3 minutes, cut the pouch corner and poured directly from the pouch in 2 or 3 inch ribbons. The rollers basically pushed around a “puddle” of Epoxy. It filled in 95% of the imperfections as I went and used up the entire pouch in that 103 square foot section. As I was rolling my goal was to do more pushing and pulling of the puddle than “painting” and there was no roller noise one gets when painting say a wall where you hear the paint “ripping” off the roller. It was mostly silent so keep that in mind. I was not sure how heavy a flake I wanted but I did read this stuff is not designed for a full flake or even a heavy flake but I was clueless how much I would actually need and the last thing I wanted was to run out of flakes and have 80% flaked one way and the remaining looking like I ran low etc... So I purchased 2 more pounds of the Black and White flakes, took all 4 bags of flakes from both kits and emptied the blue and grey chips from the kits and my black and white extra chips and mixed them all together in a 12 x 12 box. So my flake is a custom blend of the kit flakes with the black and whites mixed and its awesome. I think each blue flake bag in the kit was ½ pound so I had a total of about 4 pounds of flakes total to use. I ended up with about 3/4 pound extra at the end and I got the exact flake density and colors I wanted as I went. For me, since the air temperature was on the lower range for the application it worked out pretty good. I got a nice slow cure. For a hot minute I actually got a bit nervous it was not going to cure correctly. I finished at 6 PM and checked it after 2 hours, 4 hours, 6 hours and even at 6 hours it was still like I just rolled it out so I was having a heart attack something went wrong. I went to bed and the low temperature that night was 49 degrees and got up and checked it at 8:00 AM (14 hours post completion) and it was still slightly tacky but firming nicely. Certainly, no way was I going to walk on it per Rust-Oleum’s claims of walking on it in 10 hours… No way for me. It warmed up to the mid 70’s during the day and by about 11AM it seemed much firmer but I could still take my fingernail and push into it and it was soft yet. By 4 PM it seemed set up pretty good. I made the mistake of walking on it with my socks and I noticed that the moisture from my feet was actually leaving like ghost prints on the shine and I have about 3 foot prints where the gloss is slightly marred with the outline of my foot and toes. Fortunately, I detected this right away and let it cure overnight again in the warmer temps before messing with it any further. Next day it was truly “Rock Solid” this stuff is tuff as nails hard and you cannot even scratch it but don’t under estimate cure time in cooler conditions or you will damage all your hard work. I think it turned out awesome and I enclosed a couple pictures. The wife and I had two other couples over last night for dinner and everyone was in awe of my project. I can truly say this is one of the most satisfying projects I have done in a long time.
P**C
Prep is king. Application easy and sufficient
As all other reviews have said - prep is most important. My garage was polished concrete 28 years old. Some oil stains and very few minor cracks. Lots of shiny surfaces. I have a 4 car garage and used 2 boxes of 2.5 glossy gray polycuramine. I was so paranoid about usage from other reviews, I could have and should have put on a little heavier in the beginning. I had 1/4 of the fourth bag left over. Total of 720 sq. feet. I power washed, grinded the floor with a 4 1/2 hand masonry wheel on oil and shinny spots. Spent several hours doing this. Then I acid etched and power washed again. I still had a few spots that needed grinding and did them and then power washed again. I used a blow dryer to remover the fine concrete dust from tough up spots. I had 4 fans going x 48 hours to ensure that concrete was dried out properly. Definitely have attest one other person to help with application - their job - paint 3" trim strips around perimeter and snowflake the chips ( meaning literally throwing the chips up in the air - not outward - but upward and allowing them to float - snowflake - back to the concrete surface). Easy to do and fun. Think fairy dust! This is happening while the other guy (me) pours 2" strip across the 4'x4' working space and then rollers it in. The included rubber rollers worked fine. I used purdy 3/8"nap rollers for clear coat - these worked well also. I used one rubber roller per bag - they usually started coming apart at the end of the bag. The 2 of us finished application in 2 hours. Had plenty of time for application. I did set timer on my apple watch for 3 minutes for the mix and then set timer for 1 hour for application. Usually done in 35 minutes per bag. Once I saw how much application covered per bag and realized we had plenty of time - low stress once process got going. . I had no bubbles and only 5-6 quarter sized voids in whole garage. Didn't see until next morning when polycuramine was hard. Definitely ok for foot traffic next morning. Temperatures ranged 60-78 degrees over the 24 hour period. No car parking until 48 hours. Then when I backed out - where tires sat - some cloudy tread marks that did not wipe away. At 48 hours applied clear coat with anti-skid - one bag covered whole 4 car garage - stirring every 10 minutes to keep mixed. Next morning saw where I missed some spots - very hard to see unless have right angle. Really need to move around to see shiny vs cloud clear coat surface. Be diligent about this. I had to do a second coat the next day (which was fine with me) to cover missed areas. No missed areas this time. Overall, prep was most work. Application fun and easy with a buddy to help. Looks amazing.
C**T
COMPLETE rundown of two different applications in a 4-car garage--and RESULTS
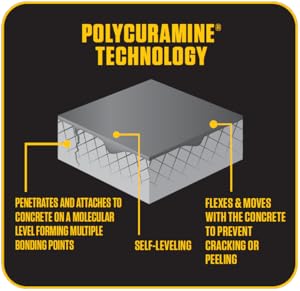
This is absolutely the most thorough review/rundown written. Part 1. I looked at the reviews on this fairly new product and still purchased it back in 2023 as I liked the advertised long-term performance, the glossy effect, and its “pot life” during applications. RockSolid Polycuramine is trademarked product. It’s a proprietary blend that is alleged to combine the best benefits of Polyurea, Polyurethane, and Epoxy. According to RockSolid documents, “Polycuramine™ combines these three chemistries and their key attributes into ONE indestructible, self-leveling, flexible, fast curing, high gloss coating system.” RockSolid states that “its Polycuramine garage floor coating is 20 times stronger than epoxy paint” (from what I found they are referring to one part epoxy paint not two part-the mixing kind). “It has a 96% solids content, a high gloss finish, and is impervious to all chemicals. The coating can be installed in one day, walked on in 8 – 10 hours, and driven on within 24 hours.” Those are the things that sold me on their product. The other big “selling point” they advertise is the low Volatile organic compounds (VOCs) emissions as compared to other products. It still smells when you apply it however. I’ve done four garage floors previously with zero imperfections – all epoxy. After using this product, I would still recommend epoxy floor coverings – as its about half the cost as compared to this product. Or, even better yet, consider the new single-part polyurea floor coating so you don’t have to mess with mixing etc. My cost for this application doubled (application rate) and with a four-car garage I couldn’t back out after one side was done. For this particular application I bought the Mocha High Gloss (P/N 293517) Rust-Oleum RockSolid garage 2.5 Car kit (advertised and printed on the box to cover 400 – 500 sq feet) on Amazon. Again, from experience figure 200 sq feet max. If you get a unique color, make sure you buy extra. Bottom Line - this stuff is not cheap and you need to realize you need about double the product for a superior result. Most reviewers will tell you there is not enough product in a box as advertised and Rust-Oleum significantly under-estimates the coverage of one box (probably due to sticker shock). The bottom line is RockSolid does not provide enough coating material for the coverage rates they list in a 2.5 garage kit. For my application of 790 sq feet (1/2 of four car garage), on a recent new build with the garage floor, less than a year old, I used five boxes (2.5 Car kits). According to Rust-Oleum five boxes should have covered 2000 Sq feet minimum. From what I can find they advertise a thickness of only 3 mils which is about half as thick as a typical coating. That’s not even comparable to high solid epoxies which are approximately 8 – 10 mils thick. Now you can clearly see their product is sold at an application rate that is half of the normal garage floor covering thickness which subsequentially effects the floor finish and uniformity. Now add in any concrete absorption of the product (which I experienced in areas) and its readily easy to understand this will not cover what its advertised. I also ordered some different color flakes on Amazon called Rust Bullet decorative flakes to make my floor look different since the box has paint flecks in it – I just didn’t like the darker flake colors included in the box. Prep is key. We degreased the new floor which had never had a vehicle on it-but was over six months old. After it was rinsed and cleaned, we used the acid crystals to “etch” the concrete. It was super clean and ready for the coating. We got all the prep work done by 1000 am. Temps were in the 80s in the afternoon so we let it dry with the help of fans. The next day everything looked great and ready to paint – not a sign of moisture or contamination. Looking back, I would wait three or four days depending on ambient heat and humidity just to make sure the floor has no residual moisture. Rust-Oleum suggests you tape a heavy clear plastic square to the floor and then 24hrs later check to see if you have moisture between the plastic and concrete floor. Paint Prep: Thoroughly massage the pouches before you open them. Pro Tip: If you are going to use more than one box and you don’t want paint imperfections of tint you need to combine and mix the paint first. This means separating the paint from the pouches and combining them and the mixing them all together. If you don’t, I guarantee you will see where you transitioned from one box to the next. Don’t trust the stamped batch numbers on the bags. They could be the exact same but there will always be a slight difference in color or tint due to heat, age, movement etc. Mix all the color up in a bucket. Don’t chance it. Next, you’ll need to do some math. And, if you have a big job requiring more than two boxes you will need more than one five-gallon bucket. I combined and mixed all the paint. Then I separated the paint evenly into the buckets based on number of boxes I bought. I put lids on them and worked only one bucket at a time. Grab the Part B from one box and add it to the first bucket and MIX 2-3 minutes with your paint mixer attached to a drill! The instructions have you squeeze the pouches together, but when you have a large area and want paint tint consistency you cannot do that. After it’s been mixed its ready to apply. Application and results: I used a 3/8 nap on an 18-inch roller—that was a mistake! Use a ¼ nap roller that’s included in the box. I wanted a thick, durable and glossy surface so I applied it heavy. Interestingly, in some places it soaked in and you can see faint concrete splotching. I’ll include a pic here but if you search for other reviews, you’ll see the same type effect. I got those because the concrete absorbed the product even though it was a full thick solid coat before we moved on. This is why I recommend a light primer coat over the entire floor first then a top coat. If you want to apply a “clear coat” after that, do it. At this price point I would not even consider a clear coat on top however. I can’t speak to the advantages of a primer coat first as I did not do that in my applications. Another thing I experienced with this new polycuramine was bubbles. An hour or so after the floor was covered, I started getting bubbles appearing above the surface. I called Rust-Oleum and they said it was an imperfection – what? They said to let the covering dry then sand the ridges of the bubble in the coating and then reapply over it. I did not do anything with them. I figure once I start sanding the floor and adding scratches from the sandpaper then repainting the area it will look even worse. I’ll include a pic of some of the imperfections. I also know there is a window for reapplication but I just didn’t want to push my luck. Review #1 from 1st application. I let it dry three days before any traffic. It came out ok. If you look at it with the light just right you can see where there were random bubbles significantly deviating from a total sheen effect. These imperfections significantly detract from a great finish in my view. 18 months after this first half of the garage was done it’s holding up well. It does not have a super glossy look but when cleaned is shiny. It scuffs and scratches easily and rubber tire marks are easily left behind but clean-up well. The bubble imperfections still show and no product has ceased adhesion from the floor. However, if I had to do it all over again, I would not select this product purely on cost (one 2.5 car kit will only cover 200 sq feet) and because it scratches and scuffs so easily. It does provide a super glossy look when new but over time it does not retain that super glossy look (sun, traffic etc). And messing with a two-part system is a pain. Part 2 second application (Finishing the other half of the four-car garage.) With those lessons learned from the completed half of the garage (2023) I set about getting the other half done in 2024. This concrete naked side had vehicles on it, areas of grease and oil, some scratches and normal wear. For this side we tried to take what we learned on the first job and mitigate the bubbles and the lighter application areas where it had absorbed into the floor. PREP. Pro Tip: Put some towels outside the perimeter or the areas you transition into the garage floor. This is so you can wipe your feet so you don’t track any grease, dirt, or contaminants onto the floor. I bought some ZEP garage floor degreaser and we scrubbed the heck out of the floor. I used the EVEAGE 16.5'' Pressure Washer Surface Cleaner, Power Washer Surface Cleaner with 2’ Extension Wand (found on Amazon) attached to my power washer to really clean and rinse the floor well. In some areas I had to apply cleaner a second time. Here’s how you know if your floor still has petroleum contamination. If the water “beads” in the area it still has contaminants. Clean it again with a more concentrated application (less dilution of floor cleaner) and scrub and scrub. Rinse it. Once the entire garage floor showed no sign of contamination after rinsing/power washing, I went to the next step of repairing the concrete. Here is where you want to use concrete patch and crack repair for any imperfections on the floor. I filled some cracks and some areas where concrete had chipped. Follow directions to repair cracks. Let it dry and cure. Next, it’s time for some acid washing. This time I bought Muriatic acid in gallon jugs. I was not all that impressed with the crystalized packets of citric acid for coverage or acidic action on the concrete on the first half of the garage (could have been some of reasons why I had the issues but don’t know). Pro Tip: Where the water runs out the garage neutralize the acid solution with baking soda. First, I wetted the entire floor down just to get it ready for the acid. I was still damp from the previous cleaning but showed no remnants of cleaner. Again, rinse and repeat to ensure its clean before the acid wash. I filled large five-gallon bucket with three gallons of water then carefully poured in and mixed the muriatic acid. I then poured it in small sections on the garage floor spreading it out evenly. I let it sit three or four minutes watching the chemical reaction (bubbling). Then we scrubbed the heck out of the floor. Muriatic acid can be used in a 3:1 or 4:1 ratio. If you are not getting the chemical reaction on the concrete go to a stronger mix (more acid less water). After it was scrubbed well, I sprayed it down with a hose and rinsed it. During the acid wash process, plugged in a fan to ensure the fumes didn’t hang around. Oh, and put on some PPE as acid is nothing you want to mess with—it’ll burn you bad from stupidity. Once we’d finished a section, we rinsed it well and moved on. We did it again until the entire floor had been acid washed. Next, we grabbed the power washer surface cleaner above and went over it again trying to ensure zero left over acid. Some folks even will test for pH. You want it neutral about 7.0-7.2 If you have to you can neutralize the concrete with baking soda if it’s too acidic. After we were absolutely confident, we’d rinsed the floor well, we let it dry, and dry and dry with zero traffic. In fact, we let the floor dry 6 days with temps in the 80s. Next, we masked the foundation areas next to the walls. We also ran tape under the garage door (so the line is covered by the closed garage door). Don’t apply this on the small outside section of the garage floor where the garage door closes. It will discolor from the sun (trust me on this one). Once all the taping was complete, we were almost ready for the floor application. But first, I took a heavy-duty floor brush and brushed the floor sweeping all sand, dust and particles out the door. Next, I grabbed my electric leaf blower (I didn’t use my gas-powered leaf blower as it likes to leak gas when rotated) and blew the floor of any contaminants. APPLICATION: Rust-oleum says the mix ratio is 2.25 of Part A to the Part B. That translates to 3.876 Quarts of A to 1.72 Quarts of Part B as the box say it contains 5.6 Quarts of product. I grabbed the four boxes of product and combined all the Part A into a five-gallon bucket (total was about 15.4 Quarts or almost 3.5 gallons) and mixed a good four minutes until I couldn’t see any lines of pigment as I mixed. Pro Tip: Be careful with the pouches as you don’t want them to mix. Grab a strong straight edge and squeegee the contents of the pouch into the bucket. Use a flat surface to help in getting as much product out of the pouch as possible. Two methods after mixing the paint. Divide up the paint into equal buckets and put lids on them. Or, you can just divide the contents by number of boxes used and pour it in equal parts. I did the latter. I took a fourth of it and then added two pouches of Part B and mixed for two minutes. It’s not as thick as paint or epoxy. It’s a less viscous materiel as it has a self-leveling attribute. Next, I poured it on a 4x4 section and worked it in with an 18-inch ¼ thick nap roller. Cut in your sides or expansion joints with a mini roller and brush. These areas typically soak up the mixture. Lay it on everywhere thick. It’s self-leveling to a point and will fill flat to a glossy sheen. After it’s been on a few minutes go back and look at it closely. Some spots will have soaked into the concrete leaving a lighter coverage. Reapply some materiel. After you are satisfied apply the flakes. Once the flakes are on you don’t want to paint over it. It’ll jack up your roller with the flakes and screw up your application. I found I could wait a good 20 minutes before putting down the flakes. That gave me time to reapply in areas where it soaked in and then I applied the flakes. Take your time. The pot life is around 45 minutes in the temperature range of 40-75F and 60 minutes if temps are 76-90F. Don’t apply if the temps are going to drop below 40F or rise above 90F. After you are done with the first application repeat. At the end I had about a qt of mixed materiel left that I discarded. I cleaned the roller mechanism, discarded the paint nap, and cleaned all the items (buckets, etc) that got the material on them with mineral spirits. In summary. I used almost four Rust-Oleum RockSolid garage 2.5 Car kits for 790 sq feet. One box is running just un $300.00 so you’ll have quite an investment in your application. I used 1.25 pounds of Rust Bullet decorative flakes paint flakes (not a super dense heavy application of chips), one 18 inch ¼ nap roller (two 12 inch ¼ nap rollers are in the kit), three 5 gallon buckets (one marketed in increments as I added the paint to mix it all together), 2.5 gallons of muriatic acid to etch the floor (you can use the stuff in the kit instead if you want); Mineral spirits for clean-up, two full rolls of blue masking tape, one 10X25 plastic sheet to cover the floor while mixing paint, a tall paint mixer attachment for the drill, a heavy duty drill to mix the paint, a small step ladder and work bench, a mini roller for the concrete walls on the garage floor, 2 paint brushes for trimming expansion joints and wall base board, PPE, Spiked Shoes to walk on painted surfaces (old golf spiked shoes may work), large towels to put on the floor where you transition into the garage, a fan to move air around, and plenty of 5mil nitrile gloves. So, how did this section match up to the other side previously painted? Pretty well honestly. Right now, it’s a little darker since the other side has had sunlight on it so it’s faded a little but overall, I think it’s fine. This side turned out much much better than the first side with only a few blemishes (where the concrete below the materiel can be barely seen due to absorption) and about five small bubbles. The ¼ nap roller worked better on this application versus the first application and I would definitely recommend nothing bigger than a ¼ nap roller. No matter what caused the bubbles on the first application in 2023 it did not repeat in excess. I think the degreaser and muriatic acid definitely had something to do with that and a longer drying time for the floor after it was etched. I do like the relatively quick drying time. 12 hours after the application it was hard, not sticky, tacky, or wet. My plan is to let it harden a good three days before I put anything on it. Rust-Oleum says its car ready in 24 hours. After four days of drying, we began to organize the garage. Be mindful of anything with rollers as it will scratch and scuff your application since it’s probably not fully cured/hardened. I had a roller on a moveable table that left a pretty nice scratch on the new paint. So, take my experience above and use it for your own application. Good luck.
F**O
Good product, lots of preparation is necessary
I give this 4 out of 5 stars only because I believe Rust-Oleum should provide 10% more epoxy in these bags to ensure coverage is possible for the suggested area. The finished product is very nice. Shipping was very fast and at $167, this is the cheapest price I’ve seen yet for the 2.5 car kit (normally $214 in my local stores). There are tons of videos and explanations on how to apply epoxy floor coating, but I wanted to share my experience as well in case something I did differently might help someone else. This is my third time using this product specifically and I wanted to pass a long some of what I’ve learned so far. Before beginning, check all your supplies. The kit should come with two bags of epoxy sealed ( I have purchased these where they bags are slightly leaking, make sure to return and get a new one if that’s the case), two rollers, two bags of flake coloring and two bags of floor etching. If you’re using a clear coat be sure to check that kit as well. Sometimes items will be missing from kits or the contents will be damaged. 1) vacuum the floor/cracks and wipe any easily removable contaminants from the floor before etching the concrete. prep is key! I did not use the acid etching method for my floor, since I’ve heard mixed results on that. Instead, I prefer to use an angle grinder with a 4inch cement grinding blade and a dust shroud with shop vacuum attachment (see pictures). The first time I did one of these floors I used a big floor buffer and was never able to grind through everything (oil spots), couldn’t get in the corners, and even with the shop vacuum attached to the floor buffer it still created a lot of dust. For the rental fee of the floor buffer you can own an angle grinder with all the necessary attachments (minus the vacuum probably). The dust shroud I used on the angle grinder really does capture 99% of all dust as advertised and it took me 4-5hrs to angle grind one garage spot. Aim for the same whitish color everywhere on the the cement after grinding; any dark spots indicate an area that might have had an oil spill or other contamination and you should do your best to remove this dark area. 2) check floor temperature using an infrared laser thermometer. Harbor freight sells these for $18-60 typically depending which one you want. See picture. Be sure the floor temperature is above 55F is my suggestion. Some people might feel comfortable with lower temps but it will slow or even stop the curing process depending how low the temperature is. I have a garage heater I used to help control the temperatures for this job. Ambient temperature was 74F while the coldest spot on the floor was near 65F for reference. Outside the garage was near 40F. Humidity should remain below 85% according to Rust-Oleum; mine ranged 61-72% from what I saw. 3) use the Rust-Oleum Concrete Patch Repair kit epoxy. It comes in a small whiteish box and you can see how far one 24oz kit went in the photos I’ve uploaded. I mixed this epoxy with a putty knife in an old shoe box and used that as my trough for the mixed epoxy while I moved around the garage. If I had wanted to fill all the cracks between the cement slabs for this one garage spot I probably would’ve needed 3-4 more kits. This crack filler product does a great job, but at $1 per ounce it is expensive. I filled cracks up to 1/2 inch wide and deep for this particular epoxy coating and did not fill the cracks between the cement slabs to save some money. (Filling cracks prevents wasting the floor epoxy which will flow into cracks very easily.) Once the filler epoxy has hardened (~8-20hrs depending on your conditions) be sure to grind the filler epoxy to level it out and also to rough it up so the floor epoxy will stick to it next. 4) vacuum the entire floor area to be coated. I used a shop vacuum with squeegee attachment then a Dyson house vacuum with the motorized head to scrub the concrete pores. 5) wipe the entire floor with acetone and some rags. I’ve found this can pick up additional particulate that the vacuum misses. I allowed the acetone to dry for 12 hours with fans running while looking for any dark spots in the cement (wet) before continuing. If you note a lot of moisture in your cement you may need to perform additional sealing of the concrete before epoxying the floor (see Rust-Oleum moisture stop). Water seeping in to the concrete from the underside can cause the floor epoxy to peal up over time and even to crack the concrete. To determine if there’s a moisture issue, Rust-Oleum suggests using a piece of plastic taped to the floor for 24hrs to see if moisture builds up under the plastic. 6) prepping the epoxy... make sure to have your paint roller ready and colored flake accessible. Before breaking the seal between epoxy A and B sides, I mixed around the contents of each separately in case they had become separated or built up in one corner inside the bags (these can sit on the shelf for years in a store). Then, on the floor, slowly roll part A side of the bag (like you’d roll a sleeping bag) toward part B and you should feel the seal in the middle “pop” open and both parts will begin mixing. Very important to mix for the suggested minimum time 3-4 minutes... I add one extra minute of mix time to be sure. Roll the bags around, press the edges, do your best to make sure parts A and B are completely mixed together. 7) Start at the furthest point from where you plan to exit the area after coating the floor. Cut the corner of the bag off to allow a small opening to pour from. Pour a line of the epoxy three fingers wide a few inches from the wall. I worked from the back of the garage to the front so I was doing 10ft wide sections at a time. The roller will absorb a bit at first, but then will act more like a squeegee pushing the epoxy around. Avoid pushing any epoxy into deep cracks as this will waste a lot of material. Attempt to keep the same thickness of epoxy in all areas of the floor to avoid discoloration. I was able to complete one 10x20 foot garage area with one bag of epoxy, but I note it appears thin in a couple spots (different color grey finish when dry) due to thin spots most likely. Unfortunately, I believe for perfect coverage, 2.5-3 bags are needed in a 20x20 garage depending on how many pours and pits the concrete has. If you want the color flake, I suggest laying 4-5 feet of epoxy on the floor in front of you, then throwing the flake (throw up and let it fall on the epoxy rather than throwing down. It will disperse more evenly this way) 8) leave the garage closed and check back in 8hours. If it is still tacky (not gummy) then check back in another 4-5hrs. I had a little on my paint roller still so I was able to check that for tackiness before I went back to the garage (trying to keep the heat in the garage). After 12hrs my epoxy was hard enough to walk on. I crawled around and used my hands to search for any sticky spots at this point. The first time I used this product I believe it was not mixed long enough before applying and/or the floor was not completely ground down and the epoxy did not cure in 60% of the floor. We had to use grinders and acetone to remove this area and then grind/rough up the cured spots before applying a new coat of epoxy. 9) once the epoxy is cured, I chose to add the Rock Solid clear coat for added strength/durability. Since the cement has been coated the pours are sealed and one bag of clear will cover a 20x20 garage floor nicely. After mixing the Part A and B for the clear, I decided to add the provided anti slip additive. I cut the top of the bag open completely and poured in the additive. I worked it around in the bag a bit before starting to pour it out around the floor. Be sure to continue to stir the additive as you’re pouring, or it will all settle to the bottom. Similar to laying the first epoxy coating. Note, This will spread much easier over the already epoxied floor, so you don’t need to pour as much out as you did initially when coating the floor. 10) wait 8-12hours and check back on the curing floor. Solid is goo, tacky is okay, gummy might 11) I wait a full weekend before moving everything heavy (tool chests) back on the floor just in case some spots are still curing. Good luck! EDIT: if you are applying the Rock Solid Clear, I have recently found better results to throw the anti slip additive on the floor (similar to throwing the colored flakes) rather than adding it to the clear epoxy while it’s in the bag. This prevents clumping of the anti skid material when the clear coat hardens.
S**M
Great product for DIY epoxy
While researching about doing epoxy on my own, there were good suggestions about Rust-Oleum products. I’ve only used their paint products before, so wanted to try this based on that trust. Preparing my garage was the challenging part and took almost 2 weeks. The best part is they’ve included a complete step by step tutorial video in the Amazon product page itself which is super helpful. I just followed that video and this is my first time doing an epoxy but the results are pretty good. The kit is awesome and includes etching chemical, rollers, decorative chips and 2 pouches of polycuramine epoxy product. I’ve a 2 car garage with a size of approximately 450-460 sqft. Though they mentioned 1 kit covers 500 sqft, I bought 2 since there’re some extra areas and corners in my garage. But turns out I had to use 3 pouches in total to cover the entire garage. The dry time is really quick as they mentioned. Please note that there’s no need of a clear topcoat as they suggested. This product itself is glossy enough and holds good adhesion. I was able to complete the application for the full garage in less than half a day. After it’s completely dried, I washed it with water and it isn’t that slippery while wet. It’s also easy to clean with just water. They’ve claimed this polycuramine product is 20x stronger than epoxy. I’m hoping to see the results in a longer run. But overall it’s a great product for DIY epoxy project to upgrade the garage for a valuable price.
R**G
Awesome gloss, great looks, and easy to apply!
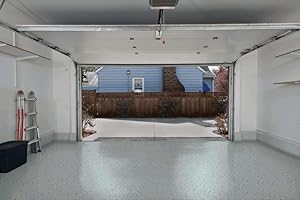
30 years ago, I applied an industrial epoxy finish to this floor and it now needed a refresh. The RockSolid Polycuramine coating was an excellent option for the refresh. I prepped the existing floor with a 40-grit sand and acetone wipe-down. I ordered this kit in Gloss Gray and had it two days later, and had it applied within two hours of delivery. It cured quickly with minimal odor. The ONE recommendation (or tip) I didn't see elsewhere is to have something available during installation to clamp the epoxy bag once you snip the corner (spring clothespin, binder clip, etc.). Since this product is self-leveling, it is low viscosity and it will leak onto the floor from the snipped bag unless mitigated with a clip or otherwise (it is applied directly from the bag and not in a roller pan). The gloss is outstanding, reflects light very well, and the overall impression is "bright, clean, fresh", per my wife. I really enjoy the upgrade, it transformed the room!
K**E
Great product! But not a weekend project if you want it done right!
I have a 2 Car Garage that is 20X20. Purchased the Tan 2.5 car kit and the Clear Top Coat kit. I had no issue with covering my 2 car garage with this amount of product. I am very happy with the finished project. But requires pre-planning and time to do it right. Advise: Labor: use 2 people to apply the paint and chips and the clear coat. You have about 45 minutes of pot life to get the paint down then it will start getting hard and difficult to apply. 2 people working together will reduce the (Monkey on your back) stress out of the application. On the paint one person painted and one person did the chips. On the Clear Coat we put the clear coat in a paint tray, put in middle of us and used 2 brushes to apply the product. We split the garage and each took half and worked back to front on the garage. Rollers: I did not use the cheap foam rollers that are provided in the kit. Like other reviews they do not last. I learned this 20 years ago on the original job. I purchased 6 Purdy 3/8 nap rollers and used 4 of them to apply both the Poly and the Clear Coat with it. Do not go cheap on your rollers…. On the Tan paint I used one roller per bag of paint. Also buy some small 3 inch disposable brushes to use to cut in the edges. Then throw them away at the end of the job. Also buy some Nitrile disposable gloves to use during the application. Chips: I did not use the provided chips as there is only enough for a light dusting of chips. I would recommend buying flakes online by the pound for the project. I purchased pre-mixed “Dark Earth Tone” chips and did a Medium to Heavy flake. Sure I had flakes left over but was not worried about being short on chips. Prep: The prep is the key to this project and takes time! I had put the RockSolid Epoxy Garage covering on the garage floor 20 years ago. I wanted to remove that covering before this project. I rented a floor polisher from Home Depot and a Diamabrush Coating removal tool. (Polisher was $46 for 24 hours and $75 for Diamabrush removal tool) Note: There are 2 Diamabrush available. One for prep and one for removal and prep. I spent 10 hours grinding the floor to get original paint off of it. I then used a 4 ½ inch double row diamond cup grinding wheel (Amazon $17) with angle grinder for edges and low spots. NOTE: this product WILL NOT fill in cracks!! If you don’t want cracks to show then you have to spend the time to fix them before applying the product. I had a number of small cracks and also wanted to fill in the expansion joints. I simply purchased Premixed Concrete Patch from Home Depot. Fill crack with putty knife, roughly smooth it out, let dry and then grind with angle grinder smooth. I even filled in the expansion joints this way. Last step was to pressure wash out the garage before painting. (PS. I painted the garage before the applying the garage floor paint) Application: The trick to this project is putting the right amount of paint down for coverage. You have to put down a small ribbon of paint on the floor. I put the ribbon of paint down in a straight line. When you start rolling first pull the paint towards you then start your rolling. I had a small amount of paint left over and on the Top Coat we ran out exactly at the end of the application. I did not use the Anti-skid in the Top Coat. So I cannot offer any advice on that. We started the job early in the morning. My garage faces East so the sun was going to be an issue so I had to drape a tarp over the front of the garage to keep the sun off. We put the paint down in the morning and we finished at 9:00. We then applied the top coat on the floor that afternoon around 6:30. Remember to do something to the garage door (lock it and put painter’s blue tape across the door) to keep anyone from walking out the garage door while the paint is curing. Also remember to put something on the garage door track to keep it elevated off the floor while it is curing. I pulled the emergency release on my garage door before we started the job and put a clamp on the track so I could pull the door down manually and have it rest on the clamp. Is the paint coverage perfect? No. If you look you can see some light color changes in the paint. But it is a garage after all and I am happy with the result. If you want a consistent coverage with no color changes then I would recommend putting down 2 coats of the paint. Paint one coverage with no chips then paint again with chips. But that will obviously increase your project cost. Added some pictures, hope this review helps.
G**S
Looks great, but plan on 2 Coats.
The finished product is very nice and it does hide imperfections so I am happy with the results. I did 3 sections of our basement floor (over 600 sq ft), over 3 separate events a few weeks apart. I learned some lessons after the first application and suggest anyone take heed. - Floor prep is paramount. There is etch included, which will work great if you are doing an area that can be hosed off. I understand it is mostly for bare concrete. Previously coated concrete needs to be ground down some. I used an angle grinder with dust shroud, dust extractor and grinding blade. At the very least use a scraper, wire brush and sandpaper. There’s lots of prep work on your hands and knees. The concrete itself needs to be sound and unbroken. I used some fast cure patch and hydraulic cement for some last minute touch ups. - Use a primer. The Rustoluem primer for previously sealed concrete worked well because the grey color tinted the floor if you decide to only do one coat. If you use a different color than grey or a different primer, use 2 coats of the epoxy paint. - Preplan your work. Once you mix the 2 parts the clock starts ticking. Have everything you need laid out. - Get yourself some spiked shoes and a squeegee on a pole. It’s too time consuming to use the method the instructions call for. The usage time of the paint is really only 45 mins - 1 hour. To try and dump, paint and flake each 4’x4’ area (as recommended) is not realistic to have enough time to use all the paint and cover even 200 square feet, which is really the limit on each mixture. With the spiked shoes, you can cut in the entire area, then dump the mix over the 200 sq ft and use the squeegee to spread it out evenly. Then use the supplied paint roller to back roll the entire area for a more uniform finish. Finally spread the flakes over the whole area if it’s your only or second coat. This is a much more efficient method to apply the paint and will give you plenty of time to work, as well as a more even application of paint and flakes. The cost of the spiked shoes and squeegee was about $30, but well worth it. - 2 coats are needed for complete coverage of 200 square feet, about a day apart. You can get away with one if you have a good primer applied which closely matches the color of the epoxy paint (see above). - Use a respirator and ventilate the area after application. This paint stinks for hours! - Have a work area set up immediately adjacent to the area being painted. This will help control keeping the paint from going where you don’t want it. Mineral spirits worked great to clean up everything. I have to mention Rustloum’s customer service. They helped me out a lot via email correspondence with how to fix my first application ending up with very noticeable dark areas. Very helpful and I recommend contacting them with any questions or concerns.
Trustpilot
3 weeks ago
3 weeks ago